Installing the Switch 9100
27
To install the mounting brackets on the switch, follow these steps:
1
Place the switch the right way up on a hard flat surface, with the front
facing toward you.
2
Remove the existing screws from the sides of the chassis.
3
Locate a mounting bracket over the mounting holes on one side of the
unit.
4
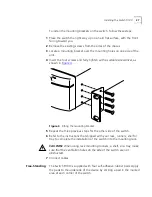
Insert the four screws and fully tighten with a suitable screwdriver, as
shown in
Figure 4
.
Figure 4
Fitting the mounting bracket
5
Repeat the three previous steps for the other side of the switch.
6
Refer to the instructions that shipped with your rack, runners, shelf or
tray to complete the installation of the switch into the mounting rack.
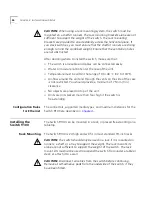
CAUTION:
When using rack mounting runners, a shelf, or a tray, make
sure that the ventilation holes on the side of the switch are not
obstructed.
7
Connect cables.
Free-Standing
The Switch 9100 is supplied with four self-adhesive rubber pads. Apply
the pads to the underside of the device by sticking a pad in the marked
area at each corner of the switch.
Содержание 3C17705
Страница 1: ... http www 3com com SuperStack II Switch 9100 User Guide Part No DUA1770 5AAA01 Published January 2000 ...
Страница 10: ...GLOSSARY INDEX INDEX OF COMMANDS 3COM CORPORATION LIMITED WARRANTY EMC STATEMENTS ...
Страница 14: ...14 ABOUT THIS GUIDE ...
Страница 32: ...32 CHAPTER 2 INSTALLATION AND SETUP ...
Страница 62: ...62 CHAPTER 3 ACCESSING THE SWITCH ...
Страница 80: ...80 CHAPTER 4 VIRTUAL LANS VLANS ...
Страница 86: ...86 CHAPTER 5 FORWARDING DATABASE FDB ...
Страница 98: ...98 CHAPTER 6 SPANNING TREE PROTOCOL STP ...
Страница 110: ...110 CHAPTER 7 QUALITY OF SERVICE QOS ...
Страница 124: ...124 CHAPTER 8 STATUS MONITORING AND STATISTICS ...
Страница 130: ...130 CHAPTER 9 USING THE WEB INTERFACE ...
Страница 136: ...136 CHAPTER 10 SOFTWARE UPGRADE AND BOOT OPTIONS ...
Страница 156: ...156 APPENDIX C TROUBLESHOOTING ...
Страница 162: ......
Страница 176: ...176 INDEX ...
Страница 180: ...180 INDEX OF COMMANDS ...

