


39
Final Installation Setup
Exiting Programming
After programming the Control Panel, all the changes need to
be saved in memory. After saving, the programmed settings will
remain in memory, even after a total power loss.
1.
After setting all the required programming values for
the sensors and the Control Panel, press
END
.
2.
Review the Control Panel Summary screen. Use the
↓
and
↑
arrows
to scroll through the listing. Verify that each option is set correctly.
3.
To save the programming changes, be sure the
SAVE CHAN
G
ES
option is checked. To exit
without
saving programming changes
un-check the
SAVE CHAN
G
ES
option (for verifi cation, an additional
confi rmation screen will display). Press
EXIT
. The Control Panel
will take a few seconds to restart and display the Home Screen.
Customizing the Installation
After programming the Control Panel, go to the User Toolbox and
customize the system to suit the installation.
1.
After the Control Panel restarts, press
SECURITY
,
MENU
,
TOOL
B
OX
to
access the User Toolbox. Enter the Master User Code (default = 1111).
2.
Press
USER MANA
G
EMENT
.
3.
Setup the User Codes. Press a User button to add, change,
or delete a User Code. The system will ask to confi rm the
code entered. Be sure to set a Duress Code as User #8.
✓
NOTE: User codes 0000, 0001, and the code used
for the Installer Code are not permitted.
4.
Setup each User Code with the User Access Option Screen. Each
User Code can be set to be currently valid or not, or to have conditional
validity depending on a time and date schedule. Refer to the User’s
Guide for details on setting User Code Access Schedules.
5.
Press
B
ACK
when fi nished.
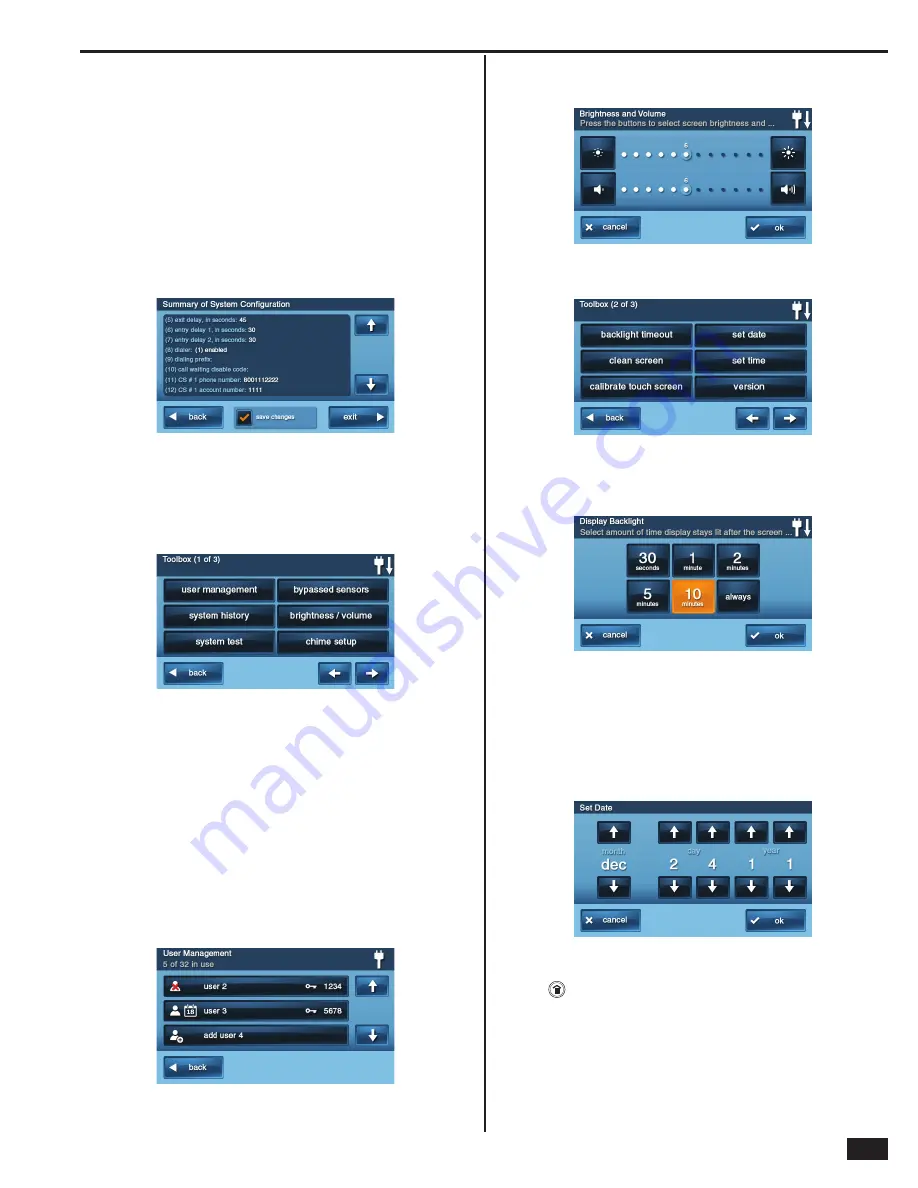
6.
Press
B
RI
G
HTNESS / VOLUME
. Set the level for the display
brightness. Set the chime & voice volume. Press
OK
when fi nished.
7.
Press
→
to view the second User Toolbox screen.
8.
Press
B
ACKLI
G
HT TIMEOUT
and set the display lighting
timeout. Choose the length of time that the display will
remain lit after it is idle. Press
OK
when fi nished.
9.
Press
SET DATE
and
SET TIME
to set the calendar and clock. On
the Set Date screen, use the
↓
and
↑
arrows to set the month, day,
and year. On the Set Time screen, use the
↓
and
↑
arrows to set the
hours, minutes, and AM/PM. Press
OK
when fi nished. A confi rmation
screen will show. Verify the time and date, then Press
OK.
✓
NOTE:
If the GSM radio module is installed and registered, the
date and time will be set automatically.
10.
Press
B
ACK
to return to the Security Screen or press
the
button to return to the Home Screen.
The installation and installer programming of the Control Panel is
now complete. Continue to the next section to test the system.
Figure 57. Programming Summary Screen
Figure 58. User Toolbox Screen 1 of 3
Figure 59. User Management Screen
Figure 60. Brightness / Volume Screen
Figure 61. User Toolbox Screen 2 of 3
Figure 62. Backlight Timeout Screen
Figure 63. Set Date Screen
Содержание GO!control 2GIG-CNTRL2
Страница 1: ...Wireless Security System Installation Programming Instructions 2GIG CNTRL2 2GIG CP2...
Страница 48: ...46 Notes...
Страница 49: ...47 Notes...
Страница 52: ...v1 9 233497 E Copyright 2012...


