


125
■
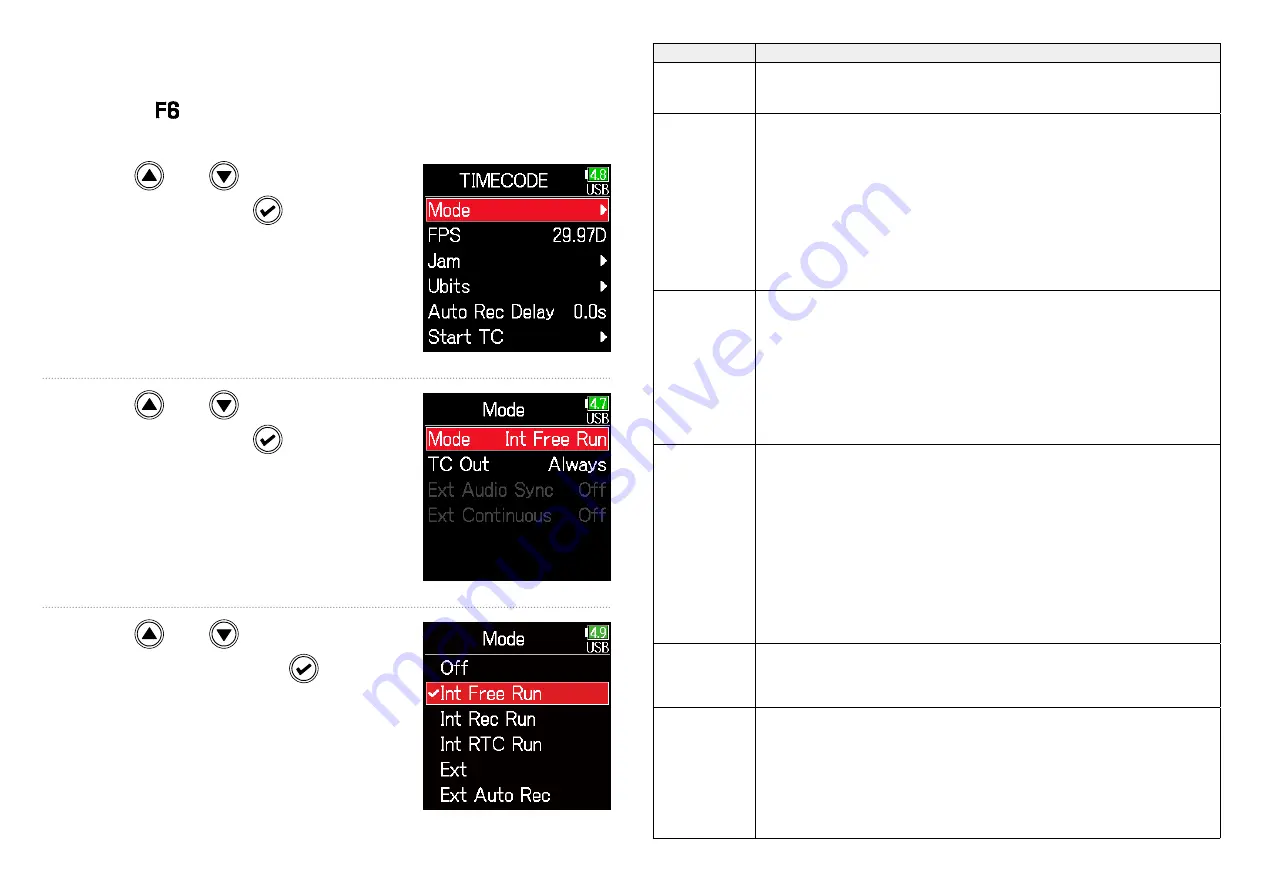
Setting the mode
The following types of settings can be made.
• Whether the
generates timecode or receives external timecode
• Whether timecode continues running or not when not recording
3.
Use and
to select
Mode
, and press
.
4.
Use and
to select
Mode
, and press
.
5.
Use and
to select
the mode, and press
.
Setting
Explanation
Off
No timecode will be written to the recording file.
Timecode will not be output from the TIMECODE IN/OUT jack.
Int Free Run
Internal timecode will be generated regardless of the recording
mode.
The internal timecode can be set manually using the following
menu items.
• MENU > TIMECODE > Jam
• MENU > TIMECODE > Restart
Timecode will always be output from the TIMECODE IN/OUT
jack.
Int Rec Run
Internal timecode will be generated only when recording.
The internal timecode can be set manually using the following
menu items.
• MENU > TIMECODE > Jam
•MENU > TIMECODE > Restart
When switching from another mode, the internal timecode will
stop at the last value.
Int RTC Run
Internal timecode will be generated regardless of the recording
mode.
In the following situations, the internal timecode will be syn-
chronized (jammed) with the RTC (internal clock).
• At startup
• When Date/Time (RTC) changed (
→
• When switching to this timecode mode
Timecode will always be output from the TIMECODE IN/OUT
jack.
Ext
The internal timecode will chase the external timecode.
When there is no external timecode, automatic generation of
internal timecode can also be enabled. (
→
Ext Auto Rec
The internal timecode will chase the external timecode.
When there is no external timecode, automatic generation of
internal timecode can also be enabled. (
→
Recording starts automatically when external timecode input
is detected. Recording stops automatically when external time-
code stops.
Summary of Contents for F6
Page 39: ...39 7 Use and to select the time to show and press ...
Page 55: ...55 6 Use and to select the track to monitor and press ...
Page 91: ...91 6 Use and to select Phase Invert and press 7 Use and to select On and press ...
Page 132: ...132 6 Use and to select Restart and press ...
Page 150: ...150 6 Use and to adjust the brightness and press HINT This can be set from 5 to 100 ...
Page 163: ...163 HINT This can be set from 5 to 100 ...
Page 179: ...179 7 Use and to select Execute and press ...
Page 194: ...194 L R Slate Tone φ φ φ φ φ φ Detailed block diagram Linear Dual modes ...
Page 195: ...195 L R Slate Tone φ φ φ φ φ φ Detailed block diagram Float mode ...


