– 71 –
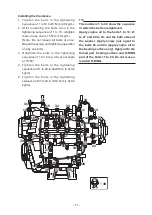
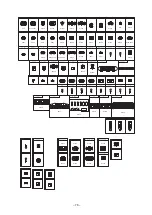
Installing the Crankcase
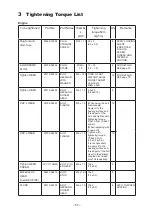
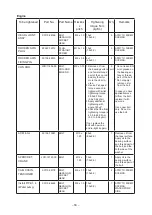
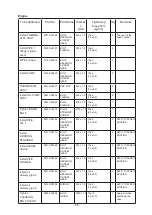
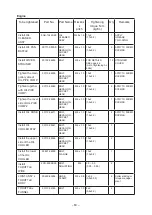
1. T i g hte n t h e b o l t s i n t h e t i g hte n i n g
sequence of 1 to 10 to 20 N•m (2.0 kg•m).
2. After loosening the bolts once in the
tightening sequence of 1 to 10, retighten
them one by one to 15 N•m (1.5 kg•m).
(Note: Do not loosen all bolts at once.
Repeat loosening and tightening operation
one by one bolt.)
3. Retighten the bolts in the tightening
sequence of 1 to 10 to a turn-of-nut angle
of 75°±5°.
4. T i g hte n t h e b o l t s i n t h e t i g hte n i n g
sequence of 11 to 20 to 24±2 N•m (2.4±0.2
kgf•m).
5. T i g hte n t h e b o l t s i n t h e t i g hte n i n g
sequence of 21 to 40 to 10±2 N•m (1.0±0.2
kgf•m).
6
8
7
5
2
4
3
1
22
32
40
12
23
33
13
24
34
14
25
35
15
26
36
16
27
37
17
28
38
18
29
39
19
21
31
11
20
30
10
9
40
TIP
The numbers 1 to 40 show the sequence
in which the bolts are tightened.
Apply engine oil to the bolts 1 to 10, 21
to 27 and 29 to 39, and the both sides of
the washer. Apply screw rock agent to
the bolts 28 and 40 (apply engine oil to
the bearing surface only). Apply oil to the
thread part, bearing surface and O-RING
part of the bolts 11 to 20. Do not reuse a
mended O-RING.

