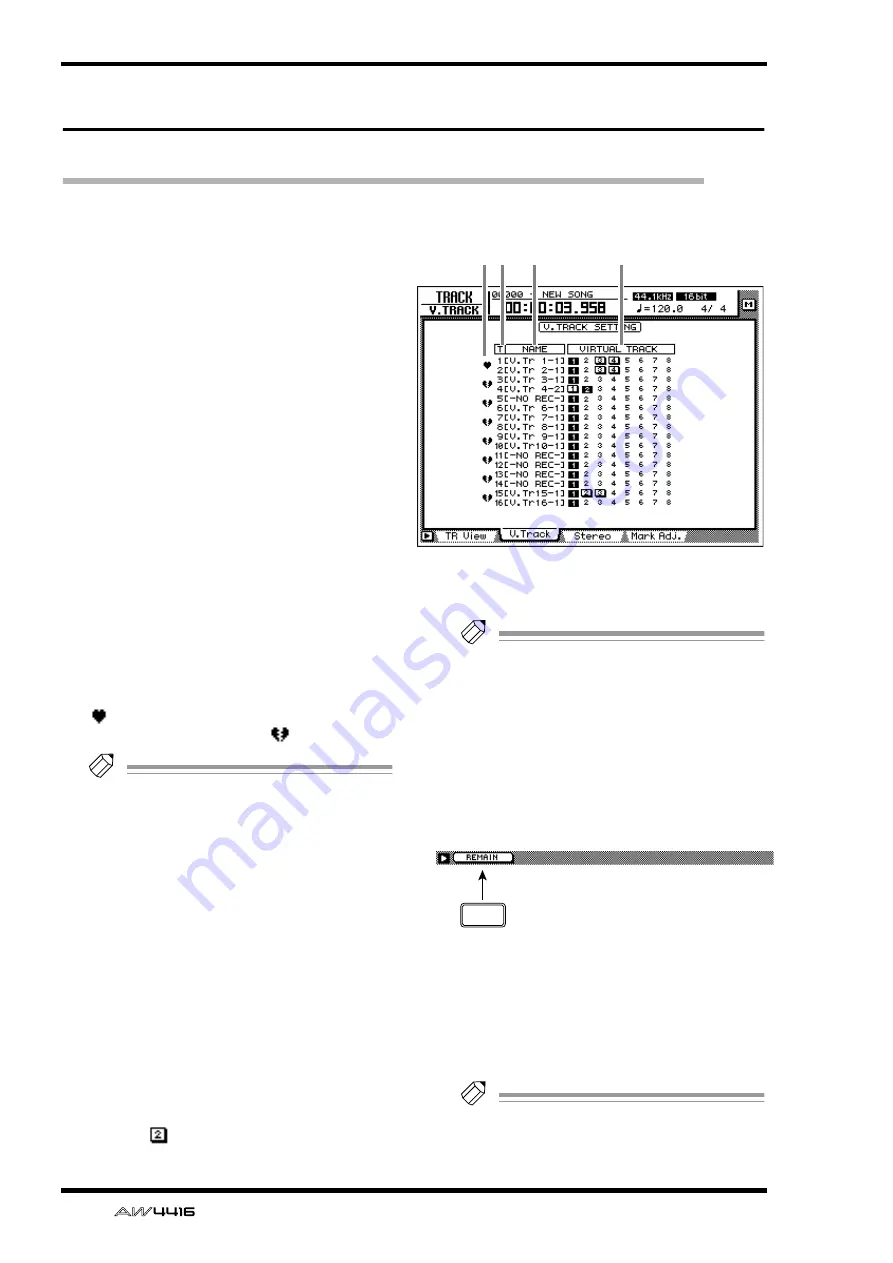
TRACK screen
94
— Reference Guide
V. Track page
Switching virtual tracks
[Function]
Switch the virtual track number assigned to
each track 1–16, and set/cancel pairing
between tracks.
[Key operation]
• [TRACK] key
→
[F2] (V. Track) key
• Repeatedly press the [TRACK] key until
the screen shown at the right appears.
[Mouse operation]
M button
→
TRAC button
→
V.Track tab
[Screen functions]
A
Pairing
By moving the cursor to this area and pressing
the [ENTER] key, you can pair (or cancel pairing
for) two adjacent odd-numbered
→
even-num-
bered tracks. Paired tracks are indicated by a
“
” symbol, and tracks for which pairing is
defeated are indicated by a “
” symbol.
Tip!
• Paired tracks will be linked when you switch
virtual tracks, or when you select them for
track editing.
• Track pairing does not affect pairing of mon-
itor channels.
B
T (track)
These are the track numbers 1–16.
C
NAME
This column shows the name of the virtual track
that is currently selected for each track 1–16.
D
VIRTUAL TRACK
Move the cursor to this column and press the
[ENTER] key to select the virtual track number
used by each track 1–16. The currently selected
virtual track number will be highlighted. Of the
virtual track numbers that are not currently
selected, tracks that have been recorded are dis-
played as
.
Tip!
For details on operating virtual tracks, refer to
Operation Guide “Chapter 9. Track and vir-
tual track operations.”
■
Additional functions in the V.
Track page
In the V. Track page you can press the [SHIFT]
key to assign the following additional function
to [F1].
• [F1] (REMAIN) key
The remaining recordable time will appear in
the level meter/counter and in the counter area
of the display. When you press the [SHIFT] key
+ [F1] (REMAIN) key once again, the normal
display will reappear.
Tip!
The remaining recordable time will depend
on the number of tracks that is currently in
record-ready mode.
12 3
4
F1


