


FreeFlow Process Manager Operator and Administrator Guide
1-23
About FreeFlow Process Manager
6. In the displayed list of templates, click [
+
] to expand the
desired template, then select the appropriate signature.
7. Select [
Add
] to add the template and signature to the job file.
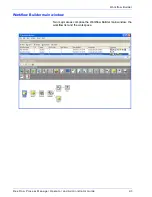
The job file template displays in the Template/Signature/Page
window.
8. Select [
OK
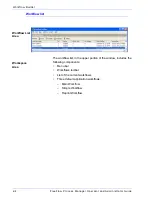
] to close the Signature Selection dialog.The job file
template displays in the Signature List window.
You must select a device type for each signature.
9. In the Signature List window, select the desired signature. The
[
Device...
] button is enabled.
10. Click [
Device...
].
11. In the Choose Device window, select [
Press Sheet Size
] as
the target device. You must select a device for each signature.
12. Select [
OK
] to close the Choose Device window.
13. To save the job file, select [
File: Save Job
] or [
File: Save Job
As...
]. Either opens the Save Job As dialog.
14. In the Save in list box, navigate to the FreeFlow Install
Directory\ImpositionJobs directory, typically, E:\ FreeFlow\
ImpositionJobs.
15. Type the appropriate file name, and select [
Save
].
16. Repeat steps 2-11 to add more job file templates.
Summary of Contents for FreeFlow
Page 1: ...FreeFlow Process Manager Operator and Administrator Guide Version 6 0 Sept 2007 701P47169...
Page 8: ...Xerox FreeFlow Process Manager Operator and Administrator Guide viii Table of Contents...
Page 26: ...FreeFlow Process Manager Operator and Administrator Guide xxvi...
Page 52: ...FreeFlow Process Manager Operator and Administrator Guide 1 26 About FreeFlow Process Manager...
Page 306: ...Xerox FreeFlow Process Manager Administrator and Operator Guide Index 4 Index...
Page 307: ......
Page 308: ......