background image


lxxvi 


2.


Click on 

Save Settings

17.5.3


MWI Notification 

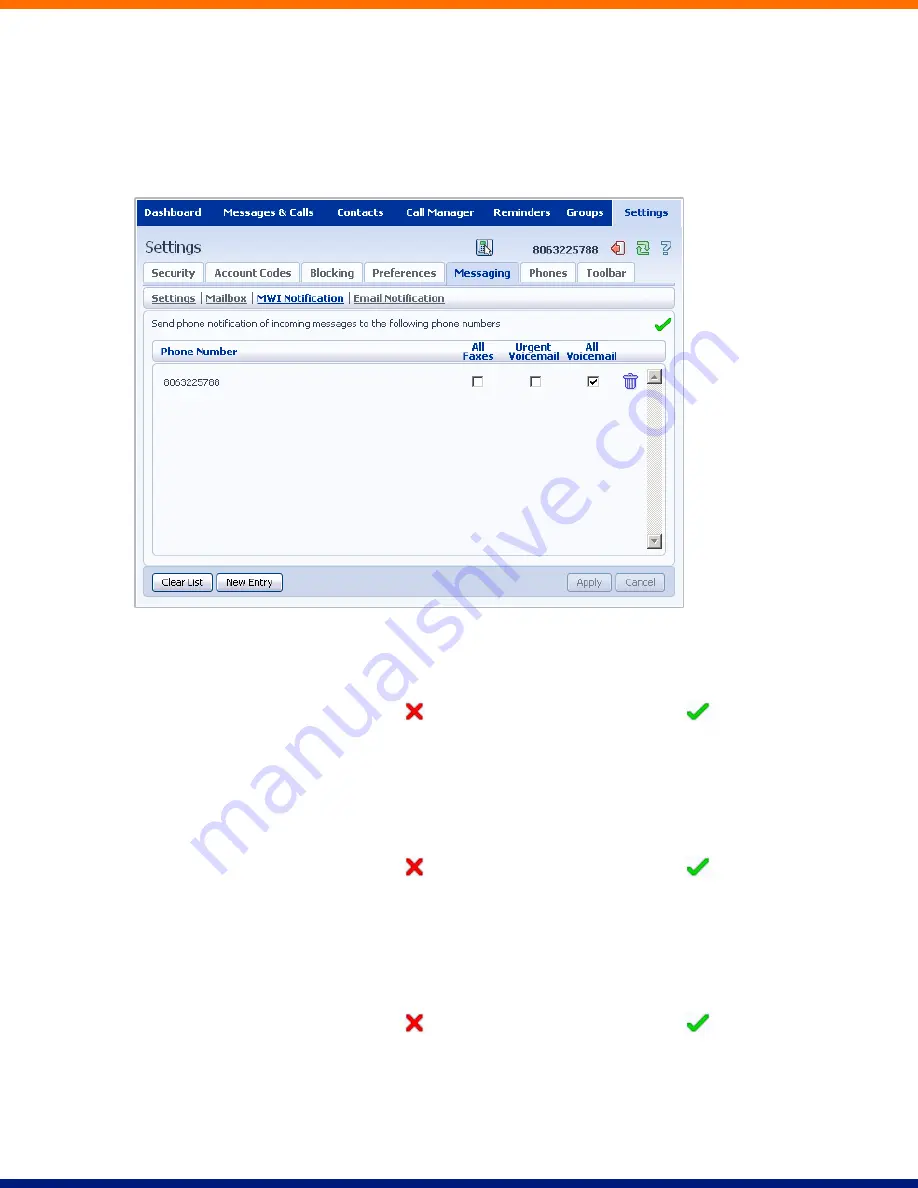
You can use the MWI Notification section to configure whether your phone should indicate to you when you 

have new messages. 


To have your phone’s messages light lit when any new faxes are waiting, follow these steps: 

1.


Check 

All Faxes

2.


If there is a red cross on the screen: 

 click it so that it becomes a green tick: 

3.


Click on 

Apply

To have all new voice messages light your phone’s messages light, follow these steps: 

1.


Check 

All Voicemail

2.


If there is a red cross on the screen: 

 click it so that it becomes a green tick: 

3.


Click on 

Apply

To have only urgent new voice messages light your phone’s messages light, follow these steps: 

1.


Check 

Urgent Voicemail

2.


If there is a red cross on the screen: 

 click it so that it becomes a green tick: 

3.


Click on 

Apply

Summary of Contents for Hosted PBX

Page 1: ...Hosted PBX End User Guide Version 7 2 Issue 1 29 Nov 2010 XACT COMMUNICATIONS 560 e 3RD STREET SUITE 202 LEXINGTON KY 40508 888 747 9228 ...

Page 2: ......

Page 3: ......

Page 4: ...eatures not available Xact Communications reserves the right to without notice modify or revise all or part of this document and or change product features or specifications and shall not be responsible for any loss cost or damage including consequential damage caused by reliance on these materials Xact and the Xact logo are trademarks of Xact Communications Other brands and products referenced he...

Page 5: ......

Page 6: ...4 3 Selective Call Forwarding using the Handset ix 4 4 Remote Access to Call Forwarding ix 5 Advanced Call Handling x 5 1 Putting a call on hold x 5 2 Call Waiting x 5 3 Transferring a call x 5 4 Three Way Conferencing x 5 5 Parking a call xi 5 6 Retrieving a parked call xi 5 7 Do Not Disturb xi 6 Voicemail xii 6 1 Accessing Voicemail xii 6 2 Using the Voicemail system xii 7 Conferencing xiii 7 1 ...

Page 7: ...xxviii 11 1 5 Call Back xxix 11 1 6 Add Caller to Contactsxxix 11 2 Faxes xxix 11 3 Missed xxix 11 3 1 Add Caller to Contactsxxx 11 4 Dialed xxxi 11 4 1 Add Dialed Number to Contacts xxxi 11 5 Received xxxi 11 5 1 Add Number to Contacts xxxii 12 Contacts xxxiii 12 1 Contact List xxxiii 12 1 1 Searching xxxiv 12 1 2 Add a New Contact xxxiv 12 1 3 Editing a Contact xxxvi 12 1 4 Deleting a Contact xx...

Page 8: ...i 17 1 4 Unblocking Account Codes lxiv 17 2 Account Codes lxiv 17 2 1 Account Code Optionslxiv 17 2 2 Business Account Codes lxv 17 2 3 Personal Account Codes lxvi 17 3 Blocking lxvii 17 4 Preferences lxviii 17 4 1 Forwarding Preferences lxix 17 4 2 Line Information lxix 17 4 3 Voicemail Preferences lxx 17 4 4 Click To Dial lxx 17 4 5 Caller ID Preferences lxxi 17 5 Messaginglxxi 17 5 1 Settings l...

Page 9: ...ne system then please contact your administrator This guide will help you get up and running with your new phone as soon as possible It tells you how to use your phone and the more commonly used features This guide may contain some features that were not set up for your phone system If you have any problems or need a more detailed description of the operation of your phone then please contact your...

Page 10: ...ype and configuration the call may not complete automatically once you have finished dialing and you may need to hit the Dial key Aastra phones once you have dialed the number 2 3 Emergency Calls In an emergency lift the handset and dial 911 If you need to dial a code when calling an external number you will also need to dial that code before calling 911 NOTE Depending on your phone type and confi...

Page 11: ...g the Handset To answer an incoming call lift your handset and you will be connected to the caller 3 2 Using the Speaker To answer a call using the speakerphone do not lift the handset and instead press the Speaker or Answer key ...

Page 12: ...r Reference source not found for instructions on doing this This section provides instructions on how to set up Call Forwarding using your handset 4 2 Immediate Busy and No Answer Call Forwarding using the Handset 4 2 1 Enabling To use your handset to enable Immediate Busy or No Answer Call Forwarding dial the access code for the type of call forwarding you want to enable followed by the number yo...

Page 13: ...ing any phone To use this feature follow these steps 1 Dial the remote access to call forwarding number 2 Enter your full 10 digit phone number followed by 3 Enter your remote access to call forwarding PIN followed by Note that this PIN is different from your CommPortal password 4 Enter the access code of the call forwarding service you wish to configure 5 If you are enabling call forwarding the s...

Page 14: ... you should either select the Answer key Aastra phones or press the line key which is flashing Answering the second call will automatically put the first call on hold You can toggle between the calls by placing the current one on hold and retrieving the other call 5 3 Transferring a call To transfer a call follow these steps 1 Press the Xfer key Aastra phones this places the current call on hold 2...

Page 15: ...sfer by pressing Transfer or Xfer again If you have keys on your phone for parking calls these keys will indicate via a light or icon when a call is parked against that orbit 5 6 Retrieving a parked call Depending on your phone type there are two ways of retrieving a parked call 1 If you have keys on your phone for parked calls pick up the handset and press the key of the park orbit where the call...

Page 16: ...ce prompts and then press the keys on your phone to select which option you would like Once you become familiar with the system there is no need to wait until the voice prompts have played before pressing a key you can interrupt the announcements to speed up your experience For your convenience the most commonly used mailbox commands are as follows To listen to your voice messages from the main me...

Page 17: ... up The account can be configured to either continue the conference or end the conference when the moderator leaves the call 7 2 Participant Instructions To join a conference call the participant should follow these steps 1 Dial the conference call number 2 Enter the 6 digit participant code followed by 3 If asked say their name and then press The participant will then be placed into the conferenc...

Page 18: ... 8 Turns conference call recording on or off 9 Mute or un mute all participants 01 Record a greeting to be played to participants when they join the conference You will hear an announcement giving instructions for recording the secondary greeting Press 2 to start recording Record the greeting and then press Press 1 to hear the recording you have just made When you are happy with the new greeting p...

Page 19: ... associated with that other extension If there is no call in progress on that extension the lamp will not be lit If a call is ringing on that extension the lamp will blink quickly If a call is on hold on that extension the lamp will blink slowly If a call is in progress on that extension the lamp will be lit solidly If you want to answer a call that is ringing on the extension you are monitoring p...

Page 20: ... code that has been configured either by your administrator or by you If your system uses non validated account codes you can enter any code so long as it is the right length If you have account codes your administrator should have explained this to you and told you what codes to use For more on account codes see Section 17 2 8 5 Headset Most of the models of phones supported by your phone system ...

Page 21: ...and phone system s settings 9 1 Accessing To access CommPortal point a browser at https myphone esco tech net CommPortal is supported on Windows 2000 Windows XP Windows 2003 and Windows Vista using the following browser versions Internet Explorer 6 Internet Explorer 7 Mozilla Firefox 2 0 JavaScript must be enabled on your browser 9 2 Logging In The following shows a sample CommPortal login page ...

Page 22: ...our phone number and your password and click on Login 9 3 Using CommPortal Once you have logged in you will see the CommPortal Dashboard This gives you a quick at a glance summary of your messages missed calls contacts and phone settings ...

Page 23: ...e like Call Forwarding and Selective Call Rejection Reminders This page allows you to set up reminder calls Groups Here you can view any groups your line is part of in your business such as hunt groups You can also login and logout of groups here Settings The Settings page gives you access to numerous other options such as changing your passwords and PINs and configuring the keys on your phone Usi...

Page 24: ...ils since you last looked you can click on the Refresh icon 9 6 Logging Out If you don t use CommPortal for 30 minutes you will be automatically logged out However if you wish to manually log out for example because you ve been accessing CommPortal using a shared computer you can do this by clicking the Logout icon ...

Page 25: ... the Dashboard in more detail Here is an example Dashboard 10 1 Messages In the top left hand corner you can see if you have any new voice messages To view and listen to new messages click on the voicemail link This will take you to the Messages Calls page which is described in Section 11 10 2 Missed Calls This section shows you the most recent calls which you have missed ...

Page 26: ... Section 11 10 2 1 Call Back To call back a number whose call you missed using Click To Dial follow these steps 1 Right click on the number of the caller 2 Select the Dial option 10 3 Contacts The Contacts section displays all of your contacts and allows you to search them ...

Page 27: ...matches your search will be highlighted in yellow To cancel the search and view all of your contacts delete the search text you entered To add modify or delete Contacts see Section 12 10 3 1 Calling a Contact To call a contact using Click To Dial follow these steps 1 Right click on the number of the contact you wish to call 2 Select the Dial option ...

Page 28: ...urrent status of your main phone line settings In the example above Call Forwarding Immediate the Follow Me service and Anonymous Call Rejection are all inactive disabled To change one of these settings you can either click on the link for that setting or select the Call Manager page described in Section 13 ...

Page 29: ...ed displays the recent calls you have received and not answered Dialed displays the recent calls you have made including those made by Click To Dial as described in Section 18 Received shows the recent calls you have answered Each of these sections is described in more detail below 11 1 Messages This shows you all stored voice messages both those you have listened to and those you haven t Unheard ...

Page 30: ...loudspeaker icon to the left of the message This will pop up a Voicemail player which loads and plays the message With this player you can See when the message was received and how long it is Pause rewind and fast forward the message Mute the player or change the volume ...

Page 31: ...sages to delete by selecting the checkbox to the left of the message Click on Delete 11 1 3 Marking a Message as Heard Listening to a voice message will mark it as heard If you want to mark a message as heard without listening to it follow these steps 1 Select the voice message or messages to mark as heard by selecting the checkbox to the left of the message ...

Page 32: ...Mark As Heard 11 1 4 Marking a Message as New To mark a message as new follow these steps 1 Select the voice message or messages to mark as new by selecting the checkbox to the left of the message Click on Mark As New ...

Page 33: ...e steps 1 Click on the Add to Contacts icon to the right of the voicemail 2 This will take you to the Contacts page Enter the details for your new contact and click on Save See Section 12 for more information on using the Contacts page 11 2 Faxes The Faxes tab lets you view your read and unread fax messages in the same way as the Messages tab does for voice messages 11 3 Missed The Missed section ...

Page 34: ...ad of their number and an icon indicating which of that Contact s numbers they used to call you 11 3 1 Add Caller to Contacts To add the number of someone who called you to your Contacts follow these steps 1 Click on the Add to Contacts icon to the right of the call information ...

Page 35: ... Dial described in Section 18 11 4 1 Add Dialed Number to Contacts To add the number of someone you called to you to your Contacts follow these steps 1 Click on the Add to Contacts icon to the right of the call information 2 This will now take you to the Contacts page Enter the details for your new contact and click on Save See Section 12 for more information on using the Contacts page 11 5 Receiv...

Page 36: ...to your to your Contacts follow these steps 1 Click on the Add to Contacts icon to the right of the call information 2 This will now take you to the Contacts page Enter the details for your new contact and click on Save See Section 12 for more information on using the Contacts page ...

Page 37: ... you to manage your personal contact list Speed Dials is where you configure your numeric speed dials Extensions shows you the extensions within your business Short Codes shows you your business s numeric speed dials Each of these sections is described in more detail below 12 1 Contact List The Contact List shows you all of your contacts ...

Page 38: ... text box CommPortal will narrow down the contacts displayed as you type and the text that matches your search will be highlighted To cancel the search and view all of your contacts delete the search text you entered 12 1 2 Add a New Contact To add a new Contact follow these steps ...

Page 39: ... text boxes provided Enter any phone numbers for your contact in the text boxes provided You can select the radio button to the right of a number to indicate that it is the preferred number for this Contact Enter any addresses for your contact in the text boxes provided ...

Page 40: ...xvi Hit Save You new contact will now have been added 12 1 3 Editing a Contact To edit a contact follow these steps 1 Select the contact you wish to edit from the list on the left hand side of the screen ...

Page 41: ...en 2 Click Delete 12 1 5 Calling a Contact To call a contact using Click To Dial follow these steps 1 Right click on the number of the contact you wish to call 2 Select the Dial option 12 1 6 Groups You can manage your contacts by assigning them to groups For example you might have a group for Work contacts and another group for Personal contacts To add a new group follow these steps 1 Click on Ne...

Page 42: ... the group in Group Name Enter an ID for the group in Telephone ID Select any contacts you want to be in the group from the list on the right hand side Click on Save The new group will now appear in the Contacts Groups section ...

Page 43: ...tal To edit a group follow these steps 1 Select the group on the left hand side 2 Click on Edit 3 Change the group settings or members 4 Click on Save To delete a group follow these steps 1 Select the group on the left hand side 2 Click on Delete 12 2 Speed Dials The Speed Dials section allows you to configure numeric speed dials ...

Page 44: ...one s keys see Section 19 12 2 1 Adding a Speed Dial To add a speed dial follow these steps 1 Select the number for the speed dial you d like to set up from the Speed Dial drop down list 2 Enter the number this speed dial should call as you would dial it For example if you dial 9 before a number enter 9 and the number here 3 Click on Add 4 Repeat steps 1 3 for any other speed dials you want to set...

Page 45: ...ps 1 Click on the Trash Can icon to the right of the speed dial 2 Click on Apply Alternatively to delete all of your speed dials follow these steps 1 Click on Clear List 2 Click on Apply 12 3 Extensions The Extensions section lists of all the extensions in your business ...

Page 46: ...i To use Click To Dial to call any of these extensions follow these steps 1 Right click on the number of the extension you wish to call 2 Select the Dial option Your administrator sets up these Extensions ...

Page 47: ...ort Codes section shows you all of the speed dials set up for all the phones in your business You can dial these short codes from any phone in the business to reach the destination Your administrator sets up these Short Codes ...

Page 48: ...n select by clicking on the tabs Summary gives you a description of what will happen to incoming calls Rules allow you to view and change your Call Forwarding settings Follow Me lets you view and set up an advanced Find Me Follow Me service Screening lets you screen different types of incoming calls ...

Page 49: ...s been set up for After using one of these tabs to change the settings for a service you can return to the Summary tab to check how the updated services interact 13 2 Follow Me The Follow Me tab allows you to enable or disable the Follow Me service enable or disable asking the caller for their name view and modify whether the Follow Me service operates in simultaneous mode in which case all target...

Page 50: ... Otherwise the phone number must be entered manually the ring duration the step when this rule should be applied if simultaneously is selected this setting has no effect the schedule days of the week and the time during which this target applies As with many of the CommPortal screens described in the remainder of this chapter the subscriber must press Apply for any changes to take effect The subsc...

Page 51: ...Xact s CFS Follow Me service shows the Xact CFS Follow Me tab where you can set up rules for the CFS Follow Me service and turn the service on and off ...

Page 52: ...es you with a single view of how your calls are currently routing and is the CommPortal interface for changing your ICM forwarding setting From this page you can quickly change your forwarding settings by selecting a radio button under the When I Receive a Call section 14 2 Rules Based Routing Rules based routing allow the user to configure how all calls are routed based on a set of pre configured...

Page 53: ...tive all calls will ring your phone using the Standard Ringtone To override this behavior for specific callers click the Add New Rule button below From this page you can select you can configure the following 1 Ring your phone with a standard or distinctive ringtone 2 Send the call to voicemail 3 Inform the caller that I am unavailable and reject the call 4 Prompt the caller to record their name t...

Page 54: ...dividual contact in your contact directory 2 This group of contacts Apply group of contacts as defined in my contact directory 3 Anyone in my contact list Apply to all callers for which you have a contact defined 4 Anyone in my business group Apply to all other members of your business with the hosted PBX service 5 This phone number Apply to a specific phone number Can be any number 6 A withheld n...

Page 55: ... ringtone 2 Send the call to voicemail 3 Inform the caller that I am unavailable and reject the call 4 Prompt the caller to record their name then prompt you to accept or reject the call 5 Ring more than one phone simultaneously or in sequence 6 Prompt the caller to record their name then ring more than one phone and prompt you to accept or reject the call To have the system route calls to one or ...

Page 56: ...hones you may have to allow more time depending on the mobile networks post dial delay 3 Click the Add button 4 Continue to add numbers as defined in steps 1 3 until all numbers have been added 5 Select the preferred ringtone for your desk phone 6 Select the number to transfer calls to in the event the lines are all busy or not answered Options are voicemail or any dialable number 7 Click Finish ...

Page 57: ...ons 1 Begin with a blank weekly schedule that you can set up from scratch 2 Begin with a typical weekly schedule that you can fine tune For ease of use select option 2 Begin with a typical weekly schedule that you can fine tune and follow the steps below 1 Select the period that you want to modify 2 Using your mouse point to the day and time you want to change and click the mouse To change multipl...

Page 58: ...e Special Days tab and follow the steps below To select individual special days 1 Select the month using the key and the year using the Key 2 Click on an individual day or click and drag to select multiple days 3 Click Apply To have the system automatically define public holidays 1 Click on the Add Public Holidays button 2 Select the holidays you wish to add US Public Holidays 3 Click Apply ...

Page 59: ...15 Reminders The Reminders page lets you set up reminder calls 15 1 Adding Reminders To add a new reminder you use the New Reminder section To add a new reminder follow these steps ...

Page 60: ...ppen once in the next 24 hours or for it to happen weekly on a certain day of the week Enter the time you would like the reminder call using the Time boxes and dropdown list Click on Add Click on Apply 15 2 Deleting Reminders To delete a reminder you use the Reminders list To delete a reminder follow these steps ...

Page 61: ...1 Click on the Trash Can icon to the right of the reminder in the list 2 Click on Apply Alternatively to delete all of your reminder calls follow these steps 1 Click on Clear List 2 Click on Apply ...

Page 62: ...all Pickup Group If your phone line is in a Call Pickup Group then you can pick calls that are ringing on any other lines in that group by picking up your phone and dialing the Group Call Pickup code Multiple Appearance Directory Number This is a special phone number that when called will ring all of the phones within the Multiple Appearance Directory Number group The first person to answer their ...

Page 63: ... come into your phone line from a Multi Line Hunt Group will ring your phone as normal and you can answer the calls as you usually would If you have permissions to log in and out of the Multi Line Hunt Group you can either use CommPortal to log in and out or you can use your phone Using Your Phone To log into a Multi Line Hunt Group using your phone follow these steps 1 Pick up your phone handset ...

Page 64: ...hone line is in a Call Pickup Group then there will be an entry in the Group Membership section called CPUG Click on this entry to view that Call Pickup Group The following information is shown The department this Call Pickup Group is in if any If your business does not use the departments then this will say None The number of lines in this Call Pickup Group The lines which are members of this Cal...

Page 65: ...umbers If your phone line is in a Multiple Appearance Directory Number group then there will be an entry in the Group Membership section for it called MADN Click on this entry to view that Multiple Appearance Directory Number The following information is shown What department this Multiple Appearance Directory Number is in if any If your business does not use departments then this will say None Ho...

Page 66: ...you configure a number of properties which apply to your phone calls Messaging allows you to configure your voice mailbox Phones lets you configure your phone s keys if you have a compatible phone model Toolbar lets you install the CommPortal Assistant Toolbar which provides quick easy access to your CommPortal settings on your PC 17 1 Security The Security tab lets you set up the security options...

Page 67: ...he service will be blocked To unblock this service click on Unblock Forwarding For more details on Remote Access to Call Forwarding see the XACT Hosted PBX End User Quick Start Guide 17 1 3 Changing your PINs You have two different PINs 1 Your Call Services PIN which you use to access Remote Access to Call Forwarding 2 Your Voicemail PIN which you use to access your Voicemail To change either of t...

Page 68: ...ons 8 4 and 17 2 or speak to your administrator 17 2 Account Codes The Account Codes tab lets you configure your Account Codes service Exactly what is configurable within this section will depend on the permissions that your administrator has given you For more details on the Account Codes services see Section 8 4 or speak to your administrator 17 2 1 Account Code Options The Account Code Options ...

Page 69: ...fies whether your system uses validated or non validated account codes Account code length specifies the length of account codes you must enter Max incorrect attempts before account is blocked specifies how many incorrect attempts to enter account codes are allowed in a row before all calls requiring account codes are blocked 17 2 2 Business Account Codes To view the list of valid account codes fo...

Page 70: ...click on the Personal link To edit your list of valid account codes click on Edit Personal Account Codes To add an account code follow these steps 1 Enter an account code in the Account Code text box 2 Enter a description for the Description text box 3 Click on Add 4 Click on OK 5 Click on Apply ...

Page 71: ...ht of the account code 2 Click on OK 3 Click on Apply Alternatively to delete all of your account codes follow these steps 1 Click on Clear List 2 Click on OK 3 Click on Apply 17 3 Blocking The Blocking tab lets you configure what types of outgoing calls should be blocked from your line ...

Page 72: ...u want to block 2 Hit Apply To unblock a type of call follow these steps 1 Uncheck the type of call you want to allow 2 Click on Apply 17 4 Preferences The Preferences tab lets you view and change some general settings for your phone line which you are unlikely to want to change often ...

Page 73: ...ou last configured through CommPortal To change whether you need to enter a number when enabling Call Forwarding from your handset follow these steps 1 Check to require a number to be entered or uncheck to mean a number is not required the type of Call Forwarding you want to change 2 Click on Apply 17 4 2 Line Information The Line Information section shows you information about your line Line name...

Page 74: ...k on Apply 17 4 4 Click To Dial The Click To Dial section lets you configure settings for your Click To Dial service For more information on using Click To Dial see Section 18 If you want to use your regular phone for your calls using Click To Dial follow these steps 1 Select Use my subscriber line 2 Click on Apply To use another phone as the phone for your calls using Click To Dial follow these s...

Page 75: ...me of a caller when your phone rings follow these steps 1 Select Display incoming call name on my phone 2 Click on Apply To display the number of a caller when your phone rings follow these steps 1 Select Display incoming call number on my phone 2 Click on Apply Note that not all models of phone will display the caller s name and number 17 5 Messaging The Messaging tab lets you change the operatio...

Page 76: ...lets you configure whether you are alerted via email when messages arrive 17 5 1 Settings Timezone To change the timezone that you are in follow these steps 1 Select the new timezone from the drop down list in the Subscriber Timezone section 2 Click on Apply Voice and Fax Forwarding This section lets you enter an email address to which all your voice and fax messages should be sent when they are l...

Page 77: ...w them in CommPortal check Leave a copy of forwarded voicemail messages and faxes in the inbox 4 If you would like to be able to include action links such as delete in the email copies of your voice messages select the Include action links in forwarded voicemail messages and faxes 5 Click on Apply 17 5 2 Mailbox The Mailbox section lets you configure your mailbox settings Greetings To configure a ...

Page 78: ...on by selecting the days you operate and the times you operate between Then click on OK Click on Save Settings Mailbox Settings To configure your mailbox so that it does not require you to enter a PIN when you collect your messages follow these steps 1 Check Skip PIN 2 Click on Save Settings To disable the Skip PIN setting follow these steps ...

Page 79: ...Save Settings To disable the auto play feature of your mailbox follow these steps 1 Uncheck Auto Play 2 Click on Save Settings Live Message Screening Live Message Screening lets you listen to callers who are leaving voice messages while they are doing so If you have Live Message Screening enabled your phone will ring with a distinctive ringtone when someone is leaving you a message If you answer y...

Page 80: ...a red cross on the screen click it so that it becomes a green tick 3 Click on Apply To have all new voice messages light your phone s messages light follow these steps 1 Check All Voicemail 2 If there is a red cross on the screen click it so that it becomes a green tick 3 Click on Apply To have only urgent new voice messages light your phone s messages light follow these steps 1 Check Urgent Voice...

Page 81: ...ck on New Entry 2 Enter the email address 3 Click on Add 4 Check whether you want All Faxes Urgent Voicemail or All Voicemail sent to this address 5 If there is a red cross on the screen click it so that it becomes a green tick 6 Click on Apply To delete an email address from this list follow these steps 1 Click on the Trash Can icon to the right of the email address 2 Click on Apply To delete all...

Page 82: ...igure your phone This will launch a new browser window for the Phone Configurator See Section 19 for instructions on using this 17 7 Toolbar The Toolbar section allows you to download the CommPortal Assistant toolbar to install on your Microsoft Windows PC This gives you fast access to the commonly used phone settings from your desktop along with Click To Dial ...

Page 83: ...low these steps 1 Click on the download the toolbar installer link 2 If prompted select Run to start the installation 3 Follow the on screen instructions to install CommPortal Assistant For instructions on using CommPortal Assistant see the Help provided with it ...

Page 84: ...his pops up a window in which you can enter the number you want to dial 18 1 Calling from your Regular Phone To make a call from your regular desk phone enter the phone number you want to call in the space provided and click Dial Your phone will now ring When you answer it the number you entered will be called ...

Page 85: ...th a direct dial number so that they appear to come from your business line This could be your cell phone a payphone or your home number Once you ve selected a Click To Dial call select Configure This takes you to the Preferences section of the Settings page Under Click To Dial select Use remote telephone and enter the number of the phone you want to use to make your call ...

Page 86: ...phone number configured the Click To Dial icon changes to You can now place a Click To Dial call This will cause the number you entered as the remote telephone to ring When you answer this phone your Click To Dial call will be set up ...

Page 87: ...r Phone link This launches a new browser window for the Phone Configurator You must have Adobe Flash Player version 9 or later installed to use the Phone Configurator 19 1 Using the Phone Configurator s Graphical View Once you have launched the Phone Configurator you will be presented with an image of your phone The examples shown in this document show an Aastra 57i phone with a 560M sidecar Your ...

Page 88: ...ter over it You can see whether you can modify a key by hovering your mouse over the key If the key glows blue you can configure it If it glows red you cannot To select a key click on it This will launch a pop up allowing you to configure the key Use the drop down list to select the operation you d like that key to perform ...

Page 89: ...to monitor another line as described in Section 8 2 Enter the number of the extension you want to monitor in the box provided Other Service this is reserved for future services Park Call this is used to park calls as described in Section 5 5 Retrieve Parked Call this is used to retrieve parked calls as described in Section 5 6 Automatic Recall this sets up the key as a speed dial to call the Autom...

Page 90: ...he number of the extension you want to pick up calls for in the box provided Whichever option you chose for your key you may enter a label for the key If your phone has a display next to the key you configured this label will be shown on the phone display Once you have finished configuring your key click on OK The picture of the phone will be updated with the label you gave your new key assignment...

Page 91: ...king on the Table View icon at the bottom right of the screen This view is normally used by the administrator to make changes to the behavior of your phone but you can use it to make changes to your advanced settings For more detail on doing this speak to your administrator or see the XACT Hosted PBX Administrator Guide ...

Page 92: ...Forwarding Deactivation 73 Busy Call Forwarding Activation 90 Busy Call Forwarding Deactivation 91 number to forward to No Answer Call Forwarding Activation 92 No Answer Call Forwarding Deactivation 93 number to forward to Park Call 55 Retrieve Parked Call 56 Do Not Disturb Activation 78 Do Not Disturb Deactivation 79 Automatic Recall 69 Group Call Pickup 11 Voicemail 86 ...

Reviews: