background image

M A - 5   Q C     S P E C T R O P H O T O M E T E R  

22


OPERATION 

The section explains instrument positioning techniques, Basic Measurement, Quick Compare, and running jobs 

from Job Templates. 

Instrument Positioning 

In order for the instrument to obtain accurate and repeatable measurements, the bottom of the measurement 

port must be flat with the sample surface to be measured. Any movement of the instrument can cause the 

measurement angles to vary, greatly affecting measurements on metallic and pearlescent paint finishes. The 

contact sensors ensure the integrity of the measurement data. 
Below is an example of how to position the instrument correctly to perform measurements. Refer to the Basic 

Measurement, Quick Compare Mode, and Using Job Templates sections that follow for information on starting a 

measurement sequence. 

IMPORTANT: 

  To avoid discomfort, do not look directly into the measurement optics when the instrument is on and 

measuring. 

  Do not move instrument while taking a sample measurement. If motion is detected by the contact 

sensors, an error message will be displayed and the measurement aborted. 

  Measurement performance may decline under certain condensing conditions. 

  It is recommended to keep the sample around 23°C (73°F) as temperature could have influence on the 

color measurement. 

  Do not move the instrument on the sample surface with pressure. This may cause scratches to the 

sample surface. 

1.


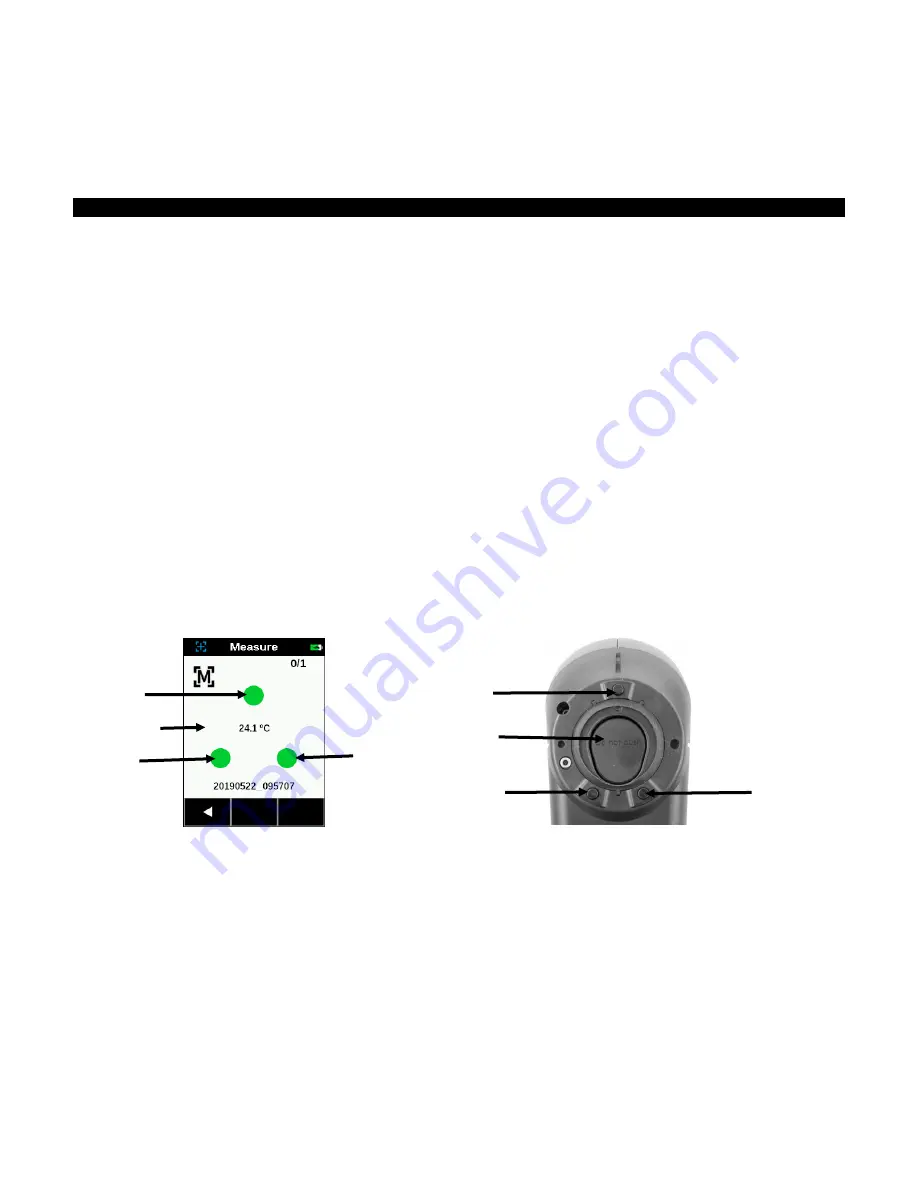
Locate the measurement port (1) in the bottom of the instrument over the first measurement area while 

viewing the screen (2). 

2.


Gently rock the instrument until all three positioning indicators (3) in the screen turn green. This indicates 

that all three contact sensors (4) are activated. 


3.


Hold the instrument steady and press the Measure button or tap the screen to initiate a measurement in 

case the instrument is configured in Manual Mode. If the instrument is configured in Automatic Mode, the 

measurement will be triggered as soon as (with a one-second delay) the instrument is correctly positioned 

on the sample and all pins are in contact (green indicators on UI). You can also initiate a measurement by 

tapping the screen in Automatic Mode if desired

Continue to hold the instrument steady until the progress 

bar in the screen reaches 100%. 

NOTE

: If an error occurs after the measurement, tap 

OK

 on the screen and try measuring again. 

4.


Continue with the remaining area measurements as required. 

5.


Refer to the Basic Measurement, Quick Compare Mode, and Using Job Templates sections that follow. 


(2) 

(3) 

(3) 

(3) 

(1) 

(4) 

(4) 

(4) 

Summary of Contents for MA-5 QC

Page 1: ...MA 5 QC Spectrophotometer TOP Spectrophotometer User Guide...

Page 2: ...uipment generates uses and can radiate radio frequency energy and if not installed and used in accordance with the instruction manual may cause harmful interference to radio communications Operation o...

Page 3: ...hotometer Para maiores informa es consulte o site da ANATEL www anatel gov br Este equipamento n o tem direito prote o contra interfer ncia prejudicial e n o pode causar interfer ncia em sistemas devi...

Page 4: ...ument is working properly Refer to the Calibration section for information on performing a Calibration Instructions for disposal Please dispose of Waste Electrical and Electronic Equipment WEEE at des...

Page 5: ...i using the device in an operating environment outside the recommended specifications e g water rain or failure to follow the maintenance procedures in X Rite s accompanying documentation or published...

Page 6: ...LIABLE FOR ANY OF BUYER S MANUFACTURING COSTS OVERHEAD LOST PROFITS GOODWILL OTHER EXPENSES OR ANY INDIRECT SPECIAL INCIDENTAL OR CONSEQUENTIAL DAMAGES BASED UPON BREACH OF ANY WARRANTY BREACH OF CONT...

Page 7: ...b Templates 1 13 Settings Mode 2 13 Quick Compare 3 13 Basic Measurement 4 13 Header Bar 5 13 Calibration mode 6 13 Power off 7 13 Connect WiFi 8 13 Settings Mode 14 Entering Settings Mode 14 Calibrat...

Page 8: ...pare Mode 26 Creating Standards 26 Comparing Standards to Samples 28 Deleting Samples 29 Using Job Templates 30 Running a Job from a Job Template 30 Deleting Jobs 31 Viewing Job Data 32 Appendices 34...

Page 9: ...rument USB interface cabling Calibration reference Safety strap Screen protector Spare light seal Targeting shoe Stylus Certificate of Performance MA 3 and MA 5 Spectrophotometer Safety Compliance Inf...

Page 10: ...con The instrument will not power off while plugged into the computer USB port however it will go into standby mode This is indicated by a blue pulsing LED A full charge from empty will take 6 hours c...

Page 11: ...creen is used to return the screen to the previous view Settings and jobs are accessed by tapping the corresponding icon on the Home screen For this example the Settings icon was tapped to open the Se...

Page 12: ...aintained for the duration of the measurement an error message will appear on the display and the measurement must be retaken Red Indicator the required contact is not being applied to the correspondi...

Page 13: ...ke quick measurements with no standard comparison Measurement data can be viewed and deleted as needed Refer to Basic Measurement section for more information Header Bar 5 Displays the current mode ti...

Page 14: ...the options tap the Left arrow at the bottom to return the screen to the Home view 5 Refer below for information on configuring each Settings option Calibration This option is used to activate the ca...

Page 15: ...n is not utilized Automatic When set to Automatic default setting the instrument automatically switches to dark mode after a dark sample is detected Speaker Mode This option is used to turn the instru...

Page 16: ...is of the measurements mean and standard deviations eliminates outliers and determines the variability of the measurements The number of required measurements 5 along with the maximum number of measur...

Page 17: ...ess tap the Device Mode icon and then tap MA 5 default or MA94 Device Information This option is used to view important instrument information such as hardware version calibration reference serial num...

Page 18: ...on Factory Reset This option is used to reset the instrument to its factory default settings All stored samples and calibration data will also be lost with the factory reset Calibration on the clean c...

Page 19: ...gured in the settings menu the device always connects to WLAN as soon as available This is indicated by the WiFi icon in the header bar which turns from greyed out to white 1 From the Home screen tap...

Page 20: ...ndices for calibration reference cleaning procedures Do not move instrument while taking a calibration measurement If motion is detected by the contact sensors an error message will be displayed and c...

Page 21: ...tile again If an error still occurs clean the white calibration tile as explained in the Appendices If the issue persists perform Factory Reset in the Settings menu turn the device off and on and rep...

Page 22: ...condensing conditions It is recommended to keep the sample around 23 C 73 F as temperature could have influence on the color measurement Do not move the instrument on the sample surface with pressure...

Page 23: ...ition the instrument on the first sample area to measure as explained in Instrument Positioning 5 Hold the instrument steady and press the Measure button or tap the screen to initiate a measurement in...

Page 24: ...creen or press the Measure button Viewing Measurement Data Lab data can be viewed for each basic measurement 1 Tap the desired job from the list on the measurement screen 2 Tap Show Results to view th...

Page 25: ...ou want to delete the job The screen returns to the Measurements screen All Job 1 Tap the desired job from the list on the measurement screen If serval jobs are available press and hold the Down arrow...

Page 26: ...rt a new standard measurement 3 The Standard Name screen appears with a default standard name Delete the entire entry by pressing the x icon for 2 seconds Enter a standard name using the virtual keybo...

Page 27: ...2 section 5 2 NOTE 1 r45as15 is formally not required in DIN 6175 2 5 The instrument goes into measure mode Position the instrument on the standard to measure as explained in Instrument Positioning 6...

Page 28: ...le at the top of the screen 4 The Sample Name screen appears Enter a sample name using the virtual keyboard Click the Enter icon to save the sample name 5 The instrument goes into measure mode Positio...

Page 29: ...Samples You can delete individual samples or all sample at once from a selected standard Single Sample 1 Tap the desired standard from the list on the Standards screen NOTE Standards that appear gray...

Page 30: ...software application for analysis Refer to the software application for specific information on creating job templates downloading job templates and uploading job data Running a Job from a Job Templat...

Page 31: ...easurement displays a icon next to the checkpoint NOTE If desired you can redo an unsuccessful checkpoint measurement by taping the checkpoint and then tapping the Remeasure button Measurement results...

Page 32: ...he screen 4 A message appears asking you to confirm that you want to delete all jobs Tap Yes to confirm or No to return to the Job screen Viewing Job Data 1 Tap the job to view 2 Tap the checkpoint fo...

Page 33: ...ure the checkpoint Data fields in tolerance appear green and red for out of tolerance Data fields can also appear yellow for a close to limit pass 4 Swipe the screen up or down to view previous or nex...

Page 34: ...t be used to clean the instrument Cleaning the instrument with blown air can cause dirt on the outside of the instrument to enter into the device and contaminate optical components Cleaning the Calibr...

Page 35: ...ll battery connector outward and remove the old battery pack 4 Insert the new battery pack into the clip and plug in the battery connector 5 Reattach the side panel and insert the long screw in the ba...

Page 36: ...e power measure button for 10 seconds and then release Instrument turns off Instrument can be started normally Measurement error or results appear inaccurate Material being measured is damaged e g scr...

Page 37: ...or when lifted there may be a problem with the contact sensor Contact technical support WiFi not connected WiFi turned off Turn on WiFi in Settings menu or tap Connect in home screen to connect once W...

Page 38: ...tance Battery Life Time 2 000 measurements Memory 500 jobs Weight 1 32 lb 0 6 kg Size L 7 08 x W 2 75 x H 3 74 L 180 mm x W 70 mm x H 95 mm Calibration Internal external white Calibration Interval 21...

Page 39: ...eadquarters X Rite Europe GmbH Althardstrasse 70 8105 Regensdorf Switzerland Phone 41 44 842 24 00 Fax 41 44 842 22 22 Asia Pacific Headquarters X Rite Asia Pacific Limited Suite 2801 28th Floor AXA T...

Reviews: