background image

83

12

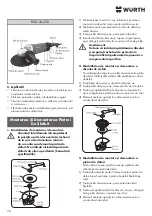
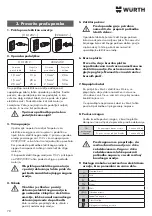
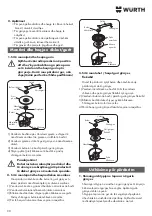
5.  Prilagajanje postavitve glave  

na kotni brusilki

  Odstranite zatič iz svojega mesta pred uporabo. 

Za uporabo v navedene zgornje primere zavrtite 

glavo brusilnika za 90° namesto, da bi zavrteli 

ročaj naprave. Nato odvijte štiri vijake, ki so na 

glavi brusilnika. Glave ne odstranjujte popolnoma iz 

ohišja ampak jo samo zavrtite v željeni položaj. Po 

nastavitvi čvrsto privijte nazaj vijake.

6.  Kako obrniti ročaj na kotni brusilki

20

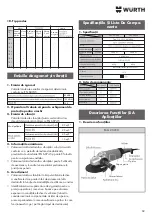
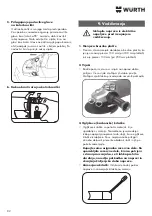
2. Pressing angle

  Do not press the whole surface of the grinding stone to 

the grinding surface. It is recommended to use the disc 

grinder by inclining it in 15-30 degrees as the picture to 

do grinding work with circumference of the grinding 

stone.

3.  Grinding direction

  When using a new grinding stone, be certain to grind 

while pulling tool backwards (B direction) until the 

grinding stone becomes rounded on its edge. Then, the 

grinder can be moved to any direction.

  This grinding stone (Grinding particle: A, Mesh: #36) is 

best for heavy grinding in general steel materials. Also, 

it can be used in wide range of other materials. For its 

lower mesh, apply the grinding stone to the work 

material lightly and grind steadily to create smooth 

finishing surface that can be made by the grinding stone 

with higher mesh.

4.  Caution after use

  Switch off to stop the rotation of the grinding stone, and 

keep the disc grinder in safe place.

  When you keep the disc grinder with the grinding stone 

rotated in the place filled with dust and shavings, dust 

and shavings can be gotten into the disc grinder.

The grinding stone can be cracked or 

grooved by an impact. Please take care 

not to impact on the disc grinder. If the 

disc grinder is hit against something or 

fallen down, you must check the 

grinding stone and disc grinder.

5.  How to rotate the head of the disc grinder 

  Remove the plug from plug socket before any operation. 

For the above purpose, rotate the head of the disc 

grinder in a 90-degree turn instead of rotating the 

handle. And then, unscrew four screws and the head. 

Do not remove the head from the main body wholly but 

rotate to new position. After that, set four screws and 

fasten them.

20

6. How to rotate the handle of the disc grinder 

Disconnect the plug from the power 

supply before making any maintenance.

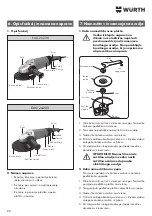
1. Change of the grinding stone

  Please change the grinding stone with new one when 

outer diameter of the grinding stone in 180mm is worn 

to


100mm


(For


the


grinding stone in 230mm is


130mm).

2. Screws

  Make sure screws in each part are set tightly at regular 

intervals. When screws are loose, fasten them tightly. 

The loose screw causes the danger situation.

3. Carbon brush

  Disposable carbon brush is used in the motor. The 

heavily worn carbon brush causes the trouble of the 

motor.

  When the length of the carbon brush is reached at the 

wear tolerance line, change it with new carbon brush.

  Also, keep the carbon brush clean to be moved in the 

brush holder freely.


Maintenance


Side handle

20

2. Pressing angle

  Do not press the whole surface of the grinding stone to 

the grinding surface. It is recommended to use the disc 

grinder by inclining it in 15-30 degrees as the picture to 

do grinding work with circumference of the grinding 

stone.

3.  Grinding direction

  When using a new grinding stone, be certain to grind 

while pulling tool backwards (B direction) until the 

grinding stone becomes rounded on its edge. Then, the 

grinder can be moved to any direction.

  This grinding stone (Grinding particle: A, Mesh: #36) is 

best for heavy grinding in general steel materials. Also, 

it can be used in wide range of other materials. For its 

lower mesh, apply the grinding stone to the work 

material lightly and grind steadily to create smooth 

finishing surface that can be made by the grinding stone 

with higher mesh.

4.  Caution after use

  Switch off to stop the rotation of the grinding stone, and 

keep the disc grinder in safe place.

  When you keep the disc grinder with the grinding stone 

rotated in the place filled with dust and shavings, dust 

and shavings can be gotten into the disc grinder.

The grinding stone can be cracked or 

grooved by an impact. Please take care 

not to impact on the disc grinder. If the 

disc grinder is hit against something or 

fallen down, you must check the 

grinding stone and disc grinder.

5.  How to rotate the head of the disc grinder 

  Remove the plug from plug socket before any operation. 

For the above purpose, rotate the head of the disc 

grinder in a 90-degree turn instead of rotating the 

handle. And then, unscrew four screws and the head. 

Do not remove the head from the main body wholly but 

rotate to new position. After that, set four screws and 

fasten them.

20

6. How to rotate the handle of the disc grinder 

Disconnect the plug from the power 

supply before making any maintenance.

1. Change of the grinding stone

  Please change the grinding stone with new one when 

outer diameter of the grinding stone in 180mm is worn 

to


100mm


(For


the


grinding stone in 230mm is


130mm).

2. Screws

  Make sure screws in each part are set tightly at regular 

intervals. When screws are loose, fasten them tightly. 

The loose screw causes the danger situation.

3. Carbon brush

  Disposable carbon brush is used in the motor. The 

heavily worn carbon brush causes the trouble of the 

motor.

  When the length of the carbon brush is reached at the 

wear tolerance line, change it with new carbon brush.

  Also, keep the carbon brush clean to be moved in the 

brush holder freely.


Maintenance


Side handle

  Izklopite napravo iz električne 

napeljave pred izvajanjem 

vzdrževanja.

1.  Menjava brusilne plošče

•  Prosimo, da zamenjate obrabljeno brusilno ploščo, ko 

je njen zunanji premer 100 mm (pri 180 mm ploščah) 

in ko je premer 130 mm (pri 230 mm ploščah).

2. Vijaki

•  Bodite pozorni, da so vsi vijaki na napravi dobro 

pritrjeni. Če so vijaki zrahljani jih dobro privijte. 

Zrahljani vijaki lahko privedejo do nevarnih poškodb.


3. Ogljikove (karbonske) krtačke

•  Ogljikove krtačke so potrošni materjal, ki je 

uporabljen v motorju. Nameščeno je samodejen 

izklop napajanja naprave (avto-stop), ko so ogljikove 

krtačke izrabljene. Ko se naprava noče prižgati 

ali neha delovati, preverite obrabo krtačk in jih po 

potrebi zamenjajte.

•  Kupujte samo originalne rezervne dele. Ko 

uporabljate rezervne dele, ki niso potrjeni 

s strani proizvajalca, se ti lahko prehitro 

obrabijo, naredijo poškodbo na napravi in 

skrajšajo življenjsko dobo naprave.

• 

Zamenjava krtačk: 

Odstranite zadnji pokrov 

naprave in zamenjajte krtačke na motorju.

9. Vzdrževanje

17

Check before Use

2. The extension cord

  When the power source is located far from your 

location, you may use the extension cord. However, you 

should use the extension cord with proper length and 

thickness not to prohibit the current. When you use too 

long or thin extension cord, the voltage drop will be 

higher. In result, the power of the motor will be 

decreased. Please use the shortest extension cord 

possible.

When the extension cord is damaged, 

you must change or repair it 

immediately.

3. The power source

  You must use the tool in the power source specified in 

the nameplate. When you use the tool for 110V in 

220V/230V, the speed of the motor will be increased 

abnormally. In result, the grinding stone and the tool 

may be damaged.

When you use the tool for 110V in 

220V/230V, the motor can be damaged 

by a fire.

4. The switch

When you plug in the power source with 

the tool switched on, you may be injured 

seriously by sudden rotating of the tool.

  Make sure the switch lever is returned to its original 

position by pushing or pulling it.

5. The wheel guard

The wheel guard is a protective wall 

preparing for the damage of the 

grinding stone. You must install the 

wheel guard.

  You can set the desired angle of the wheel guard by 

unfastening two small screws. Please use the tool after 

adjusting the angle of the wheel guard for the work. 

After adjustment, please fasten two small screws tightly.

6.  Checking and installing the grinding stone

Be sure the grinding stone is in normal 

condition and free from cracks or 

damage. Make sure the grinding stone is 

installed securely. To install the grinding 

stone, see to the section installing and 

removing grinding stone.

7. Mains Outlet

  When inserting the plug, if a sound is heard or if it is a 

taken out easily, you must repair it. Please contact 

nearby electric shop.

  When you use the mains outlet as it is, it causes the 

accident by overheating.

8.  Trial run

  Always make a trial run before operation with grinding 

stone pointed away from people to check the tool.

Before switching on the disc grinder, be 

sure the rotating part of the disc grinder 

is not contacted work material. 

Accidental switching on with contacted 

other objects may cause personal injury 

by damaged grinding stone.

9.  An explanation of any symbols or 

pictograms marked on the tool relevant to 

safe use

10. Product type

Nominal cross

section of 

conductor

1.0 mm²

1.5 mm²

2.5 mm²

Nominal cross

section of 

conductor

1.0 mm²

1.5 mm²

2.5 mm²

Max.

lenght

10 m

15 m

25 m

Max.

lenght

20 m

30 m

50 m

110-120 V

220-240 V

Trial run time

When replacing grinding stone

When using grinder initialy

3 minutes or more

1 minute or more

n

V
A

Hz

W

/min

~

rated speed
volts
amperes
hertz
watts

Handle

Only 

plastic

Soft- 

starter

Restart- 

pro

Soft-starter

plastic

+

rubber

Lock-off

(2pole,

2 terminal)

Lock-on

(2pole,

2 terminal)

Lock-on

(1pole,

4 terminal)

Switch

Controller

Product

TYPE 1

TYPE

TYPE 2
TYPE 3

TYPE 4
TYPE 5
TYPE 6

TYPE 7
TYPE 8

revolutions or reciprocations per minute
alternating current
Class II construction
Disposal of Old Electrical & 

Electronic Equipment

1. Connection to Power Supply


[110-120 V ] 

[220-240 V ]

~

~

20

2. Pressing angle

  Do not press the whole surface of the grinding stone to 

the grinding surface. It is recommended to use the disc 

grinder by inclining it in 15-30 degrees as the picture to 

do grinding work with circumference of the grinding 

stone.

3.  Grinding direction

  When using a new grinding stone, be certain to grind 

while pulling tool backwards (B direction) until the 

grinding stone becomes rounded on its edge. Then, the 

grinder can be moved to any direction.

  This grinding stone (Grinding particle: A, Mesh: #36) is 

best for heavy grinding in general steel materials. Also, 

it can be used in wide range of other materials. For its 

lower mesh, apply the grinding stone to the work 

material lightly and grind steadily to create smooth 

finishing surface that can be made by the grinding stone 

with higher mesh.

4.  Caution after use

  Switch off to stop the rotation of the grinding stone, and 

keep the disc grinder in safe place.

  When you keep the disc grinder with the grinding stone 

rotated in the place filled with dust and shavings, dust 

and shavings can be gotten into the disc grinder.

The grinding stone can be cracked or 

grooved by an impact. Please take care 

not to impact on the disc grinder. If the 

disc grinder is hit against something or 

fallen down, you must check the 

grinding stone and disc grinder.

5.  How to rotate the head of the disc grinder 

  Remove the plug from plug socket before any operation. 

For the above purpose, rotate the head of the disc 

grinder in a 90-degree turn instead of rotating the 

handle. And then, unscrew four screws and the head. 

Do not remove the head from the main body wholly but 

rotate to new position. After that, set four screws and 

fasten them.

20

6. How to rotate the handle of the disc grinder 

Disconnect the plug from the power 

supply before making any maintenance.

1. Change of the grinding stone

  Please change the grinding stone with new one when 

outer diameter of the grinding stone in 180mm is worn 

to


100mm


(For


the


grinding stone in 230mm is


130mm).

2. Screws

  Make sure screws in each part are set tightly at regular 

intervals. When screws are loose, fasten them tightly. 

The loose screw causes the danger situation.

3. Carbon brush

  Disposable carbon brush is used in the motor. The 

heavily worn carbon brush causes the trouble of the 

motor.

  When the length of the carbon brush is reached at the 

wear tolerance line, change it with new carbon brush.

  Also, keep the carbon brush clean to be moved in the 

brush holder freely.


Maintenance


Side handle

20

2. Pressing angle

  Do not press the whole surface of the grinding stone to 

the grinding surface. It is recommended to use the disc 

grinder by inclining it in 15-30 degrees as the picture to 

do grinding work with circumference of the grinding 

stone.

3.  Grinding direction

  When using a new grinding stone, be certain to grind 

while pulling tool backwards (B direction) until the 

grinding stone becomes rounded on its edge. Then, the 

grinder can be moved to any direction.

  This grinding stone (Grinding particle: A, Mesh: #36) is 

best for heavy grinding in general steel materials. Also, 

it can be used in wide range of other materials. For its 

lower mesh, apply the grinding stone to the work 

material lightly and grind steadily to create smooth 

finishing surface that can be made by the grinding stone 

with higher mesh.

4.  Caution after use

  Switch off to stop the rotation of the grinding stone, and 

keep the disc grinder in safe place.

  When you keep the disc grinder with the grinding stone 

rotated in the place filled with dust and shavings, dust 

and shavings can be gotten into the disc grinder.

The grinding stone can be cracked or 

grooved by an impact. Please take care 

not to impact on the disc grinder. If the 

disc grinder is hit against something or 

fallen down, you must check the 

grinding stone and disc grinder.

5.  How to rotate the head of the disc grinder 

  Remove the plug from plug socket before any operation. 

For the above purpose, rotate the head of the disc 

grinder in a 90-degree turn instead of rotating the 

handle. And then, unscrew four screws and the head. 

Do not remove the head from the main body wholly but 

rotate to new position. After that, set four screws and 

fasten them.

20

6. How to rotate the handle of the disc grinder 

Disconnect the plug from the power 

supply before making any maintenance.

1. Change of the grinding stone

  Please change the grinding stone with new one when 

outer diameter of the grinding stone in 180mm is worn 

to


100mm


(For


the


grinding stone in 230mm is


130mm).

2. Screws

  Make sure screws in each part are set tightly at regular 

intervals. When screws are loose, fasten them tightly. 

The loose screw causes the danger situation.

3. Carbon brush

  Disposable carbon brush is used in the motor. The 

heavily worn carbon brush causes the trouble of the 

motor.

  When the length of the carbon brush is reached at the 

wear tolerance line, change it with new carbon brush.

  Also, keep the carbon brush clean to be moved in the 

brush holder freely.


Maintenance


Side handle

13

repair the tool for themselves. Contact nearby A/S 

center (agencies) for solution.

7. X attachment cord

  If the supply cord of this power tool is damaged, it must 

be replaced by a specially prepared cord available 

through the service organization.

We declares that these products meet the standards

EN 60745-1, EN 60745-2-3, EN 55014-1, EN 55014-2,

EN 61000-3-2, EN 61000-3-3 in compliance with the 

directives 2006/42/EC, 2004/108/EC, 2011/65/EU.

EC Declaration of conformity


D. Assimosis 


M. Weiss

General Manager 


Executive Vice President

Technical documentation at:

Würth Hellas SA

23rd


Km


Athens-Lamia


National


Road,


145


68


Krioneri


Attica,


Greece

6. Abnormal operation

  It is very dangerous for customers to troubieshoot or 

repair the tool for themselves. Contact nearby A/S 

center (agencies) for solution.

7. X attachment cord

  If the supply cord of this power tool is damaged, it must 

be replaced by a specially prepared cord available 

through the service organization.

We declares that these products meet the standards

EN 60745-1, EN 60745-2-3, EN 55014-1, EN 55014-2,

EN 61000-3-2, EN 61000-3-3 in compliance with the 

directives 2006/42/EC, 2004/108/EC, 2011/65/EU.

EC Declaration of conformity


D. Assimosis 


M. Weiss

General Manager 


Executive Vice President

Technical documentation at:

Würth Hellas SA

23rd


Km


Athens-Lamia


National


Road,


145


68


Krioneri


Attica,


Greece

Disposal of Old Electrical & Electronic Equipment (Applicable in the European Union and 

other European countries with separate collection systems)

This symbol on the product or on its packaging indicates that this product shall 

not be treated as household waste. Instead it shall be handed over to the 

applicable  collection  point  for  the  recycling  of  electrical  and  electronic 

equipment. By ensuring this product is disposed of correctly, you will help 

prevent  potential  negative  consequences  for the  environment  and  human 

health, which could otherwise be caused by inappropriate waste handling of 

this product. The recycling of materials will help to conserve natural resources. 

For more detailed information about recycling of this product, please contact 

your local city office, your household waste disposal service or the shop 

where you purchased the product.

*  We may apply the auto-stop carbon brush for 

improvement in quality without previous notice. Auto-

stop will interrupt current automatically for wear of the 

carbon brush. When the disc grinder is stopped for the 

built-in auto-stop, check the carbon brush and change it.


 How to change

: Remove the brush cap with the 

minus driver to take off the carbon brush.

You must purchase the genuine parts in 

A/S centers authorized by Würth 

company for change. When you use the 

carbon brush other than the genuine 

parts, the commutator may be worn 

rapidly. In result, the life of the tool can 

be shortened.

4. Motor

  The winding and commutator in the motor are the core 

of the disc grinder.

  Do not scratch the surface of the winding and 

commutator in the motor, and do not apply oil or water 

on it.

Dust in the motor causes the trouble of 

the motor. After using the disc grinder 

for 50hours, let the compressed air in the 

ventilation slots in the handle side by 

rotating the disc grinder in no-load 

revolution to eliminate dust from the 

motor.

5.  Keep after operation


You must keep the tool out of reach of children in dry 

place.

6. Abnormal operation

  It is very dangerous for customers to troubieshoot or 

repair the tool for themselves. Contact nearby A/S 

center (agencies) for solution.

7. X attachment cord

  If the supply cord of this power tool is damaged, it must 

be replaced by a specially prepared cord available 

through the service organization.

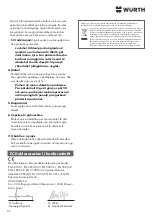
Zagotavljamo, da se izdelki skladajo z naslednjimi 

standardi: EN 60745-1, EN 60745-2-3, EN 55014-1, EN 

55014-2, EN 61000-3-2, EN 61000-3-3   

v skladu z direktivami 2006/42/EC, 2014/30/EU, 

2011/65/EU.
Tehnična dokumentacija je na voljo pri:  

Würth Hellas SA, 23rd Km Athens-Lamia National Road,  

14568 Krioneri Attica, Grčija

D. Assimosis 


M. Weiss 

Generalni direktor  


Izvršni podpredsednik

V skladu z Direktivo 2012/19/EU 

Evropskega Parlamenta in Sveta o odpadni 

električni in elektronski opremi (OEEO) 

in njeni uresničitvi v nacionalnem pravu 

se morajo električna orodja, ki niso več v 

uporabi, ločeno zbirati ter okolju prijazno 

reciklirati.

4. Motor

•  Navitje in komutator motorja sta jedro brusilke.
•  Ne krtačite ali brusite navitja in komutatorja motorja, 

ne nanašajte olja ali vode nanju.


Prah v motorju povzro

č

a napake pri 

delovanju. Pri stalnu uporabi brusilke 

pogosto izpihajte ventilacijski del motorja 

skozi re

ž

e s stisnjenim zrakom.

5. Varno shranjevanje naprave

Brusilko shranjujte na varnem in suhem prostoru. 

Preprečite dostop otrokom.

6. Servis

Zelo nevarno je, če se sami lotite odpravljanja napak 

ali servisiranja naprave. To naj opravi pooblaščen 

serviser, kontaktirajte prodajalca naprave.

7. Priklju

č

ni kabel

•  Če je napajalni kabel poškodovan, morate poskrbeti 

za zamenjavo s primernim napajalnim kablom.

•  To naj opravi pooblaščen serviser, kontaktirajte 

prodajalca naprave.

10. CE izjava o skladnosti 

Summary of Contents for EAG 20-230

Page 1: ...ns Μετάφραση της γνήσιας οδηγίας λειτουργίας Originalne upute za uporabu Originalne upute za uporabu Prevod originalnog uputstva za rad Prevod originalnog uputstva za rad Превод на оригиналното ръководство за експлоатация Traducerea instrucţiunilor de exploatare originale Prevod originalnega Navodila za uporabo Përkthim nga origjinali i udhëzimit për përdorim ...

Page 2: ...2 DE 3 12 GB 13 21 GR 22 32 HR 33 41 BiH 33 41 RS 42 50 ME 42 50 bg 51 62 Ro 63 72 SI 73 83 AL 84 92 ...

Page 3: ...ose passen Modifizieren Sie den Stecker nie und in keiner Weise Verwenden Sie keine Adapterstecker mit geerdeten Elektrowerkzeugen Nicht modifizierte Stecker und passende Steckdosen reduzieren das Risiko eines Elektroschocks b Vermeiden Sie Körperkontakt mit geerdeten Oberflächen wie z B Rohren Heizkörpern Herden und Kühlschränken Wenn Ihr Körper geerdet ist besteht ein erhöhtes Risiko eines Elekt...

Page 4: ...ragen Sie Gehörschutz Lärmeinwirkung kann Gehörverlust verursachen i Verwenden Sie die mit dem Werkzeug mitgelieferten zusätzlichen Griffe Verlust der Kontrolle kann Verletzungen verursachen 4 Verwendung und Pflege von Elektrowerkzeugen a Üben Sie keine Gewalt auf das Elektrowerkzeug aus Verwenden Sie das richtige Elektrowerkzeug für Ihre Anwendung Das richtige Elektrowerkzeug wird die Arbeit bess...

Page 5: ...ce vibrieren übermäßig und können zum Verlust der Kontrolle führen g Verwenden Sie keine beschädigten Zubehörteile Überprüfen Sie vor jeder Verwendung die Zubehörteile wie z B Schleifscheiben auf Späne und Kratzer Schleifteller auf Kratzer Abnutzung oder übermäßigen Verschleiß und Drahtbürsten auf lose oder gebrochene Drähte Nach einem Sturz des Elektrowerkzeugs oder eines Zubehörteils überprüfen ...

Page 6: ...nde Vorsichtsmaßnahmen wie unten beschrieben vermieden werden a Halten Sie das Elektrowerkzeug fest und positionieren Sie Ihren Körper und Ihren Arm damit Sie den Rückschlagkräften entgegen wirken können Falls verfügbar benutzen Sie immer den zusätzlichen Griff damit Sie einem Rückschlag oder einer Drehmomentreaktion während des Anlaufens entgegen wirken können Der Bediener kann Drehmomentreaktion...

Page 7: ...wenn das Elektrowerkzeug gestartet wird und die Scheibe das Werkstück berührt e Stützen Sie Platten oder andere übergroße Werkstücke um das Risiko dass die Scheibe verklemmt und zurück schlägt zu vermeiden Große Werkstücke neigen dazu unter ihrem eigenen Gewicht durch zu hängen Stützen Sie das Werkstück in der Nähe der Schnittlinie und in der Nähe der Kante des Werkstücks auf beiden Seiten der Sch...

Page 8: ...stellt haben Nach der Einstellung ziehen Sie die beiden kleinen Schrauben fest an 6 Prüfen und Einbauen der Schleifscheibe Vergewissern Sie sich dass sich die Schleifscheibe in einem normalen Zustand befindet und keine Kratzer oder Beschädigungen aufweist Vergewissem Sie sich dass die Schleifscheibe sicher eingebaut ist Das Einbauen der Schleifscheibe wird im Abschnitt Ein und Ausbauen der Schleif...

Page 9: ... A 103 dB A 3 dB Material Nur Plastik Sanftanlauf Wiederanlauf schutz Sanftanlauf Plastik Gummi Verriegelung AUS 2Phasen 2 Terminals Verriegelung EIN 2Phasen 2 Terminals Verriegelung EIN 1Phase 4 Terminals Schalter Steuerung Product TYP 1 TYP TYP 2 TYP 3 TYP 4 TYP 5 TYP 6 TYP 7 TYP 8 Mit A bewerteter Lärmdruckpegel L pA Mit A bewerteter Schallleistungspegel L wA Korrektur K Lärmemissionswert a h L...

Page 10: ...cheibe der Spindel wie beim Einbau einer Schleifscheibe Danach setzen Sie den Schleifteller und die flexible Schleifscheibe nacheinander ein 2 Setzen Sie die Mutter über der flexiblen Schleifscheibe auf die Spindel 3 Fixieren Sie die Achse der Spindel indem Sie den Arretierknopfdrücken Danach ziehen Sie die Mutter mit dem Schraubenschlüssel fest 2 Anwendung Für Finish Arbeiten oder um Splitter von...

Page 11: ...terial Darüber hinaus kann es auch für eine ganze Reihe anderer Materialien verwendet werden 4 Vorsicht nach dem Gebrauch Schalten Sie aus um die Drehung der Schleifscheibe zu stoppen und legen Sie den Winkelschleifer an einen sicheren Platz Wenn Sie den Winkelschleifer mit drehender Schleifscheibe an einem Platz mit viel Staub und Schleifresten ablegen können Staub und Schleifreste ins Innere des...

Page 12: ...emäßeEntsorgungdiesesProduktsentstehenkönnten Recycling alter Materialien trägt dazu bei die natürlichen Ressourcen zu erhalten Für mehr Informationen über das Recycling dieses Produkts kontaktieren Sie bitte Ihre Stadtverwaltung die zuständige Entsorgungsstelle oderdasGeschäft indemSiedasProduktgekaufthaben 1 Wechseln des Schleifsteins Ersetzen Sie den Schleifstein mit einem neuen wenn der äußere...

Page 13: ...rthed or grounded c Do not expose power tools to rain or wet coditions Water entering a power tool will increase the risk of electric shock d Do not abuse the cord Never use the cord carrying pulling or unpluging the power tool Keep cord away from heat oil sharp edges or moving parts Damaged or entangled cords increase the risk of electric shock e When operating a power tool outdoors use an extens...

Page 14: ...ikely to bind and are easier to control g Use the power tool accessories and tool bits etc in accordance with these instructions taking into account the working conditions and the work to be performed Use of the power tool for operations diff erent from those intended could result in a hazardous situation 5 Service a Have your power tool serviced by a qualified repair person using only identical r...

Page 15: ...cessory into your body n Regularly clean the power tool s air vents The motor s fan will draw the dust inside the housing and excessive accumulation of powdered metal may cause electrical hazards o Do not operate the power tool near flammable materials Sparks could ignite these materials p Do not use accessories that require liquid coolants Using water or other liquid coolants may result in electr...

Page 16: ...son switch off the power tool and hold the power tool motionless until the wheel comes to a complete stop Never attempt to remove the cut off wheel from the cut while the wheel is in motion otherwise kickback may occur Investigate and take corrective action to eliminate the cause of wheel binding d Do not restart the cutting operation in the workpiece Let the wheel reach full speed and carefully r...

Page 17: ...grinding stone is in normal condition and free from cracks or damage Make sure the grinding stone is installed securely To install the grinding stone see to the section installing and removing grinding stone 7 Mains Outlet When inserting the plug if a sound is heard or if it is a taken out easily you must repair it Please contact nearby electric shop When you use the mains outlet as it is it cause...

Page 18: ...er time 1 Specifications Noise and Vibration Emissions Specifications and List of Contents Check before Use Description of Functions and Applications EAG 20 230 EAG 24 230 EAG 20 230 EAG 24 230 8 5 m s 2 0 m s 1 5 m s 4 5 m s Vibration emission value a h Vibration emission value a h Uncertainty K Uncertainty K Grinding mode Disk type sanding mode Items Rated speed Model Power source Motor Weight w...

Page 19: ...witch and disconnect the plug from the power supply before installing and removing grinding stone Never use the grinding stone below the peripheral velocity See to specifications Installing and Removing 1 Place the spindle upwards Insert the depressed part of the wheel washer onto the plane part of the spindle 2 Place the prominent part of the grinding stone onto the wheel washer 3 Set the wheel n...

Page 20: ...pact Please take care not to impact on the disc grinder If the disc grinder is hit against something or fallen down you must check the grinding stone and disc grinder 5 How to rotate the head of the disc grinder Remove the plug from plug socket before any operation For the above purpose rotate the head of the disc grinder in a 90 degree turn instead of rotating the handle And then unscrew four scr...

Page 21: ...he genuine parts in A S centers authorized by Würth company for change When you use the carbon brush other than the genuine parts the commutator may be worn rapidly In result the life of the tool can be shortened 4 Motor The winding and commutator in the motor are the core of the disc grinder Do not scratch the surface of the winding and commutator in the motor and do not apply oil or water on it ...

Page 22: ... πρέπει να ταιριάζουν με την πρίζα Ποτέ μην τροποποιείτε το φις με οποιονδήποτε τρόπο Μη χρησιμοποιείτε φις προσαρμογής με γειωμένα ηλεκτρικά εργαλεία Μη τροποποιημένα φις και αντίστοιχες πρίζες θα μειώσουν τον κίνδυνο ηλεκτροπληξίας β Αποφύγετε τη σωματική επαφή με γειωμένες επιφάνειες όπως σωλήνες καλοριφέρ κουζίνες και ψυγεία Υπάρχει αυξημένος κίνδυνος ηλεκτροπληξίας εάν είναι γειωμένο το σώμα ...

Page 23: ...ντίδα ηλεκτρικών εργαλείων α Μη ζορίζετε το ηλεκτρικό εργαλείο Χρησιμοποιήστε το σωστό ηλεκτρικό εργαλείο για τη δουλειά σας Το κατάλληλο ηλεκτρικό εργαλείο θα κάνει τη δουλειά καλύτερα και ασφαλέστερα στο βαθμό για τον οποίο σχεδιάστηκε β Μην χρησιμοποιήσετε το ηλεκτρικό εργαλείο εάν ο διακόπτης δεν το ενεργοποιεί και δεν το απενεργοποιεί Οποιοδήποτε ηλεκτρικό εργαλείο που δεν μπορεί να ελεγχθεί ...

Page 24: ...ορεί να προκαλέσουν απώλεια ελέγχου ζ Μην χρησιμοποιήσετε ένα κατεστραμμένο εξάρτημα Πριν από κάθε χρήση ελέγχετε τα εξαρτήματα όπως οι τροχοί λείανσης για σπασίματα και ραγίσματα τις βάσεις λειαντικών εξαρτημάτων για ρωγμές σκισίματα ή υπερβολική φθορά τις συρματόβουρτσες για χαλαρά ή ραγισμένα σύρματα Αν το ηλεκτρικό εργαλείο ή το εξάρτημα πέσει κάτω ελέγξτε για ζημιές ή τοποθετήστε ένα εξάρτημα...

Page 25: ...του ηλεκτρικού εργαλείου και μπορεί να αποφευχθεί με τη λήψη των κατάλληλων προφυλάξεων όπως αναφέρονται παρακάτω α Διατηρήστε μια στιβαρή λαβή στο ηλεκτρικό εργαλείο και τοποθετήστε το σώμα και το χέρι σας με τρόπο που να σας επιτρέπει να αντισταθείτε στις δυνάμεις του κλωτσήματος Πάντοτε χρησιμοποιείτε τη βοηθητική λαβή εφόσον παρέχεται για το μέγιστο έλεγχο κατά του κλωτσήματος ή της ροπής αντί...

Page 26: ...πανεκκινηθεί εντός του τεμαχίου εργασίας ε Στηρίξτε πάνελ ή οποιαδήποτε υπερμεγέθη τεμάχια εργασίας για να ελαχιστοποιήσετε το κίνδυνο κολλήματος και κλωτσήματος του τροχού Μεγάλα τεμάχια εργασίας τείνουν να λυγίζουν υπό το βάρος τους Πρέπει να τοποθετούνται υποστηρίγματα κάτω από το τεμάχιο εργασίας κοντά στη γραμμή κοπής και κοντά στο άκρα του τεμαχίου εργασίας και στις δύο πλευρές του τροχού στ...

Page 27: ... 240 V 1 Σύνδεση στην παροχή τροφοδοσίας 110 120 V 220 240 V μικρές βίδες Παρακαλούμε χρησιμοποιήστε το εργαλείο μετά τη ρύθμιση της γωνίας του προστατευτικού του τροχού για την εργασία Μετά τη ρύθμιση σφίξτε καλά τις δύο μικρές βίδες 6 Έλεγχος και τοποθέτηση του σμυριδοτροχού Βεβαιωθείτε ότι ο σμυριδοτροχός είναι σε κανονική κατάσταση και χωρίς ρωγμές ή ζημιές Βεβαιωθείτε ότι ο σμυριδοτροχός έχει...

Page 28: ...2 ακροδέκτες Κλείδωμα ενεργοποίησης 1 πόλος 4 ακροδέκτες Διακόπτης Σύστημα ελέγχου TYPE Προϊόν ΤΥΠΟΣ 1 ΤΥΠΟΣ ΤΥΠΟΣ 2 ΤΥΠΟΣ 3 ΤΥΠΟΣ 4 ΤΥΠΟΣ 5 ΤΥΠΟΣ 6 ΤΥΠΟΣ 7 ΤΥΠΟΣ 8 Η επιτρεπόμενη σταθμισμένη στάθμη ηχητικής πίεσης Lpa Η επιτρεπόμενη σταθμισμένη στάθμη ακουστικής ισχύος Lpa Αβεβαιότητα K 91 dB A 102 dB A 3 dB Λειτουργία λείανσης Λειτουργία λείανσης τύπου δίσκου 5 5 m s 2 0 m s 3 0 m s 1 5 m s Τιμή...

Page 29: ...ι αφαίρεση του εύκαμπτου σμυριδοτροχού Μπορείτε να χρησιμοποιήσετε τα ίδια παξιμάδια του τροχού και ροδέλα τροχού που χρησιμοποιούνται για το σμυριδοτροχό 1 Τοποθετήστε τη ροδέλα τροχού επάνω στην άτρακτο όπως στην τοποθέτηση του σμυριδοτροχού Στη συνέχεια τοποθετήστε τη βάση και τον εύκαμπτο σμυριδοτροχό ένα ένα 2 Τοποθετήστε το παξιμάδι του τροχού επάνω στην άτρακτο πάνω από τον εύκαμπτο σμυριδο...

Page 30: ...ξιμάδι τροχού Πλευρική χειρολαβή Αυτός ο σμυριδοτροχός Κόκκος λείανσης A Κόκκος 36 είναι καλύτερος για βαρέα λείανση γενικά σε υλικά χάλυβα Επίσης μπορεί να χρησιμοποιηθεί σε ένα ευρύ φάσμα άλλων υλικών Για χαμηλότερα μεγέθη κόκκου εφαρμόστε τον σμυριδοτροχό στο υλικό εργασίας ελαφρά και τρίψτε σταθερά για να δημιουργήσει ένα λείο φινίρισμα επιφάνειας που μπορεί να επιτευχθεί με τρίψιμο με κόκκο υ...

Page 31: ... 55014 1 EN 55014 2 EN 61000 3 2 EN 61000 3 3 σε συμμόρφωση με τις οδηγίες 2006 42 ΕΚ 2014 30 ΕU 2011 65 EU Αποσυνδέστε το φις από την πηγή τροφοδοσίας πριν εκτελέσετε οποιαδήποτε συντήρηση 1 Αλλαγή του σμυριδοτροχού Παρακαλούμε αλλάξτε το σμυριδοτροχό με ένα νέο όταν η εξωτερική διάμετρος του σμυριδοτροχού στα 180mm έχει φθαρεί στα 100mm Για το σμυριδοτροχό στα 230mm στα 130mm 2 Βίδες Βεβαιωθείτε...

Page 32: ...τρικού και ηλεκτρονικού εξοπλισμού Εξασφαλίζοντας ότι το προϊόν αυτό απορρίπτεται σωστά βοηθάτε στην πρόληψη πιθανών αρνητικών συνεπειών για το περιβάλλον και την ανθρώπινη υγεία οι οποίες θα μπορούσαν διαφορετικά να προκληθούν από ακατάλληλο χειρισμό του προϊόντος αυτού ως απόρριμμα Η ανακύκλωση υλικών θα βοηθήσει στην εξοικονόμηση φυσικών πόρων Για πιο λεπτομερείς πληροφορίες σχετικά με την ανακ...

Page 33: ...okovati ozbiljne ozljede b Izbjegavajte kontakt tijela s uzemljenim površinama kao što su cijevi radijatori i frižideri Ako je Vaše tijelo uzemljeno postoji povećan rizik od strujnog udara c Ne izlažite električne alate kiši ili vlažnim uvjetima Voda koja uđe u električni uređaj povećava opasnost od strujnog udara d Ne oštećujte kabl Nikada ne koristite kabl električnog alata za nošenje povlačenje...

Page 34: ...nim alatom ili ovim uputama da rukuju tim alatom Električni alati su opasni u rukama nestručnih osoba e Redovito održavajte električne alate Provjerite ima li iskrivljenih ili blokiranih pokretnih dijelova slomljenih ili na bilo koji drugi način oštećenih dijelova što bi moglo utjecati na rad električnog alata Ukoliko je oštećen električni alat prije upotrebe odnesite na popravak f Održavajte alat...

Page 35: ...zloženim metalnim dijelovima a korisnik će doživjeti strujni udar k Pozicionirajte kabel dalje od rotirajućeg alata Ako izgubite kontrolu kabel se može prerezati ili zaglaviti a zbog toga rotirajući dio može povući Vašu ruku ili šaku I Nikada ne spuštajte električni alat dok se potpuno ne zaustavi Dodatna oprema koja se vrti može zgrabiti površinu i istrgnuti električni alat iz Vaše ruke m Elektri...

Page 36: ...vati od zateznih matica brusnih ploča e Nemojte koristiti istrošene ploče većih električnih uređaja Ploča koja je namijenjena većem električnom uređaju nije prikladna za veće brzine manjeg uređaja i može se rasprsnuti 4 Dodatne sigurnosne upute za sve operacije rezanja Dodatna sigurnosna upozorenja specifična za radove abrazivnih rezanja a Nemojte ukliještiti reznu ploču ili primijeniti pretjerani...

Page 37: ...i predmet Slučajno uključivanje dok je ostvaren kontakt s drugim predmetima može izazvati osobne povrede oštećenom brusnom pločom Papir za šmirglanje koji je veći od brusnog podloška predstavlja opasnost od komadanja i može uzrokovati uklještenje trganje diska ili povratni udar 6 Dodatne sigurnosne upute za radove poliranja Sigurnosna upozorenja specifična za radove poliranja a Nemojte dopustiti d...

Page 38: ...dardu EN 60745 4 Sljedeće informacije Deklarirana ukupna vrijednost vibracija je mjerena u skladu sa standardnom metodom testiranja prema normi EN 60745 i može se koristiti za uspoređivanje jednog alata s drugim Deklarirana ukupna vrijednost vibracija također se može koristiti u preliminarnim procjenama izloženosti Specifikacije i popis sadržaja kutije EAG 20 230 EAG 24 230 Opis Nazivna brzina Mod...

Page 39: ...itni pokrov i nositi naočale tijekom korištenja brusilice sa abrazivnim alatima 2 Postavljanje i skidanje disk za šmirglanje Ne koristite isti podložak i maticu kao za brusnu ploču Molimo koristite drugi podložak i maticu za disk za šmirglanje 1 Postavite gumeni nosač i disk za šmirglanje na vreteno 2 Postavite ravnu maticu na vreteno iznad diska za šmirglanje 3 Fiksirajte vreteno pritiskom na pol...

Page 40: ...com radite u prostoriji u kojoj ima prašine i dlaka prašina i dlačice se mogu uvući u unutrašnjost brusilice Brusna ploča može napuknuti ili se ogrebati prilikom udarca Molimo Vas da pazite da brusnu ploču ne opterećujete na udar Ako je brusilica udarena ili ispadne provjerite jesu li brusna ploča i brusilica oštećeni 5 Kako zarotirati glavu brusilice lsključite utikač iz utičnice prije bilo kakvo...

Page 41: ... alat sami Za rješenje kontaktirajte obližnji prodajni centar 7 X napojni kabl Ukoliko je napojni kabl električnog alata oštećen mora biti zamijenjen posebno pripremljenim kablom dostupnim putem naše distributivne mreže lzjavljujemo da ovi proizvodi ispunjavaju standarde EN 60745 1 EN 60745 2 3 EN 55014 1 EN 55014 2 EN 61000 3 2 i EN 61000 3 3 u skladu s Direktivama 2006 42 EC 2014 30 EU 2011 65 E...

Page 42: ...inalni utikači i odgovarajuće utičnice smanjuju opasnost od strujnog udara b Izbegavajte kontakt sa uzemljenim površinama kao što su cevi radijatori šporeti i frižideri Postoji povećan rizik od strujnog udara ukoliko je vaše telo uzemljeno c Ne izlažite električne alate kiši ili vlažnim uslovima Voda koja uđe u električni uređaj povećava opasnost od strujnog udara d Ne oštećujte kabl Nikada ne kor...

Page 43: ...su opasni u rukama neobučenih osoba e Održavanje električnog alata Proverite da li ima iskrivljenih ili blokiranih pokretnih delova slomljenih ili na bilo koji način oštećenih delova koji mogu da utiču na rad električnog alata Ukoliko je oštećen odnesite električni alat na popravku pre upotrebe Mnoge nesreće su se dešavale zbog lose održavanih električnih alata f Održavajte rezne alate oštrim i či...

Page 44: ...ati podlogu i da nekontrolisano odvuče alat m Nemojte da prenostite električni alat koji radi noseći ga jednom rukom sa strane Slučajni kontakt sa dodatkom koji se vrti može da zahvati vašu odeću i da se zarije u vaše telo n Redovno čistite proreze za ventilaciju na električnom alatu Ventilator na motoru će usisati prašinu u kućište i izazvati taloženje metalnog praha koji može da izazove električ...

Page 45: ...ustite prekidač i držite testeru u mestu u materijalu dok se sečivo sasvim ne zaustavi Nikada ne pokušavajte da izvadite ploču iz radnog komada dok se ploča okreće jer može da odskoči Istražite i primenite korektivne mere da eliminišete uzrok zaglavljivanja ploče d Ne uključujte alat dok se ploča nalazi u rezu radnog komada Dopustite da se ploča za rezanje zavrti punom brzinom pa onda ponovo uđite...

Page 46: ...o Max Nominal Nominal poprečni presek poprečni presek provodnika provodnika Max dužina dužina 110 120 V 230 240 V 1 Priključak na mrežu 110 120 V 220 240 V 6 Provera i montaža brusnog kamena Proverite da je brusni kamen u normalnom stanju i da nema naprslina ili oštećenja Proverite da je brusni kamen montiran čvrsto Da bi ste montirali brusni kamen pogledajte odeljak o montaži i demontaži brusnog ...

Page 47: ...cija i primene EAG 20 230 EAG 24 230 8 5 m s 2 0 m s 1 5 m s 4 5 m s Model Opis Ugljenične četkice D ručica Opcionalno Opcionalno Opcionalno Opcionalno Opcionalno EAG 20 230 Kočnica Drška Taster okidač Kapica za četkice Zaštitni lim Bočna ručica Kamen za brušenje Poluga za blokadu EAG 24 230 Kamen za brušenje Drška Poluga za blokadu Taster okidač Kočnica Blokada drške Prigušivač vibracija Kapica z...

Page 48: ...i isključite utikač iz zida pre montaže ili demontaže brusnog kamena Nikada ne koristite kamen predviđen za niže obimne brzine pogledajte specifikacije Montaža i demontaža 1 Postavite vreteno na gore Postavite udubljeni deo podloške ka ravnoj strani vretena 2 Postavite metalni deo brusnog kamena na podlošku 3 Postavite navrtku na vreteno i zavijte je do brusnog kamena 4 Gurnite polugu za blokadu v...

Page 49: ... prilikom udara Molimo vas da pazite da ne udarite brusni kamen Ako je brusilica udarena ili ispadne morate da proverite brusni kamen i brusilicu na oštećenja 5 Kako da zaokrenete glavu brusilice Isključite utikač iz zida pre bilo kakvog rada U cilju ostvarenja gore navedenog okrenite glavu brusilice za 90 stepeni suprotno od rotacije drške Onda odvijte četiri vijka i glavu Ne skidajte glavu sa gl...

Page 50: ...problema ili da vrše popravke alata Kontaktirajte obližnji prodajni centar za rešenje 7 X napojni kabl Ukoliko je napojni kabl električnog alata oštećen mora biti zamenjen specijalno pripremljenim kablom dostupnim kroz našu distributivnu mrežu Izjavljujemo da ovi proizvodi ispunjavaju standarde EN 60745 1 EN 60745 2 3 EN 55014 1 EN 55014 2 EN 61000 3 2 i EN 61000 3 3 u skladu sa Direktivama 2006 4...

Page 51: ...ица в близост до вас когато работите с електроинструмент Разсейването може да ви накара да изгубите контрол 2 Електрическа безопасност а Щепселите на електроинструментите трябва да са съобразени с електрическия контакт Никога не модифицирайте щепсела по какъвто и да било начин Не използвайте адаптерни щепсели със заземени електроинструменти Немодифицираните щепсели и подходящите електрически конта...

Page 52: ...да бъдат захванати от движещи се части ж Ако са осигурени приспособления за свързване на инсталации за отделяне и събиране на прах уверете се че те са правилно свързани и използвани Събирането на праха може да намали опасностите свързани с натрупването на прах з Носете шлемофони Излагането на шум може да доведе до загуба на слуха и Използвайте спомагателните дръжки предоставени с инструмента Загуб...

Page 53: ... Специфични предупреждения за безопасност при работата с електроинструмента проектирани и препоръчани от производителя на инструмента Фактът че е възможно да прикрепите дадено допълнително приспособление към вашия електроинструмент не гарантира безопасна работа с него г Номиналната скорост на въртене на допълнителното приспособление трябва да бъде най малкото равна на максималната скорост отбеляза...

Page 54: ...пособление вашите дрехи могат да бъдат захванати от него и да притеглят инструмента към тялото ви н Редовно почиствайте вентилационните отвори на електроинструмента Вентилаторът на мотора засмуква прах в корпуса а прекомерното натрупване на метален прах може да доведе до опасност от токов удар о Не използвайте електроинструмента в близост до запалими материали Искрите могат да запалят тези материа...

Page 55: ...ги подпирайте за да намалите риска от притискане и обратен удар на режещия диск Големите обработвани детайли могат да се Никога не поставяйте ръцете си в близост до въртящото се приспособление в Не заставайте в зоната в която елекгроинструментът може да отскочи при възникване на обратен удар Обратният удар ще премести инструмента в посока обратна на движението на диска в точката на захващане г Раб...

Page 56: ...искате твърде силно Телчетата от телената четка могат лесно да проникнат през тънките дрехи и или кожата б Ако за почистване с телена четка се препоръчва използването на предпазен кожух не позволявайте на дисковите или чашковидните телени четки да влизат в контакт с него Дисковите или чашковидните телени четки могат да увеличат диаметъра си в резултат на натоварването при работа и центробежните си...

Page 57: ...и шлифовъчният диск е в нормално състояние и е без пукнатини или повреди Уверете се че шлифовъчният диск е монтиран здраво За информация относно поставянето на шлифовъчния диск вижте раздела Поставяне и изваждане на шлифовъчния диск 7 Електрически контакт Ако при включване на щепсела се чува звук или ако щепселът може да се извади лесно от контакта трябва да ремонтирате електрическия контакт Моля ...

Page 58: ... които се основават на изчисляване на въздействието при реални условия на употреба имайки предвид всички части на работния цикъл като например времето в което инструментът е изключен и времето в което той работи на празен ход в допълнение към пусковото време 1 Спецификации EAG 20 230 2000 W 2400 W EAG 24 230 110 127 V 220 240 V 2 Списък на съдържанието EAG 20 230 EAG 24 230 1 Описание на функциите...

Page 59: ...ЕНИЕ Когато използвате дисковия шлифовъчен инструмент със специални части Р н трябва да монтирате предпазния кожух и да носите защитни очила 2 Начин на поставяне и изваждане на диска с шкурка Не използвайте шайбата и гайката за диск предназначени за шлифовъчния диск Моля използвайте друга гайка с шайба за диска с шкурка 1 Поставете гумената подложка и диска с шкурка върху вала 2 Поставете гайката ...

Page 60: ...териали от стомана Освен това той може да се използва и за много други материали При по голяма зърнистост на диска поставете с лек натиск шлифовъчния диск върху обработвания материал и шлифовайте равномерно за да постигнете гладка шлифована повърхност която може да се получи с шлифовъчен диск с по малка зърнистост 4 Предпазни мерки след употреба Изключете за да спрете въртенето на шлифовъчния диск...

Page 61: ...еството Фчнкияга за автоматичнo cлиpане ше лрeкъcнe елeктрозаxpaнването автоматично след като въглеродната четка cе износи Ако дисковият шлифовъчен инструмент cе изключи вследствие на вградената функция за автоматично спиране гроверете вьглеродната четка и я сменете Начин на смяна Отстранете капачката на четката с обикновена отвертка за да свалите въглеродната четка Трябва да купувате оригиналните...

Page 62: ...th Hellas SA 23rd Km Athens Lamia National Road 145 68 Krioneri Attica Greece Изхвърляне на старо електрическо и електронно оборудване приложимо в Европейския съюз и други европейски страни със системи за разделно събиране Този символ върху продукта или върху неговата опаковка указва че продуктът не трябва да се третира като битов отпадък Той трябва да се предаде в съответния пункт за събиране на ...

Page 63: ...a electrică Nu modifi caţi niciodată ştecherul în vreun fel Nu folosiţi adaptoare pentru ştechere împreună cu uneltele electrice împământate legate la masă Ştecherele nemodifi cate şi prizele compatibile vor reduce riscul de electrocutare b Evitaţi contactul corpului cu suprafeţele împământate precum ţevi radiatoare cup toare şi frigidere Există un risc sporit de electrocutare în cazul în care cor...

Page 64: ...eţele izolate pentru prindere atunci când efectuaţi o operaţie în care accesoriul de debitat poate atinge cabluri ascunse sau propriul cablu de alimentare Tăierea unui cablu sub tensiune de către accesoriul de debitat ar putea determina scurgerea curentului în componentele metalice expuse ale uneltei electrice şi ar putea electrocuta operatorul 4 Utilizarea şi îngrijirea uneltelor electrice а Nu f...

Page 65: ...re ale uneltei electrice vor funcţiona neechilibrat vor vibra în mod excesiv şi pot cauza pierderea controlului g Nu utilizaţi un accesoriu deteriorat înainte de fiecare utilizare inspectaţi accesoriul cum ar fi discurile abrazive pentru depistarea aşchiilor formate şi a fisurilor tălpile pentru depistarea fisurilor rupturilor sau uzurii excesive periile de sârmă pentru depistarea sârmelor desprin...

Page 66: ...e menţionate în continuare а Apucaţi ferm unealta electrică şi poziţionaţi vă corpul şi braţul astfel încât să puteţi rezista forţei unui recul Utilizaţi întotdeauna mânerul auxiliar dacă este furnizat pentru un control maxim în caz de recul sau de reacţie de cuplare în momentul pornirii Operatorul poate controla reacţiile de cuplare sau forţele de recul dacă sunt adoptate măsuri adecvate de prote...

Page 67: ...superioară a unei unelte mai mici şi se pot rupe 4 Instrucţiuni suplimentare de siguranţă pentru operaţiunile de tăiere Avertizări suplimen tare de siguranţă specifice operaţiunilor de tăiere abrazivă а Nu blocaţi discul de debitat sau nu apăsaţi excesiv pe acesta Nu încercaţi să efectuaţi o tăiere cu o adâncime excesivă Suprasolicitarea discului măreşte sarcina şi proba bilitatea de răsucire şi b...

Page 68: ...eta unghiul dorit al apărătorii discului desfăcând cele două şuruburi mici Utilizaţi 5 Apărătoare discului Apărătoarea discului este o protecţie care preîntâmpină deteriorarea pietrei de şlefuit Trebuie să instalaţi apărătoarea discului unealta după reglarea unghiului apărătorii discului pentru lucrarea în cauză După reglare strângeţi bine cele două şuruburi mici 6 Verificarea şi montarea pietrei ...

Page 69: ...fi utilizată de asemenea în cadrul unei evaluări preliminare în privinţa expunerii 5 Avertisment Valoarea totală a vibraţiilor în timpul utilizării efective a uneltei electrice poate diferi de valoarea totală declarată în funcţie de modalităţile de utilizare a uneltei Identificaţi măsuri suplimentare de siguranţă pentru a proteja operatorul care să se bazeze pe estimarea expunerii în condiţiile ef...

Page 70: ... cheii de piuliţe Avertisment Trebuie să instalaţi apărătoarea discului şi să purtaţi ochelari de protecţie în timpul utilizării polizorului împreună cu componentele specifice 2 Modalitatea de montare şi demontare a discului de şlefuit Nu utilizaţi şaiba discului şi piuliţa discului pentru piatra de şlefuit Utilizaţi altă şaibă şi altă piuliţă pentru discul deşlefuit 1 Fixaţi talpa de cauciuc şi d...

Page 71: ...e materiale Pentru granulaţia mai mică aplicaţi uşor piatra de şlefuit pe materialul de pre lucrat şi polizaţi uniform pentru a crea o suprafaţă fină ce poate fi realizată de piatra de şlefuit cu granulaţie mai mare 4 Atenţie după utilizare Opriţi unealta pentru a opri rotirea pietrei de şlefuit şi depozitaţi polizorul în siguranţă Atunci când ţineţi polizorul în spaţii pline de praf şi aşchii ace...

Page 72: ...in motor 5 Păstrarea după utilizare Nu păstraţi uneltele la îndemâna copiilor şi depozitaţi le într un spaţiu uscat 6 Funcţionarea anormală Este foarte periculos pentru consumatori să depaneze sau să repare unealta pe cont propriu Contactaţi cel mai apropiat centru A S agenţie de comercializare pentru remediere 7 Cablu de ataşament X În cazul în care cablul de alimentare al acestei unelte electric...

Page 73: ...nual is read before the power tool is operated for the first time Always keeps this instruction manual together with the power tool Ensure that the instruction manual is with the power tool when it is given to other persons Note As our engineers are striving for the constant research and development to develop the quality of products shape or structure of our model can be changed without previous ...

Page 74: ... priprave za odsesavanje prahu zmanjšuje zdravstveno ogroženost zaradi prahu h Uporabljajte zaščito za sluh Izpostavljenost hrupu lahko privede do okvare sluha i Uporabljajte dodatne ročice ki so priložene napravi Izguba nadzora nad orodjem lahko privede do poškodb 13 d or an extension cord suitable for outdoor use Use of a cord suitable for outdoor use reduces the risk of electric shock f If oper...

Page 75: ...dje na tla poglejte če ni poškodovano in uporabljajte samo nepoškodovana vsadna orodja Po kontroli in vstavljanju vsadnega orodja se ne zadržujte v ravnini vrtečega se vsadnega orodja kar velja tudi za druge osebe v bližini Električno orodje naj eno minuto deluje z najvišjim številom vrtljajev Poškodovana vsadna orodja se največkrat zlomijo med tem preizkusnim časom h Uporabljajte osebno zaščitno ...

Page 76: ... motorja povleče v ohišje prah in velika količina nabranega prahu je lahko vzrok za električno nevarnost o Ne uporabljajte električnega orodja v bližini gorljivih materialov Ti materiali se lahko zaradi iskrenja vnamejo p Ne uporabljajte vsadnih orodij ki za hlajenje potrebujejo tekočino Uporaba vode ali drugih tekočin lahko povzroči električni udar 2 Nadalnja varnostna opozorila Povratni udarec i...

Page 77: ...aj z vrtečim se kolutom odleti naravnost v Vas c Če se rezalna plošča zagozdi ali če prekinete z delom električno orodje izklopite in ga držite pri miru dokler se kolut popolnoma ne ustavi Nikoli ne poskušajte rezalne plošče ki se še vrti potegniti iz reza ker lahko pride do povratnega udarca Ugotovite in odstranite vzrok zagozditve d Dokler se električno orodje nahaja v obdelovancu ga ne smete po...

Page 78: ... tool may be damaged When you use the tool for 110V in 220V 230V the motor can be damaged by a fire 4 The switch When you plug in the power source with the tool switched on you may be injured seriously by sudden rotating of the tool Make sure the switch lever is returned to its original position by pushing or pulling it 5 The wheel guard The wheel guard is a protective wall preparing for the damag...

Page 79: ...F stikala 2 pola Zaklep ON stikala 2 pola Zaklep ON stikala 1 pol Počasni zagon Zaščita ponovnega zagona Tip 1 o o Tip 2 o o Tip 3 o o o Tip 4 o o o Tip 5 o o Tip 6 o o Tip 7 o o o Tip 8 o o o 1 Karakteristike naprave Model EAG 20 230 EAG 24 230 Električno napajanje Tip A 110 120 V 50 60Hz Tip B 220 240 V 50 60 Hz Motor Enofazni komutativni motor Nazivni tok A 110 127 V 15 A Nazivna moč W 220 230 ...

Page 80: ...n you may be injured seriously by sudden rotating of the tool Make sure the switch lever is returned to its original position by pushing or pulling it 5 The wheel guard The wheel guard is a protective wall preparing for the damage of the grinding stone You must install the wheel guard You can set the desired angle of the wheel guard by unfastening two small screws Please use the tool after adjusti...

Page 81: ...o uporabljajte brez pretiranega pritiska za gladko površino Za bolj gladko površino in ostale materjale uporabljajte brusilne plošče višjih granulacij 4 Opozorila ob koncu uporabe naprave Izklopite napravo na stikalu za zaustavitev vrtenja Napravo shranjujte na varnem mestu Če shranjujete napravo ko se brusilna plošča še vrti lahko zajame prah in nevarne dele kar lahko povzroči poškodbe naprave Ko...

Page 82: ...the disc grinder by inclining it in 15 30 degrees as the picture to do grinding work with circumference of the grinding stone 3 Grinding direction When using a new grinding stone be certain to grind while pulling tool backwards B direction until the grinding stone becomes rounded on its edge Then the grinder can be moved to any direction This grinding stone Grinding particle A Mesh 36 is best for ...

Page 83: ... information about recycling of this product please contact your local city office your household waste disposal service or the shop where youpurchased the product We may apply the auto stop carbon brush for improvement in quality without previous notice Auto stop will interrupt current automatically for wear of the carbon brush When the disc grinder is stopped for the built in auto stop check the...

Page 84: ...metimi i zhurmës dhe vibrimit 5 Specifikat dhe lista e aksesorëve 6 Përshkrimi i funksioneve dhe aplikimeve 7 Montimi dhe heqja e diskut gurit 8 Udhëzime për përdorim 9 Mirëmbajtja b Shmangni kontaktin e trupit me sipërfaqet e përtokëzuara siq janë gypat radiatorët linjat dhe frigoriferët Rreziku nga goditja elektrike rritet kur trupi është i përtokëzuar c Mos i ekspozoni veglat elektrike në shi o...

Page 85: ... mund të montohet në veglën tuaj nuk nënkupton se ofron operim të sigurtë d Shpejtësia nominale e veglës duhet së paku të jetë e barabartë me maksimumin e deklaruar në vegël Veglat që operojnë me shpejtësi më të madhe mund të këputen dhe fluturojnë tutje e Diametri i jashtëm dhe trashësia e aksesorit duhet ti përshtaten kapacitetit të veglës Aksesorët me madhësi të gabuar nuk mund të mbrohen dhe t...

Page 86: ...veglën drejt trupit tuaj n Rregullisht pastroni pjesët ventiluese të veglës Ventilatori i motorit tërheqë pluhurin brenda shtëpizës dhe akumulimi i metalit pluhur mund të shkaktojë rrezik nga rryma o Mos punoni me vegël pranë materialeve të ndezshme Shkëndijat mund të ndezin këto materiale p Mos përdorni aksesorë që kërkojnë ftohës me lëng fluid Përdorimi i ujit dhe lëngjeve tjera mund të shkaktoj...

Page 87: ...ni të heqni diskun nga prerja përderisa është duke u rrotulluar përndryshe mund të ndodhë goditja prapa Analizoni dhe merrni hapat e nevojshëm pët të eliminuar shkaqet e lidhjes së diskut d Mos ri startoni operacionin e prerjes nëse disku është në pjesën që prehet Rifuteni diskun prerës në pjesën vetëm atëherë kur arrihet shpejtësia maksimale Disku mund të lidhet të ecë ose të godisë prapa nëse ve...

Page 88: ...s do të dëmtohen Kur përdorni veglën 110V në atë 220v 230V motori mund të dëmtohet nga zjarri Kur kyçni në prizë veglën e aktivizuar ju mund të lëndoheni nga rrotullimi i menjëhershëm i veglës Mbrojtësja e diskut është mur mbrojtës i gurit gdhendës gërryes Ju duhet të montoni mbrojtësen e diskut Sigurohuni që leva e ndërpresit të jetë e kthyer në pozitën e çkyçjes duke e shtyer ose tërhequr atë Ju...

Page 89: ...skut gurit 2 Operatori duhet të vëjë kufje mbrojtëse 3 Emetimi i vibrimeve Vlerat e përgjithshme të vibrimit shuma vektoriale tri aksiale sipas EN 60745 Niveli A i shtypjes së zërit të emetuar LpA Paqartësia K 89 dB A 103 dB A 3 dB 4 Informata në vijim Vlera totale e deklaruar e vibrimit është matur sipas metodës testuese standarde të dhënë në EN 60745 dhe mund të përdoret për krahasimin e një veg...

Page 90: ...ë të gurit gërryes në nënshtresën e diskut 3 Vendosni bulonin në bosht përmbi gurin gërryes 4 Shtyni pykën pini bllokuese të boshtit e pastaj shtrëngoni bulonin me çelës Paralajmërim Duhet instaluar mbrojtësja e diskut dhe të vëni syze mbrojtëse gjatë përdorimit të diskut gërryes në materiale speciale Mos përdorni nënshtresë dhe bulon të gurit gërryes Ju lutemi përdorni nënshtresë tjetër për disku...

Page 91: ...sëza të imëta metali guri mbushet me këto materiale 5 Si të rrotulloni kokën e veglës gërryese Heqni kabllon nga priza Për qëllimin e përmendur rrotulloni kokën e veglës për 90 shkallë në vend se të rrotulloni dorezën Lironi të katër bulonat dhe rrotulloni kokën Mos e heqni kokën nga trupi por vetëm rrotullojeni në pozitën e re Pas rrotullimit shtrëngoni bulonat Guri gërryes mund të çahet ose të g...

Page 92: ...s rregullës ju ndihmoni në parandalimin e pasojave të mëdha negative për ambientin dhe shëndetin e njeriut që do të shkaktohej nëse do të hudhej në mënyrë jo të drejtë Riciklimi i materialeve ndihmon në konservimin e resurseve natyrore Për informata më të hollësishme rreth riciklimit të këtij produkti kontaktoni zyrën përkatëse në qytetin tuaj shërbimin e mebturinave të amvisërisë ose shitoren ku ...

Page 93: ...93 ...

Page 94: ...94 ...

Page 95: ...95 ...

Page 96: ...Trzin Slovenia T 386 153 057 80 F 386 153 057 90 www wuerth si Wurth d o o Podgorica Ludvika Kube 6 81000 Podgorica T 382 20 209 000 www wurth me Corporate Design Number MA 2015 2281 160905 Reprint only with permission We reserve the right to apply changes on the product without prior notice or notification if the changes apply to the improvement of quality of the product from our point of view Il...

Reviews: