background image

4-16

Chapter 4: Troubleshooting

November 2007

4

To perform an SPN device diagnostic test, select 

Start

 next to the desired device.

The

 Device Diagnostics 

screen displays the device actively running its diagnostic test, 

Figure 

4-19

Figure 4-19  Active SPN device diagnostic example.

See 

Table 4-3

 for information on the individual SPN device diagnostic tests.

5

To end the diagnostic test, select 

Stop

.

6

Select 

Exit

 to return to the 

Administration Menu

Using SVC/GAT

Complete the following steps to use a software verification (SVC)/game authentication terminal 
(GAT) to verify game software components: 

1

Open the Main Door. 

2

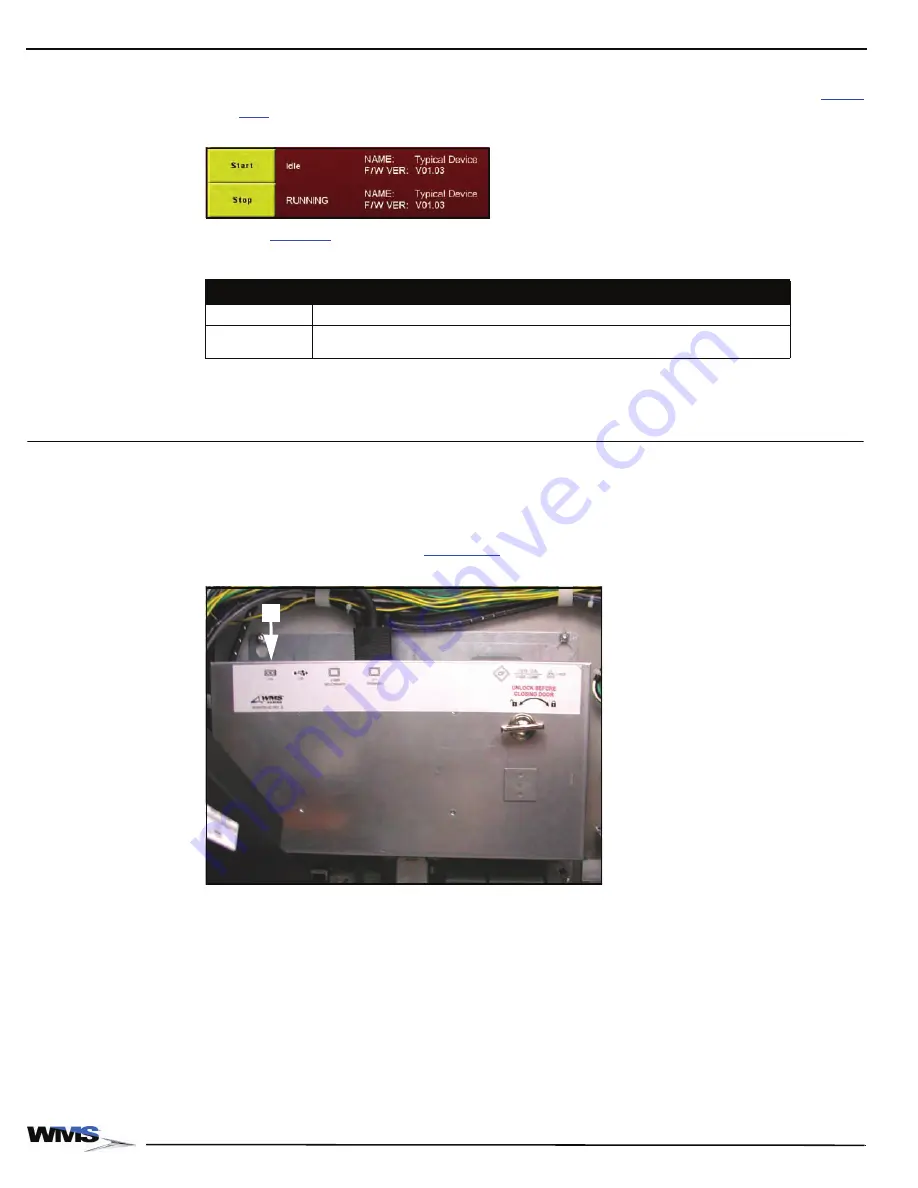
Using an SVC or GAT terminal, connect a standard serial cable to the J14 connector on the 
Bluebird Video CPU Board, 

Figure 4-20

 (A).

Figure 4-20  Bluebird (Upright) CPU Enclosure.

3

Press the DIAGNOSTIC button. 

Table 4-3  SPN device diagnostic tests

Test

Description

Progressive Meter Changes the color of the Progressive Meter display. 

Universal 
Animator

Lights up all the LEDs in the Animator Button.

A

Summary of Contents for Bluebird Series

Page 1: ...24 7 Product Support Center 1 866 967 4457 or CustomerSupport WMS com WMSGaming Inc 800S Northport Boulevard Waukegan IL60085 Service Manual User Guide Upright BBU Video Gaming Devices ...

Page 2: ......

Page 3: ... Weight 1 3 Power Dissipation 1 4 Features Doors 1 4 Main Door and Lower Door 1 5 Door Switches 1 6 CPU Enclosure 1 6 Hard Meters 1 7 Bose Audio System 1 7 Top Box Connector Plate 1 8 Player Tracking SMIB Mounting Plate 1 8 Top Box Mounting Hardware 1 9 In Game Progressive Meter 1 9 CPU Enclosures RoHs CPU NXT and CPU NXT2 1 10 RoHs CPU NXT Board Identification 1 10 RoHS CPU NXT CompactFlash Slots...

Page 4: ...nnection 2 6 Bulkhead Board Jumper Settings 2 6 Bill Acceptor Jumpers 2 7 Progressive Port Jumpers 2 8 Host 1 Jumpers 2 9 Host 2 Jumpers 2 9 Installing the Top Box 2 10 Mount Top Box 2 10 Install Two Crown Pieces 2 11 Electronic Connections 2 12 CHAPTER 3 Maintenance Table of Contents 3 1 Overview 3 2 ESD Prevention 3 2 Cleaning the Game 3 2 Game Cabinet 3 2 LCD 3 2 Bill Acceptor 3 2 Removing the ...

Page 5: ... 4 14 SPN Diagnostics Traffic 4 14 SPN Diagnostics Link Statistics 4 15 SPN Devices Diagnostics 4 15 Using SVC GAT 4 16 Tilt Codes 4 19 Table of Contents 5 1 CHAPTER 5 Exploded Views CHAPTER 6 BBU Video Replacement Parts Table of Contents 6 1 Overview 6 2 Ordering Parts 6 2 Electrical Parts 6 3 Bulbs and Ballasts 6 3 Batteries 6 3 Button Panel Buttons and Button Inserts 6 3 Cables 6 5 Electrical A...

Page 6: ...4 Table of Contents November 2007 Other Parts 6 11 Decals Inserts 6 11 Labels 6 11 Top Award Inserts 6 11 Top Coin Entry Inserts 6 12 Tower Light Inserts 6 12 ...

Page 7: ...riptions for Crown Pieces 2 11 Table 2 8 BBU Cabinet Top Box Connector Plate Designations 2 12 CHAPTER 3 Maintenance Table 3 1 Division of maintenance responsibilities 3 2 Table 3 2 Bulb size 3 5 CHAPTER 4 Troubleshooting Table 4 1 Tower Light troubleshooting 4 2 Table 4 2 Basic Game Troubleshooting 4 3 Table 4 3 SPN device diagnostic tests 4 16 Table 4 4 Tilt Codes 4 19 CHAPTER 5 Exploded Views C...

Page 8: ... Covers 6 8 Table 7 Part Descriptions 6 9 Table 6 1 Top Box Glass Mountaining Frame 6 9 Table 6 2 Top Box Kits 6 10 Table 6 3 Tower Lights 6 10 Table 6 4 Insert Bill Here Decal 6 11 Table 6 5 Labels 6 11 Table 6 6 Top Award Inserts 6 11 Table 6 7 Top Coin Entry Inserts 6 12 Table 6 8 Tower Light Inserts 6 12 ...

Page 9: ...ots and cable connectors 1 11 Figure 1 17 Layout of CPU NXT2 PCB 1 12 Figure 1 18 CompactFlash slots and cable connectors 1 13 Figure 1 19 Blind Mate Connectors on outside of CPU Enclosure 1 13 Figure 1 20 Open Logic Door left and warning label on Logic Door right 1 14 Figure 1 21 Security Wire Holes 1 14 Figure 1 22 Bulkhead Board 1 16 Figure 1 23 Bulkhead Board inside game 1 16 Figure 1 24 Plast...

Page 10: ... 3 12 Empty Button Panel area 3 7 Figure 3 13 Install the Button Panel 3 8 Figure 3 14 Connect Cables 3 8 Figure 3 15 Secured Universal Animator Bracket 3 9 Figure 3 16 Universal Animator without Formex Cover left and with Formex Cover right 3 9 Figure 3 17 Universal Animator seated on Bracket 3 9 Figure 3 18 SPN Bracket and SPN Distribution Board 3 10 Figure 3 19 Remove Top Ground Braid 3 10 Figu...

Page 11: ...cs screen 4 15 Figure 4 18 SPN Device Diagnostics screen 4 15 Figure 4 19 Active SPN device diagnostic example 4 16 Figure 4 20 Bluebird Upright CPU Enclosure 4 16 Figure 4 21 SVC GAT on the Administration Menu 4 17 Figure 4 22 SVC Authentication Interface screen 4 17 Figure 4 23 OS Authentication Level 2 screen 4 18 Figure 4 24 OS Authentication Level 2 screen example 4 18 ...

Page 12: ...4 List of Figures November 2007 ...

Page 13: ...legal regulations protect the gaming device Unauthorized modifications may be illegal under international law This principle also applies to WMS logos designs publications and assemblies Facsimiles of WMS equipment or any feature of it may be illegal This principle applies to facsimiles manufactured with or without WMS components Check Local Laws Operation of gaming devices may be subject to state...

Page 14: ...ns used in this guide Table 1 Notice Icon Descriptions Icon Format Description NOTE Information note about important features or instructions but is not critical data CAUTION Caution alerts you to potential damage to a program system or device WARNING Warning indicates a situation that may cause personal injury or death WARNING Warning indicates a situation that may cause personal injury or death ...

Page 15: ...e Top Box Line Cord from the outlet If one is installed remove the Hopper to access the Power Entry Assembly WARNING Disconnecting the game Power Supply Cord is the only means of disconnecting the game from power Figure 1 2 Power Supply Cord plugged into Power Entry Assembly Special Instructions for PCBs Whenever accessing any printed circuit boards PCBs or components in direct contact with PCBs i...

Page 16: ...4 About this Guide General Information October 2007 ...

Page 17: ...ication 1 10 RoHS CPU NXT CompactFlash Slots and Cable Connectors 1 11 CPU NXT2 Board Identification 1 12 CPU NXT2 CompactFlash Slots and Cable Connectors 1 13 Blind Mate Connectors for Bulkhead Board 1 13 Logic Door 1 14 Security Wire Holes 1 14 Ethernet USB Port Cover Plate in select jurisdictions 1 15 Bulkhead Board 1 16 Safety Features 1 17 Liquid Diversion 1 17 Ground Braids 1 18 Electrical R...

Page 18: ...mbled and only requires a review of the components light assembly and preparation for software installation and configuration Table 1 1 Reference Documentation Service Manual Description 16 020832 xx Manual CPU NXT CPU NXT2 Operating System Contains installation and configuration steps for the CPU NXT Operating System which runs on either CPU NXT1 or CPU NXT2 hardware The manual includes troublesh...

Page 19: ...p right Weight The weight of the game is provided in Table 1 2 CAUTION The maximum weight of a game is 452 lbs 205 kg Verify that any non WMS game stand specifications meet this weight requirement before mounting the game Using inadequate game stands voids the WMS Warranty and may lead to distortion of the game cabinet including the inability to close and lock the Main Door Table 1 2 Game weight G...

Page 20: ...d when determining air conditioning requirements as Hopper payout occurs infrequently when compared to standby and play conditions Features Doors The BBU features easy serviceability and quick access to parts The BBU Main Door and Lower Door provide access to many of the internal components Figure 1 2 Figure 1 2 Open BBU Doors Table 1 3 Heat Electricity Dissipation Type of Current BBU Video BBU Vi...

Page 21: ...er latch Figure 1 3 A The full Main Door which opens with the upper latch Figure 1 3 B Figure 1 3 Latches to separate doors left and Lower Door separated right When the door is opened it is safely held in place by a gas strut Figure 1 4 Figure 1 4 Gas strut The LCD Figure 1 5 A is seated inside the Main Door as is the Coin Acceptor Figure 1 5 B Figure 1 5 Components in Main Door A B A B ...

Page 22: ...the Belly Door is closed The Belly Door Switch is located in the center of the inside of the Belly Door Figure 1 7 A Figure 1 7 Belly Door Switch in center of inside of Belly Door Both switches are accessible with one hand enabling easy maintenance and testing of game functionality CPU Enclosure The CPU Enclosure protects the CPU Board and is completely removable from the game Four square tabs on ...

Page 23: ...the LCD Bezel right The meters can be viewed through a window in the front glass by putting your eye up against the LCD Bezel on the right side of the LCD Figure 1 9 and turning the attendant key to activate a light Bose Audio System The Bluebird features a Bose Audio System that includes the Speaker Assembly and the Primary Amplifier Figure 1 10 Figure 1 10 Installed Bose Wave Guide Sound System ...

Page 24: ...oved Figure 1 12 WMS SMIB Mounting Plate in Top Box 1 Disengage the pull pin securing the WMS SMIB Mounting Plate to the Top Box Figure 1 12 A 2 Lift and pull the pull pin towards you to disengage the mounting tabs Figure 1 12 B Table 1 4 Cabinet Top Box Connector Plate Designations Connector Function A Top Box Aux Logic Player Tracking switched inputs B Top Box Serial Interface and I O interface ...

Page 25: ... Top Box Figure 1 13 A Figure 1 13 Video Top Box mounting hardware In Game Progressive Meter If applicable the Progressive Meter Figure 1 14 A mounts into the game Top Box The In Game Progressive Meter enables compact Top Boxes to contain all the features of larger Top Boxes and Marquees for Progressives Figure 1 14 In Game Progressive Meter location A A ...

Page 26: ... the complete CPU Enclosure Only Do not remove the PCB from the CPU Enclosure Figure 1 15 Layout of RoHS CPU NXT PCB Table 1 5 Layout of RoHS CPU NXT ID Connector A Ethernet Dual USB Connector B Video Port C Intel Celeron 650 MHz Processor under heat sink D Auxiliary Serial Port E Reset Switch F CompactFlash Drive game software G CompactFlash Drive OS software H CompactFlash Drive Activity LEDs I ...

Page 27: ...Flash slots and five cable connectors on the outside of the CPU Enclosure CompactFlash slot for OS software Figure 1 18 A CompactFlash slot for game software Figure 1 18 B Auxiliary Serial Connector Figure 1 18 C Video Connector Figure 1 18 D Ethernet Dual USB Connector Figure 1 18 E Figure 1 16 CompactFlash slots and cable connectors A B C D E ...

Page 28: ...Connector A Blind Mate Connectors B Hard Drive C PCI Express Video Card under hard drive D Reset Switch E SDRAM Memory Module F CPU Module G CPU NXT2 Enclosure Fan H CompactFlash Drive OS software I CompactFlash Drive game software J Jurisdictional EEPROM SPI K Digital Audio SPDIF Connector L BIOS Firmware Hub M DVI Video Port N Batteries 2 for NVRAM subsystem O VGA Video Port Auxiliary Serial Por...

Page 29: ... Video Port Figure 1 18 D Auxiliary Serial Port Figure 1 18 E 10 100 1000 Ethernet Dual USB Connector Figure 1 18 F 10 100 Ethernet Dual USB Connector Figure 1 18 G VGA Video Port Figure 1 18 H Four USB Connections Figure 1 18 I Figure 1 18 CompactFlash slots and cable connectors Blind Mate Connectors for Bulkhead Board The CPU Enclosure attaches to the Bulkhead Board via two blind mate connectors...

Page 30: ...emoved without unlocking and or removing the Logic Door as indicated on the yellow warning label on the Logic Door Figure 1 20 B Figure 1 20 Open Logic Door left and warning label on Logic Door right Security Wire Holes A metal wire can be looped through the two security holes Figure 1 21 A in the CPU Enclosure to deter theft of the PCB and components Figure 1 21 Security Wire Holes A B A ...

Page 31: ... USB ports cover NOTE Image shown covering Ethernet port 01 020155 00 00 CPU NXT RoHS A 017096 00 03 USB ports cover 01 020073 00 01 CPU NXT2 A 017999 01 01 USB ports cover 01 020073 00 02 CPU NXT A 017096 00 03 Ethernet port single cover 01 018003 00 01 NOTE CPU A 010785 075 a previously released non RoHS CPU NXT enclosure included an Ethernet cover by design This CPU enclosure is no longer avail...

Page 32: ...lkhead Board is located on the back wall of the game Figure 1 23 Figure 1 23 Bulkhead Board inside game Table 1 8 Bulkhead Board connectors ID Connector ID Connector ID Connector A Touch Screen pink I 24 V Q Hopper B Printer yellow J Bill Acceptor red R Meter C SPN K Coin Acceptor S Top Box D Audio green L Tower Lamp T aux secondary Power DC E Spare M Game Button Switches U Host Comm 1 F Lamp Matr...

Page 33: ...ame The plastic shields Figure 1 24 divert liquids to the bottom of the base cabinet or out of the game and the foam above the speakers Figure 1 25 guides liquids down the sides of the cabinet and out of the game CAUTION To avoid electrical shock always remove power from the game when servicing Take all necessary precautions to avoid spillage of any liquids on or near the game to protect critical ...

Page 34: ...irements defined in Table 1 9 Properly Ground Gaming Devices Avoid electrical shocks by using proper grounding at all times Do not plug in the gaming device until you inspect and verify the outlet Only connect the WMS device to grounded three wire outlets Do not use a cheater plug to defeat the power cord s ground pin Do not cut off the ground pin After servicing a gaming device ensure that ground...

Page 35: ...e Canadian Interference Causing Equipment Regulations EU Interference Notice This Class B digital apparatus meets all requirements of the EURO CISPR 22 EMC specifications and safety requirements This Gaming Device is not intended for use by young children or infirm persons without supervision Young children should be supervised to ensure they do not play with this Gaming Device Replacement Fuse Us...

Page 36: ...re 1 28 The auxiliary power source is 24V DC power The power switch located on the left just inside the door turns the game ON or to standby mode In standby mode the switched outlet s and many game components are turned OFF while the unswitched outlets continue to be powered The unswitched outlets Figure 1 28 A power AC devices when the power switch is in either the standby or in the ON position T...

Page 37: ...LCD Connection 2 6 Bulkhead Board Jumper Settings 2 6 Bill Acceptor Jumpers 2 7 Progressive Port Jumpers 2 8 Installing the Top Box 2 10 Mount Top Box 2 10 Install Two Crown Pieces 2 11 Electronic Connections 2 12 Introduction This chapter describes the basic installation of a BBU Video Cabinet including installation onto a Game Stand Bulkhead Board Jumper Settings and Top Box Installation 16 0208...

Page 38: ...d specifications meet this weight requirement before mounting the game Using inadequate game stands voids the WMS Warranty and may lead to distortion of the game cabinet including the inability to close and lock the Main Door Figure 2 1 Bluebird Drill Fixture NOTE Space the games at least 6 apart 1 Use one of the following three methods to Attach the game drop stand to the floor with carriage bolt...

Page 39: ...pping locks with locks according to the specifications in Table 2 1 and Table 2 2 Table 2 1 Lock Specifications inches Lock Location Designed Length Extended Length Cam Description Cam Part No Rotation to Lock viewed from key end Upper Main Door 5 8 1 2 inside or outside 1 1 2 lg 1 4 offset 01 001614 04 clockwise Lower Belly Door 5 8 1 4 inside 1 2 outside 1 1 2 lg 1 4 offset 01 001614 04 clockwis...

Page 40: ...crewdriver to bend the cam until it breaks off 7 Install the new lock according to casino protocol Ensure that the cam removed in the previous step is installed with the new lock Table 2 2 Lock Specifications metric Lock Location Designed Length Extended Length Cam Description Cam Part No Rotation to Lock viewed from key end Upper Main Door 16 mm 13 mm inside or outside 38 mm lg 6 mm offset 01 001...

Page 41: ...use game damage or malfunctions CAUTION The Socket Outlet is the means of disconnection and should be installed near the equipment and be easily accessible 1 Verify that the line voltage at the outlet is either 120 VAC or 220 240 VAC per the rating of the specific game 2 Use an outlet tester to check for properly implemented ground hot and neutral outlet wiring Only use a grounded AC outlet The ga...

Page 42: ...ings The Bulkhead Board includes ten jumpers Figure 2 6 that determine the game communication interface with the Bill Acceptor Progressive System and the Host System s If a feature is not used by the game then jumper settings have no effect on game functionality Figure 2 6 Bulkhead Board Jumper locations JP5 Bill Acceptor Jumpers JP3 JP2 JP1 JP4 JP6 Progressive Port Jumpers JP7 JP8 JP9 JP10 Host 1...

Page 43: ...tor Jumpers There are two possible jumper positions which are referenced in Table 2 3 as 1 2 and 2 3 Figure 2 8 While the pins are not actually numbered on the board the assumption is that in text legible board orientation the top pin is 1 and the bottom pin is 3 Figure 2 8 Diagram of Bill Acceptor Jumpers Table 2 3 Bill Acceptor jumpers Interface JP1 JP2 JP3 JCM UBA or WBA Position 2 3 Position 2...

Page 44: ...igure 2 9 Jumper setting at JP4 on Bulkhead Board The Jumper at JP5 must be set to FULL Figure 2 9 The Jumper at JP6 must be set to RS232 485 Figure 2 10 Figure 2 10 Jumper setting at JP6 on Bulkhead Board Table 2 4 provides the jumper settings for each interface Table 2 4 Progressive Port jumpers Interface JP4 JP5 JP6 RS 232 Position 2 3 Either Position Position 2 3 R 485 Half Duplex Position 1 2...

Page 45: ...e 2 5 Figure 2 11 Host 1 bottom and Host 2 top jumpers both set to RS 232 Host 2 Jumpers Two jumpers control the Host 2 communication interface Figure 2 11 The two options are RS 232 and RS 485 Table 2 6 Table 2 5 Host 1 jumpers Interface JP9 JP10 RS 232 Position 2 3 Position 2 3 RS 485 Position 1 2 Position 1 2 Table 2 6 Host 2 jumpers Interface JP7 JP8 RS 232 Position 2 3 Position 2 3 RS 485 Pos...

Page 46: ... Mounting Studs Posts on the game engage the Mounting Keyholes on the Top Box 4 Determine the following Figure 2 13 Two mounting configurations for BBU Top Box 5 For both mounting setups use a Phillips screwdriver or 1 4 nut driver to secure the Top Box to the Bluebird cabinet with two 8 32 x 38 hex head screws 4008 007026 06 in the holes provided on both sides of the game Figure 2 13 If the BBU h...

Page 47: ...4 One of two Crown Brackets Figure 2 15 Mounting setup for left Crown Piece left and the outside view of properly mounted crown right 2 Engage the mounting tab on the Crown Piece Figure 2 14 B with the 8 32 mounting stud on the Top Box Figure 2 15 B 3 Use an 11 32 nut driver or socket wrench to secure the two mounting studs with two 8 32 Keps nuts 4408 01128 00 Figure 2 16 A Figure 2 16 Secured Cr...

Page 48: ... 17 Figure 2 17 Top Box Connector Plate 2 Make connections as needed based on the Top box being installed Refer to Figure 2 17 and Table 2 8 as needed Table 2 8 BBU Cabinet Top Box Connector Plate Designations Connector Plate Item Function A Top Box Aux Logic Player Tracking switched inputs B Top Box Serial Interface C Lamp Matrix D Player Tracking Power Switch Interface E Player Tracking Door Swi...

Page 49: ...emove the Cashbox 3 3 Button Panel Maintenance 3 4 Inserting the LED 3 4 Replacing the Button Panel Lenses and Inserts 3 6 Remove Button Panel 3 6 Install Button Panel 3 8 Replace SPN Components 3 9 Install the SPN Distribution Board 3 10 Mount SPN Board to SPN Bracket 3 10 Connect the SPN Distribution Board 3 12 Connect the Universal Animator 3 12 Bose Audio System Maintenance 3 14 16 020834 00 N...

Page 50: ... hard to reach and narrow places on the cabinet Then use a non ammonia non alcohol cleaning solution to clean the game exterior Never spray the solution directly onto the game Instead spray a soft lint free cloth and wipe the game exterior LCD A 50 50 mixture of distilled water and isopropyl alcohol is acceptable to use on the LCD Never spray liquid directly onto the LCD Spray liquid onto a non ab...

Page 51: ... 3 1 A Figure 3 1 Open Bill Acceptor Door 3 Press down on the release lever Figure 3 1 B and slide the Bill Acceptor out of the game 4 Close the Bill Acceptor door 5 Close and lock the Belly Door Remove the Cashbox When the Stacker Full tilt displays the Cashbox must be emptied Complete the following steps 1 Unlock and open the Bill Acceptor door Figure 3 2 A Figure 3 2 Open Bill Acceptor Door 2 P...

Page 52: ...anel Inserting the LED To remove the button lamp and insert the LED complete the following steps 1 Using the needle nose pliers gently grip the lamp within the button Figure 3 3 A Figure 3 3 Gripping the lamp 2 Slowly and carefully pull the lamp out of the Button socket Figure 3 4 Figure 3 4 Pulling the lamp from the socket A ...

Page 53: ...side of the button light socket The positive side is marked at the cable connections on the rear of the button Figure 3 6 B Figure 3 6 Polarity stripe on LED left and positive marking on rear of button right 4 Turn on the game and perform a diagnostic check to confirm that the LEDs light NOTE If the LED does not light power OFF the game remove the LED rotate the LED and reinsert with the opposite ...

Page 54: ...utton Panel 1 Before beginning this procedure follow the instructions for disconnecting the game WARNING Disconnect the line cord before servicing to avoid electrical shock The game must be powered off before the Button Panels are removed or inserted Button Panels are not hot swappable 2 Unlock and open the Belly Door 3 On the interior of the Belly Door remove the Cable and the Belly Light cable f...

Page 55: ...UTION Use care when performing the following step as the Belly Glass is not secured once the bracket is removed 8 Slowly and carefully rotate down the top of the Belly Light Bracket backward on the two pivoting screws Figure 3 10 and remove the bracket Figure 3 10 Rotate the Belly Light Bracket backward 9 Slide out the existing Button Panel Figure 3 11 Figure 3 11 Slide out the existing Button Pan...

Page 56: ...utton Panel 2 Route the Button Panel cables through the cable clamp Figure 3 14 Figure 3 14 Connect Cables 3 Connect the Button Panel cable H 012813 00 branches P1 and P2 to the connectors on the Main Door Figure 3 14 CAUTION Use care when performing the following step as the Belly Glass is not secured once the bracket is removed 4 If required replace the Belly Glass with glass corresponding to th...

Page 57: ...ention 1 Using a 1 4 nut driver secure the Universal Animator Bracket Non Rail 01 016185 01 00 Component Rail with LCD and without LCD 01 016185 01 00 to the Belly Door with a 8 32 self threading screw 4008 007027 04 Figure 3 15 A Figure 3 15 Secured Universal Animator Bracket 2 Fit on the black Formex Cover 03 012325 by engaging the three slots on the cover Figure 3 16 with the studs in the middl...

Page 58: ...n the About This Guide chapter for details on ESD prevention 1 Align each of the four holes with the four standoffs on the SPN Bracket 01 012704 2 Using a Phillips screwdriver tighten the four pan head screws to secure the SPN Distribution Board to the SPN Bracket Figure 3 18 A Figure 3 18 SPN Bracket and SPN Distribution Board 3 Ensure that the game power is set to OFF and disconnect the power co...

Page 59: ... A Figure 3 20 Mount the SPN Distribution Board and Bracket 6 Replace the ground braid over the top 8 32 mounting stud and the SPN Distribution Board Figure 3 21 A Figure 3 21 Replace ground braid 7 Add a second 8 32 Keps nut to the bottom stud Figure 3 21 B 8 Use an 11 32 nut driver to tighten the two 8 32 Keps nuts Figure 3 21 A and Figure 3 21 B to secure the SPN bracket and ground braid A B A ...

Page 60: ...1 007962 33 to any of the SPN Out ports on the SPN Distribution Board Figure 3 22 C The other end of this cable will be connected to the Universal Animator in the procedure Connect the Universal Animator with SPN Distribution Board Connect the Universal Animator Follow the procedures in this section to connect the Universal Animator Board Connect the Universal Animator with SPN Distribution Board ...

Page 61: ...imator when no SPN Distribution Board is present 1 Connect the 8 inch Ribbon Cable to the Universal Animator Figure 3 24 A Figure 3 24 Connect the Ribbon Cable to the Universal Animator 2 Connect the Button Panel 5V cable H 012478 01 to the Universal Animator Figure 3 24 B 3 Connect the 4 pin Lamp Matrix portion of the Cable Figure 3 24 C to the Universal Animator C B A ...

Page 62: ... remove speaker screens 1 Press the DIAGNOSTIC button The Administration Menu displays 2 Select Setup The Setup Menu displays Figure 3 25 Figure 3 25 Setup Menu 3 Select Sound Setup The Sound Setup screen appears Figure 3 26 Figure 3 26 Sound controls 4 Adjust the volume by touching the slider Figure 3 26 A and moving your finger up or down 5 Slowly move the volume slider to the desired sound outp...

Page 63: ... Test 4 6 Coin Acceptor Diagnostics 4 9 Hopper Diagnostics 4 10 Printer Diagnostics 4 11 Progressive Diagnostics 4 12 WMSP Diagnostics Traffic Statistics 4 12 WMSP Diagnostics Link Statistics 4 13 SPN Diagnostics 4 14 SPN Diagnostics Traffic 4 14 SPN Diagnostics Link Statistics 4 15 SPN Devices Diagnostics 4 15 Using SVC GAT 4 16 Tilt Codes 4 19 16 020834 00 November 2007 ...

Page 64: ...er Light indicators some jurisdictions have different Tower Light functionality The upper portion of the tower light is the Attendant indicator the lower portion is the Service indicator The lights illuminate for several reasons and characterize the exact nature of the event causing the indication Each light has five states Off On Slow Flash Medium Flash and Fast Flash Fast Flash blinks eight time...

Page 65: ...rom the Power Entry Assembly 4 Check the LED power lights on the Bulkhead Board 5 Check the harness that goes connects the SMIB to Comm Ports 1 or 2 on the Bulkhead Board 6 Replace the entire Power Entry Assembly 7 Replace the SMIB Game comes up with a double call attendant window or No Trigger errors 1 Replace the BIOS chip 2 Replace the SPI chip 3 Replace both chips at the same time 4 Replace th...

Page 66: ... Board 3 Replace CPU 4 Replace Bulkhead Whole game is blacked out 1 Verify connection to outlet 2 Verify the Power Strip under the game to see if it has been tripped if applicable 3 Check to see if the power plug is connected to the transformer 4 Check fuse on transformer 5 Replace transformer 6 Replace Power Entry Assembly 7 Replace Power Strip 8 If necessary install an entirely new set of Power ...

Page 67: ...omponents Cash Devices Diagnostics The Diagnostics Menu Figure 4 1 includes an added Cash Devices option which allows you to perform the following tests Bill Validator Test for tickets and vouchers Coin Acceptor Test counting coins sent to either the Hopper or Drop Hopper Tests 1 coin or 10 coin test with counter displayed Printer Test printing a void ticket NOTE Before initiating any Cash Devices...

Page 68: ...e Administration Menu select Diagnostics 2 Select Input Output Diagnostics 3 Select Cash Device Diagnostics Figure 4 2 Figure 4 2 Cash Device Diagnostics Menu 4 Select Bill Validator The Bill Validator Diagnostic screen displays Figure 4 3 Figure 4 3 JCM Billval Diagnostic screen 5 Insert a valid bill or voucher into the Bill Acceptor ...

Page 69: ...tic Tools 16 020834 00 6 A message regarding the inserted bill or voucher displays Figure 4 4 or Figure 4 5 Figure 4 4 JCM Billval Diagnostic screen 20 bill example Figure 4 5 JCM Billval Diagnostic screen ticket ...

Page 70: ...te the successful rejection Figure 4 6 NOTE After a time out period the Bill Acceptor rejects the bill or voucher automatically Figure 4 6 JCM Billval Diagnostic screen 8 Press Exit or Return to Game An Exit banner displays for 2 5 seconds ensuring that the Bill Acceptor is disabled Figure 4 7 Figure 4 7 Exit banner ...

Page 71: ... Hopper and Coin To Drop to indicate where the coins are being routed Figure 4 8 B 7 Insert coins 8 The number of coins inserted increments each of the fields as follows Coin To Hopper Coins routed to Hopper Coin To Drop Coins routed to the Drop or coins routed to the Drop once Hopper is full Coin Total The total number of coins in the Hopper and Drop 9 Verify that the coin count increments each t...

Page 72: ... Diagnostics screen 5 Perform a 1 Coin test a Select Paid 1 Coin b The Hopper dispenses a single coin c The Coin Paid counter increments to 1 6 Perform a 10 Coin test a Select Paid 10 Coins b The Hopper dispenses 10 coins c The Coin Paid counter increments to 10 7 If necessary select Hopper Shutoff to stop the Hopper from dispensing coins 8 When the test is complete select Exit 9 Under special cir...

Page 73: ...ut Output Diagnostics 3 Select Cash Devices Diagnostics 4 Select Printer The Printer Diagnostic screen displays Figure 4 10 Figure 4 10 Printer Diagnostics screen 5 Select Print Void Ticket A ticket prints while displaying a message on the screen Figure 4 11 Figure 4 11 Printer Diagnostics screen 6 Verify that a ticket printed 7 Select Exit once the test is complete ...

Page 74: ...ponding to the game Complete the following steps 1 From the Administration Menu select Diagnostics 2 Select WMSP Diagnostics Figure 4 12 Figure 4 12 WMSP Diagnostics menu 3 Select WMSP Traffic Statistics Figure 4 12 The WMSP Traffic Statistics screen displays Figure 4 13 Figure 4 13 WMSP Traffic Statistics screen 4 Select Update Data to refresh the displayed data 5 Select Exit to return to the Adm...

Page 75: ...game Complete the following steps 1 From the Administration Menu select Diagnostics 2 Select WMSP Diagnostics Figure 4 12 3 Select WMSP Link Statistics Figure 4 12 The WMSP Link Statistics screen displays Figure 4 14 Figure 4 14 WMSP Link Statistics screen 4 Select Update Data to refresh the displayed data 5 Select Exit to return to the Administration Menu ...

Page 76: ...ic data corresponding to the game Complete the following steps 1 From the Administration Menu select Diagnostics 2 Select SPN Diagnostics Figure 4 15 Figure 4 15 SPN Diagnostics menu 3 Select SPN Traffic Statistics Figure 4 15 The SPN Traffic Statistics screen displays Figure 4 16 Figure 4 16 SPN Traffic Statistics screen 4 Select Update Data to refresh the displayed data 5 Select Exit to return t...

Page 77: ...re 4 17 SPN Link Statistics screen 4 Select Update Data to refresh the displayed data 5 Select Exit to return to the Administration Menu SPN Devices Diagnostics This function displays data for each individual SPN device in the game Complete the following steps 1 From the Administration Menu select Diagnostics 2 Select SPN Diagnostics Figure 4 15 3 Select SPN Device Diagnostics Figure 4 15 The Devi...

Page 78: ... Exit to return to the Administration Menu Using SVC GAT Complete the following steps to use a software verification SVC game authentication terminal GAT to verify game software components 1 Open the Main Door 2 Using an SVC or GAT terminal connect a standard serial cable to the J14 connector on the Bluebird Video CPU Board Figure 4 20 A Figure 4 20 Bluebird Upright CPU Enclosure 3 Press the DIAGN...

Page 79: ...ure 4 21 Figure 4 21 SVC GAT on the Administration Menu The SVC Authentication Interface screen displays Figure 4 22 Figure 4 22 SVC Authentication Interface screen 5 Select the Stage 1 or Stage 2 button to verify any of the available software components ...

Page 80: ...ntication Level 2 screen 7 Follow the instructions provided on the screen to perform the authentication Figure 4 24 Figure 4 24 OS Authentication Level 2 screen example 8 Send the request from the SVC GAT as requested on the screen to collect results 9 The results display on the SVC GAT If necessary consult the SVC GAT documentation for more information on utilizing the application or terminal 10 ...

Page 81: ... Motor RAM ROM Replace the Bill Acceptor head BillVal Door Open Bill Acceptor Door is open Check the Bill Acceptor Door Check connections on cherry switch Replace switch Replace the CPU Board Replace Bulkhead BillVal Port Error An attempt to open close read or write through the COM port on the Bulkhead Board has failed The Bulkhead Board is not communicating with the Bill Acceptor through the COM ...

Page 82: ...nal with an optic signal There was a sense signal with no optic signal Check the Coin Acceptor and optics for coin jams Coin Acceptor Jam The Coin Acceptor reported that one or more coins are jammed in the coin path Check Coin Acceptor and optics Clear any jammed coins Coin Acceptor System Error The Coin Acceptor detected that the coin in signals did not occur in the expected order Check the Coin ...

Page 83: ...ter 1 shorted The meter connector is shorted Check the meter connection If necessary replace the meter harness Hard Meter 2 shorted The meter connector is shorted Check the meter connection If necessary replace the meter harness Hard Meter 3 shorted The meter connector is shorted Check the meter connection If necessary replace the meter harness Hard Meter 4 shorted The meter connector is shorted C...

Page 84: ...rect If the firmware is not correct change the firmware Logic Door Open Logic Door is open Check the Logic Door Check connections on cherry switch Replace switch Replace the CPU Board Replace Bulkhead Machine Disabled The Host has disabled the game Displays for various reasons including SAS communication breakdown Review Host System messages for detailed information Main Door Open Main Door is ope...

Page 85: ...he Top Box Logic Door Check connections on cherry switch Replace switch Replace the CPU Board Replace Bulkhead Open Door S Bill Acceptor Cashbox Door is open Check the Bill Acceptor Stacker Cashbox Door Check connections on cherry switch Replace switch Replace the CPU Board Replace Bulkhead Open Door T Top Box Main Door is open Check the Main Top Box Door Check connections on cherry switch Replace...

Page 86: ...Line The Printer reported an offline status Check Printer cabling Printer Open Error The Printer reported an open status For the Seiko FutureLogic the Printer detected a door open error or a platen disengaged error Open and close the Printer Printer Out of Paper The Printer detected an out of paper status or a lost paper input status Refill the paper Check optic on printer Printer Paper In Chute F...

Page 87: ...d or central system and that the data entered matches the actual game configuration Verify that the cables are functional Replace the Progressive Controller software Verify that the game has been configured in Admin Protocol Com Error A com port error has occurred Check Host communication configuration in Administration Mode Verify that the game has been entered into the casino backend system Prot...

Page 88: ... The controller reported an initialization error Check the Touch Screen controller Replace LCD Waiting For Progressive Win Amount A progressive win has occurred and the game is waiting to receive the confirmed progressive win amount from the Progressive Controller This condition clears itself automatically once the confirmed win amount is received If the game does not receive a confirmed win amoun...

Page 89: ...o Cabinet Lower Door 5 6 Bluebird Upright BBU Door Latch Mechanism 5 7 Bluebird Upright BBU Bill Acceptor 5 8 Bluebird Upright BBU 12 inch Top Box 5 9 Bluebird Upright BBU 13 inch Round Top Box 5 10 Bluebird Upright BBU 17 inch Top Box 5 11 Bluebird Upright BBU 7 inch Top Box 5 12 Block Diagram for BBU AC Power Distribution 5 13 Block Diagram for BBU Bulkhead with CPU NXT 5 14 Block Diagram for BB...

Page 90: ...bird Upright BBU Video Cabinet Power Components ITEM DESCRIPTION 1 POWER STRIP 2 BALLAST POWER SWITCH ASSEMBLY 3 BULKHEAD PANEL ASSEMBLY 4 CPU ENCLOSURE 5 24V POWER SUPPLY BOSE AMP ASSEMBLY 6 POWER ENTRY ASSEMBLY 7 ATX DC POWER SUPPLY ...

Page 91: ... 14246 00 00 SW MOMENTARYDPDTINTERLOCK 2 12 6799 006989 00 04 BRAID GROUND 8 1 4 8 2 13 01 012704 BRKT SPNPCBMTG BUX 1 14 A 012604 02 00 PCBA SPNDISTRIBUTIONII 1 15 4008 007026 08 8 32x08P H LH X WF M SS TZ N 4 16 A 009816 01 ASSY BLSTPWR SWTCH BUV 1 17 01 011915 BRKT PRNTR CABMTG UBX 1 18 01 013952 BRKT PRNTRBASE BUX 1 19 02 011506 01 POST SHLDR8 32INTTHD 09THK BUX 2 20 BBU OC PRINTER BBU OC PRIN...

Page 92: ... NO KEY SHIPPING 1 38 01 12793 08 CAM FLT 1 25 DUAL MTG 1 39 01 008302 BRKT WBA DR SW ACTR UBX 1 40 4006 01027 04 6 32x04 PHL RDW MS ST ZN 1 41 A 010954 BBU METER 1 42 A 013324 01 ASSY SERVICE LMP DUAL BUX 1 43 24 005467 BULB 4PIN PL 9 W O STARTER 1 44 01 001614 04 CAM OFFSET 1 50x 25 DUAL MTG 1 45 08 013053 SPT SHIPPING LCK RTNR BUX 1 46 03 013054 RTNR CAP VINYL 7 16 I D 1 47 A 010771 ASY LWR DR ...

Page 93: ... 13 4408 01128 00 NUT 8 32 KEPS ST ZN 1 14 03 017288 00 00 HSG PYLN HSG INS BUR 1 15 A 018026 01 00 PCBA 20 LINE PAYLINE 5 DIGIT 1 16 4106 01009 06 6 19x06 PHL PAN PLS ST ZN 4 17 01 018473 02 00 CVR PYLN PCB 2 3 DIGIT BUR 1 18 4006 01003 06 6 32x06 PHL PAN E MS ST ZN 6 19 20 10011 06 RIVET SNAP RICHCO SR 3545 W 7 20 03 018480 00 00 SBOX LED PCB 7 7 5 DIGIT BUR 1 21 A 016671 01 00 PCBA LED DISPLAY ...

Page 94: ...6 A 012562 01 00 ASY PCB UNIVERSAL ANIMATOR CTRLR 1 7 03 012325 CVR BAP PCB CNTRLLR BUX 1 8 31 009912 XX INS PLAY MAX 1 9 03 008236 LENS TCE DENOM CLR UBV 1 10 G 014397 BTN ASY BAS BAP LOWER DOOR BBU 1 11 20 016108 00 00 ZZZ SPCR LWR DR PLYR TRK BUX 1 12 01 008245 XXZZZ PLT LWR DR UBX 1 13 31 011169 XX DCL PLYTRK PLT 1 14 4408 01128 00 NUT 8 32 HEX KEPS ST ZN 6 15 34 016182 00 XX TMPLT LWR DR P TR...

Page 95: ...OC UBV 1 2 4700 002560 00 FW 320x 750x 030 CRS ZN 3 3 4008 000203 06 8 32x06 PHL TRS MS ST ZN 3 4 01 010209 BRKT CAB DR REL UBX 2 5 4420 01141 00 NUT 1 4 20 FLANGRIP ST ZN 1 6 02 008218 PIN MAIN DR ACTR UBX 2 7 02 008219 NUT MAIN DR ACTR REL UBV 1 8 6799 006989 00 09 BRAID GROUND 8 8 6 5 1 9 4408 01128 00 NUT 8 32 HEX KEPS ST ZN 1 ...

Page 96: ...ON QTY 1 01 013248 01 00 HSG WBA BUX 1 2 20 004576 LOCK THUMB NO KEY SHIPPING 1 3 01 12793 08 CAM FLT 1 25 DUAL MTG 1 4 4008 007027 04 8 32x04 PHL HXW F ST TT ZN 4 5 01 008302 BRKT WBA DR SW ACTR UBX 1 6 4006 01027 04 6 32x04 PHL RDW MS ST ZN 1 7 BBU OC BILL VALIDATOR BBU OC BILL VALIDATOR 1 ...

Page 97: ... 125 SHLDR 1 5 03 7655 12 CLAMP CBL 3 4 1 6 03 7655 8 CLAMP CBL 1 2 3 7 20 010653 01 FASTNER PUSH RICHCO BPF F4410 6 8 24 8804 BULB FLUOR 15W 18 F15T8CW 1 9 4408 01128 00 NUT 8 32 KEPS ST ZN 8 10 4408 01141 00 NUT 8 32 FLANGEGRIP ST ZN 8 11 A 007668 04 ZZZ ASSY CRWN T B 48 VIDEO BUV 1 12 A 013399 ASY 12 T B LMP BRKT MTG BUX 1 13 A 010774 ASY CAB FAN BRKT UBX 1 14 HD 012840 00 00 CBL DC FAN T B BUX...

Page 98: ... ZZZ CAB 13 RTOP 1 4 02 012839 02 PST 8 32x 125SHLDR 1 5 03 7655 8 CLAMP CBL 1 2 3 6 20 010653 01 FASTNER PUSH RICHCOBPF F4410 6 7 24 8804 BULB FLUOR 15W18 F15T8CW 1 8 4408 01128 00 NUT 8 32KEPS ST ZN 8 9 4408 01141 00 NUT 8 32FLANGEGRIP ST ZN 7 10 A 012399 07 ZZZ ASY CRWNRTOP 13 BUV 1 11 A 012525 ASY 13 RND T B LMP BUX 1 12 A 010774 ASY CAB FAN BRKT UBX 1 13 HD 012840 00 00 CBL DC FAN T B BUX 1 ...

Page 99: ... F15T8CW 1 19 4008 002563 08 8 32X08 PHL FLT 1 MS ST ZN 6 20 4008 007026 06 8 32X06 PHL HXW F MS ST ZN 5 21 4008 01041 06 8 32X06 PHL FLT MS ST ZN 4 22 4020 01178 08 1 4 20x08 HXW MS ST ZN 2 23 4408 01128 00 NUT 8 32 KEPS ST ZN 19 24 4408 01141 00 NUT 8 32 FLANGEGRIP ST ZN 8 25 5797 005236 01 CBL VGA FPD 1 26 6556 001668 00 00 FERRITE CORE SNAP ON 857x1 285 SQUARE 2 27 6620 008027 00 00 BALLAST 10...

Page 100: ... 125 SHLDR 1 5 03 7655 12 CLAMP CBL 3 4 1 6 03 7655 8 CLAMP CBL 1 2 3 7 20 010653 01 FASTNER PUSH RICHCO BPF F4410 6 8 24 8804 BULB FLUOR 15W 18 F15T8CW 1 9 4408 01128 00 NUT 8 32 KEPS ST ZN 8 10 4408 01141 00 NUT 8 32 FLANGEGRIP ST ZN 6 11 A 007668 01 ZZZ ASSY CRWN T B 43 VIDEO BUV 1 12 A 013398 ASY 7 T BX LMP BRKT MTG BUX 1 13 A 010774 ASY CAB FAN BRKT UBX 1 14 HD 012840 00 00 CBL DC FAN T B BUX...

Page 101: ...5 13 Chapter 5 Exploded Views Block Diagram for BBU AC Power Distribution ...

Page 102: ...5 14 Chapter 5 Exploded Views Block Diagram for BBU Bulkhead with CPU NXT ...

Page 103: ...5 15 Chapter 5 Exploded Views Block Diagram for BBU Bulkhead with CPU NXT ...

Page 104: ......

Page 105: ... Media 6 7 RAM 256MB to 512MB Upgrade Kit 6 7 Switches 6 7 Miscellaneous Electrical Parts 6 7 Mechanical Parts 6 8 Cams 6 8 Marquees 6 8 Marquee Adaptor Kits 6 8 Miscellaneous Mechanical Parts 6 8 Plates Brackets and Covers 6 8 Transmissive Reels 6 9 Top Box Glass Mounting Frame 6 9 Top Box Kits 6 10 Tower Lights 6 10 Peripherals 6 10 Other Parts 6 11 Decals Inserts 6 11 Labels 6 11 Top Award Inse...

Page 106: ...nd may change without notice CAUTION The use of any component not listed in this chapter or any other unapproved hardware causes non compliance of the BBU Only replace BBU components with WMS approved components and parts to ensure compliance with all product and safety certifications and requirements Ordering Parts Replacement parts are ordered by contacting the Customer Resource Center at WMS 86...

Page 107: ...9w x 2 6620 018006 00 00 ballast univ input dual 6w 6620 004995 00 00 ballast universal input 15wS 24 005467 bulb 4pin pl 9 w o starter 24 014092 bulb fluor 4pin 5w w o starter 4100k 24 8809 bulb fluorescent 15w 18 24 010167 bulb t3 25 wedge 14v 24 008144 lamp 9 6w f6t5cw 6710 005466 00 00 socket 4pin pl 9 fluorescent service lamp 6710 9848 00 00 socket fluorescent lmp 24 8841 socket mini bi pin s...

Page 108: ...utton std w See Pays KIT 015880 00 16 zzz 14 Button w Green Feature KIT 015880 00 13 zzz 14 Button w Orange Feature KIT 015880 01 20 zzz 14 Button w Purple Feature KIT 015880 01 14 zzz 14 Button w Red Feature KIT 015880 01 19 zzz 14 Button w Yellow Feature KIT 015880 00 01 zzz 5 Button KIT 015880 00 03 D12 5 Button Monopoly Money KIT 015880 00 05 zzz 6 Button Can t Lose Table 6 3 Buttons and Butto...

Page 109: ...q max lines 20 001986 22 insert sq 1 line 20 001986 194 insert sq 15 lines 20 001986 26 insert sq 5 lines 20 001986 69 insert sq 9 lines 20 001986 27 insert sq play 1 per line 20 001986 28 insert sq play 2 per line 20 001986 29 insert sq play 3 per line 20 001986 245 LENS LRG RND CLEAR BTN 20 018133 01 00 00 00 Lens m rnd clear btn 20 018132 01 00 00 00 lens sq clear btn vlt 01 009787 25 D04 pnl l...

Page 110: ...2938 02 00 pcb Printer Power Fail Reset A 006672 04 00 pcba bluebird bulkhead A 15895 01 00 pcba fiber optic link Table 6 6 Fuses Part Numbers Description 6733 005797 00 00 fuse holder panel 5mm x 20mm 6731 017329 00 00 fuse 5x20mm hc sb 10a 250 Table 6 7 Mechanical Assemblies Part Numbers Description A 010779 01 assembly bv hsg wba 13 ubx A 009561 00 00 assembly cntr 7dgt 12vdc w conn A 010770 as...

Page 111: ...1 01 label A 008316 19 board upgrade A 010785 01 ASSY Bluebird CPU NXT 256MB CPU Assembly A 010785 05 ASSY Bluebird CPU NXT 256MB CPU Assembly hinged door A 010785 04 ASSY Bluebird CPU NXT 512MB CPU Assembly A 010785 07 ASSY Bluebird CPU NXT 512MB CPU Assembly hinged door A 008316 0x ASSY Legacy 550 3601 PCB 256 MB CPU A 008316 19 ASSY Legacy 550 3601 PCB 512 MB CPU Table 6 10 Switches Part Number...

Page 112: ... Part Numbers Description KIT 015933 00 01 kit marquee mtg bbu 7 12 KIT 015933 00 02 kit marquee mtg bbu 12 17 Fastback KIT 015933 00 03 kit marquee mtg bbu 13 18 Table 6 15 Miscellaneous Mechanical Parts Part Numbers Description A 012866 assembly cn deflector bux used on the Coin Tray A 011502 01 kit spare parts BBU 02 008221 post b pnl l dr sprg rel ubv 02 010321 roller brr pnl ubx 02 010320 sha...

Page 113: ...cket Top Box conn ubx 01 008248 bracket wba conn mtg ubv 01 008302 bracket wba dr sw act ubx 03 009532 cover opto board 01 010591 plate 24v h snk assy bux Table 6 16 Plates Brackets and Covers continued Part Numbers Description Table 7 Part Descriptions Part Numbers Description A 015476 01 00 asy brr pnl upr dr bux A 019039 00 00 Asy Reel Shield 03 018306 00 00 bezel 20 lcd lava bux HS 019386 00 0...

Page 114: ...zz zzz psa t b 12 BBU Video PSA 015930 05 zzz zzz psa t b 13 Round BBU Video PSA 016679 00 zzz zzz psa t b 17 Fastback BBU Video LCD PSA 016992 00 zzz zzz psa t b 18 Round BBU Video PSA 015928 01 zzz zzz psa t b 7 BBU Video Table 6 3 Tower Lights Part Numbers Description 20 008273 00 01 twr lt 2 tier shrt std bux 20 008273 00 02 twr lt 2 tier shrt rnd bux 20 012194 00 02 twr lt 2 tier tall rnd bux...

Page 115: ...588 07 label bb plytrk receptacle 16 010588 07 label bb plytrk receptacle 16 010588 07 label bb plytrk receptacle 16 010588 06 label bb pwr configuration 16 010588 06 label bb pwr configuration 16 010588 06 label bb pwr configuration 16 010588 01 label bb switched receptacle 16 010588 08 label bb tb fuse rating 16 010588 09 label game configuration model tb 16 010588 12 label game configured 16 00...

Page 116: ...nternational 31 011100 SD xxx BB TCE Slant Denom Inserts 31 012000 SMD xxx BB TCE Slant Multi Denom Inserts 31 009900 SMC xxx BB TCE Slant Play Max Credit Inserts 31X011100 UD xxx BB TCE Upright Demom Insert International 31 011100 UD xxx BB TCE Upright Denom Inserts 31 012000 UMD xxx BB TCE Upright Multi Denom Inserts 31 009900 UMC xxx BB TCE Upright Play Max Credit Inserts Table 6 8 Tower Light ...

Reviews: