background image

User manual Wilo-Geniax Central Control

31

Daily operation and quick settings

English


3.

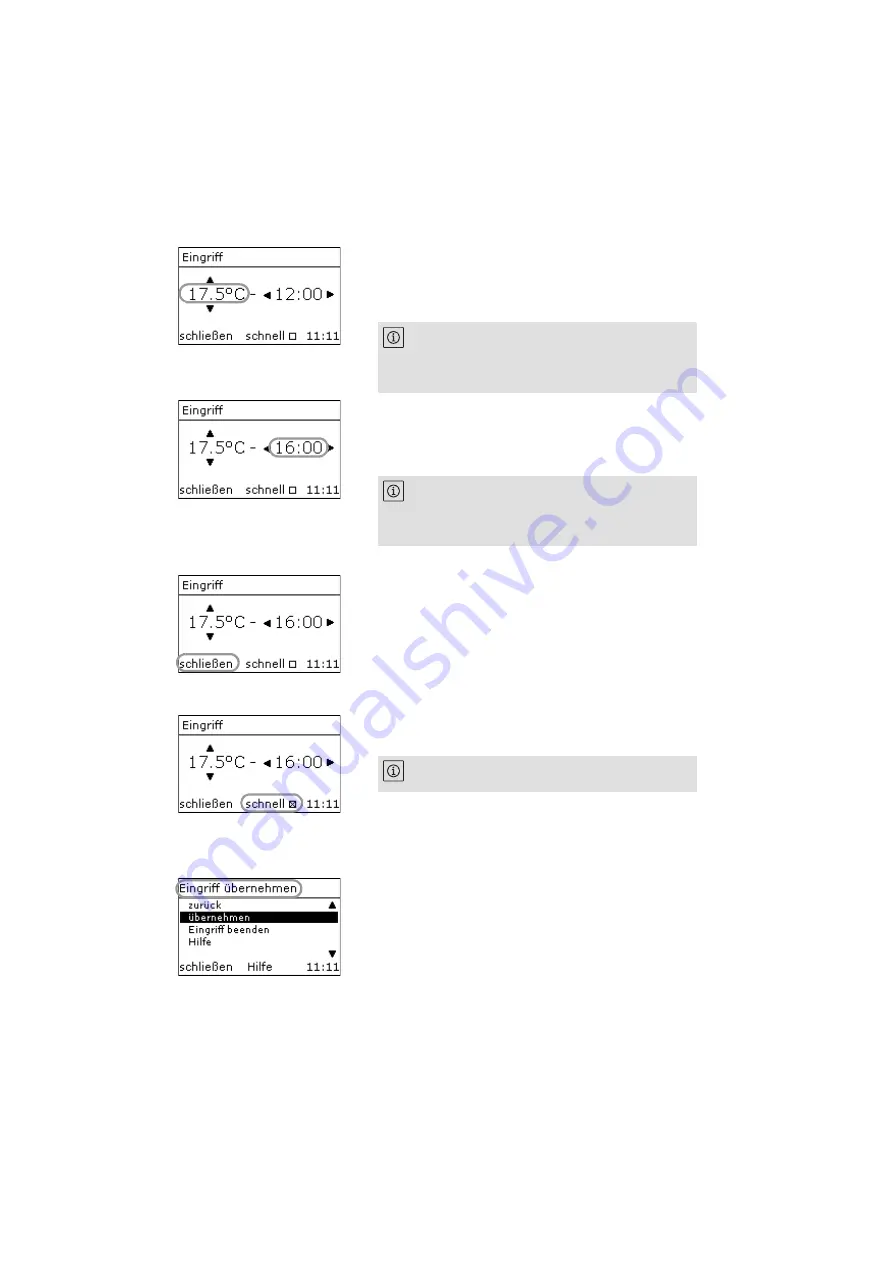
Select the desired room target temperature with the [

and [

] buttons:

[

] for a higher temperature, e.g. »

17.5°C

«,

[

] for a lower temperature  


4.

Use the [

] and [

] buttons to select the time up to when 

the room target temperature should be maintained:
[

] for a earlier time

[

] for a later time, e.g. »

16:00

«. 

Do not apply values?

5.

In case you want to retain the original values and do 

not


want to apply the changed values, press the [

Close

] func-

tion button.

The display changes back to the room main display. 
The active time profile remains active. 
Start with Step

2.

 to input again.

Quick heating-up?

6.

In case you want a particularly quick heating up of the 
room, press the [

Quick

] function button.

Pressing the function button again resets the function.  

Apply values?

7.

In order to apply the values, press [

OK

] on the navigation 

button. 


The display shows the »

Apply intervention

« selection 

menu. 

8.

 Use the [

] and [

buttons to select the »

Apply

« menu 

point and press [

OK

] or [

].

If you lightly tap on the buttons, the temperature 
will be adjusted in 0.5°C steps. If you press and hold 
down the buttons, the temperature will be 
adjusted in 1°C steps.

If you lightly tap on the buttons, the time will be 
adjusted in 1-minute steps. If you press and hold 
down the buttons, the time will be adjusted in 15-
minute or hour steps.

“Quick heating-up” increases energy use of the 
heating system.

Summary of Contents for Geniax Central Control

Page 1: ...GB User manual Wilo Geniax Central Control 2 122 587 Ed 01 2011 04 Wilo www geniax de...

Page 2: ......

Page 3: ...tons 14 3 2 3 Operational readiness 15 3 2 4 Changing main display 15 3 2 5 Navigating in the selection menus 15 3 2 6 Setting the values in the input menus 16 3 2 7 Calling up information in the disp...

Page 4: ...ent today for a room group 45 5 3 6 Present until for a room group 46 5 3 7 Editing presence for a room group 50 5 3 8 Ending presence for a room group 51 5 4 Temporary absence 53 5 4 1 Briefly away f...

Page 5: ...up 88 7 4 Setting day and night period 90 7 4 1 Setting day night area for the room 90 7 4 2 Setting day night area for a room group 91 7 5 Calling up factory configuration 92 7 5 1 Viewing the preset...

Page 6: ...4 2011 11 7 Do not cover the Central Control 105 11 8 Close roller blinds 105 12 Menu structure 106 12 1 Room function 106 12 2 Central functions 107 13 Technical information 108 13 1 Type key 108 13...

Page 7: ...and correct operation of the product These instructions correspond to the relevant version of the product and the underlying safety standards valid at the time of going to print Save these operating...

Page 8: ...fore operating instructions it designates preconditions for carrying out the sequence of action In paragraphs this symbol designates lists with out a fixed order 1 Introduction page 5 This highlightin...

Page 9: ...as to use the Central Control Extended functions In section 6 Calling up information page 69 and 7 Extended operation setting up the Central Control page 76 complex functions of the Central Control ar...

Page 10: ...utilisation or any utilisation that exceeds this is not considered to be an intended use Intended use also includes adherence to these operating instructions Warning This device is not intended for u...

Page 11: ...l Control 9 For your safety English 2 3 Who is allowed to do what Wilo recommends that some functions only be changed by an expert or in consultation with an expert This is indi cated in the respectiv...

Page 12: ...y In normal operation the display shows the room or central main display 3 1 1 Room main display The room main display shows various items of status information for the room in which the Central Contr...

Page 13: ...erature is the temperature as is currently measured in the room If the room temperature is below the room target temperature then the room will be heated Time specification The time specification indi...

Page 14: ...operating status of the Geniax system e g heating mode fault See section 10 Symbols page 99 The percentage of centrally con trolled rooms can be read at the filling level bar The three markings corres...

Page 15: ...lues is done in the display via a menu display When doing this there are three menu types Selection menus Selection menus consist of a list of menu points Every menu point leads to a further menu Inpu...

Page 16: ...3 2 2 Function buttons The two function buttons have different functions depending on the menu display The allocated functions are shown in the display directly above the function but tons Assignment...

Page 17: ...order to change from the room main display to the cen tral main display press the Central function button In order to change from the central main display to the room main display press the Room func...

Page 18: ...the menu point Help and then the OK button Cancel selection In order to cancel the selection press the Close function button 3 2 6 Setting the values in the input menus Values are changed in the input...

Page 19: ...th or the year Then press the and buttons to change the selected entry Change temperature In order to change the displayed temperature press the and buttons Apply values In order to apply changed valu...

Page 20: ...2011 3 2 7 Calling up information in the display menus Additional information is shown in the display menus The displayed values can not be changed Exit display menu In order to exit a display menu pr...

Page 21: ...e display as room mode Week profile The week profile is the standard time profile It is always active as soon as another time profile is completed You cancreate up tothreetimeareasfor everydayofthewee...

Page 22: ...vating the week profile 5 3 Temporary presence page 39 For absences for example holidays the selected period willbe heated at an energy savingtemperature aroundthe clock Fig 5 Representation of a day...

Page 23: ...ly adjusting room temperature page 30 The current time profile is deactivated for the duration of an intervention After that the previously active time pro file is applied again Fig 7 Representation o...

Page 24: ...a central time profile in the Central Control is activated then this time profile becomes active for all the room user interfaces that are included in the central control 7 1 Configuring central cont...

Page 25: ...and in the night period 4 2 3 Minimum temperature The minimum temperature specifies the lowest tempera ture that can be set in the input menus 4 2 4 Maximum temperature The maximum temperature specifi...

Page 26: ...ivated central time profile will become automatically active again should the locally activated room time profile end If a room is to be completely excluded from the central control the correspondingG...

Page 27: ...heating sequence for a short time you can temporarily deactivate the week profile and instead manually adjust the room temperature as follows Temporarily adjusting room temperature Perform an interve...

Page 28: ...t until for the room page 54 The absence time profile can be activated for the room or a room group A manual adjustment of the room temperature with one of the named procedures is a good idea if the a...

Page 29: ...the standard time profile for all the rooms included in the central con trol 5 1 1 Activating the central week profile for a room group 1 Press the Central function button in case the central main dis...

Page 30: ...e central control The pre set time profile remains active Activate week profile 8 In order to activate the week profile press the Activate function button The display shows the Save dialogue 9 In orde...

Page 31: ...display shows the main display The central active Week profile room mode is indicated by the symbol 2 Press the Menu function button The display shows the Menu selection menu 3 Use the and buttons to...

Page 32: ...s To do this select a desired room target temperature and a time up to when the temperature in the room should be maintained At the selected time the current time profile will auto matically be activa...

Page 33: ...rt with Step 2 to input again Quick heating up 6 In case you want a particularly quick heating up of the room press the Quick function button Pressing the function button again resets the function App...

Page 34: ...he tem peraturesequenceofthe room with thisfunction Youcan onlycarryoutthischangeifthe Intervention roommode is active and the symbol is shown in the room main dis play 1 Press the Room function butto...

Page 35: ...mode for the room early You can only carry out this func tion if the Intervention room mode is active and the symbol is shown in the room main display 1 Press the Room function button in case the roo...

Page 36: ...emperature difference from the room tempera ture and a time up to when the temperature change should be maintained At the selected time the current time profile will be auto matically activated again...

Page 37: ...the displayed value to lower the temperature by the displayed value Do not apply values 8 In case you want to retain the original values and do not want to apply the changed values press the back func...

Page 38: ...intervention warmer colder for a room group You can subsequently edit the intervention warmer colder in the temperature sequence of a room group with this function You can only make this change if the...

Page 39: ...u point and press OK or The display showsthe Rel temperature change input menu 7 Continue with step 6 in section 5 2 4 Intervention warmer colder for a room group page 34 5 2 6 Ending intervention war...

Page 40: ...ss OK or The display shows the Central active interventions selection menu 5 Use the and buttons to select the Warmer colder menu point and press OK or The display shows the Warmer colder central sele...

Page 41: ...rn home early during the day you can use this time profile to heat the room for the rest of the day period at the preset comfort temperature At the end of the day the preset time profile is activated...

Page 42: ...tempera tures for the room for day and night periods At the end of the select period the preset time profile is automatically activated again 1 Press the Room function button in case the room main di...

Page 43: ...for selection to the right 6 Select the desired final date of your presence with the and buttons for a later final date for a earlier final date 7 Apply your input with OK The display shows the Prese...

Page 44: ...ntil input menu 11 Use the and buttons to select the desired room target temperature for By day until or At night until 12 Use the and buttons to select the time up to when the room target temperature...

Page 45: ...ion You can only carry out this change if the Present room mode is active and the symbol is shown in the room main display 1 Press the Room function button in case the room main display is still not d...

Page 46: ...to end the Present room mode for the room early You can only carry out this function if the Present room mode is active and the symbol is shown in the room main display 1 Press the Room function butto...

Page 47: ...spontaneously stay at home for a day or return home early during the day you can use this time profile to heat a room group for the rest of the day period at the preset comfort temperature At the end...

Page 48: ...layed period the preset time profile is activated again 5 3 6 Present until for a room group In case you are going to remain at home for several days weeks or months due to illness for example you can...

Page 49: ...u 4 Use the and buttons to select the Central inter ventions menu point and press OK or The display shows the Central interventions selec tion menu 5 Use the and buttons to select the Present until me...

Page 50: ...press OK or The display shows the Present until input menu 10 Follow the instructions in step 6 to step 8 Use the individual settings for every room 11 Use the and buttons to select the Apply menu po...

Page 51: ...n order to changeday ornight time room settings usethe and buttons toselect the By day or At night menu point and press OK or Depending on the selection the display shows the By day until or At night...

Page 52: ...ile is activated again 5 3 7 Editing presence for a room group You can subsequently edit the settings for the presence time profile of a room group with this function You can only carry out this chang...

Page 53: ...ion menu 5 Use the and buttons to select the Present menu point and press OK or The display shows the Present central selection menu 6 Use the and buttons to select the Edit menu point and press OK or...

Page 54: ...ay shows the Central control selection menu 4 Use the and buttonstoselect the Central active interventions menu point and press OK or The display shows the Central active interventions selection menu...

Page 55: ...ain 1 Press the Room function button in case the room main display is still not displayed The display shows the room main display 2 Press the Menu function button The display shows the Menu selection...

Page 56: ...e displayed period the preset time profile is activated again 5 4 2 Absent until for the room With this time profile you can define an energy saving room target temperature to be maintained during the...

Page 57: ...input menu 5 Use the and buttons to select whether you want to set the day month or year of the final date of your absence for selection to the left for selection to the right 6 Select the desired fi...

Page 58: ...n menu 11 Follow the instructions from Step 5 to Step 7 Subsequently change the return time 12 In order to change the return time use the and buttons to select the Return at menu point and press OK or...

Page 59: ...Absent room mode At the end of the set period the preset time profile is activated again 5 4 3 Editing absence for the room You can subsequently edit the settings for the absence time profile with thi...

Page 60: ...set till then 5 Continue with step 10 in section 5 4 2 Absent until for the room page 54 5 4 4 Ending absence for the room You can use this function to end the Absent room mode for the room early You...

Page 61: ...sent room mode has been ended and the preset time profile is active again 5 4 5 Briefly away for a room group In case you leave the house for short periods for example to shop you can lower the room t...

Page 62: ...nu 5 Use the and buttons to select the Briefly away for menu point and press OK or The display shows the Briefly away for selection menu Absent for 2 4 or 8 hours 6 Use the and buttons to select the m...

Page 63: ...ng to be absent or on holidays for several days weeks or months At the end of the select period the preset time profile is automatically activated again 1 Press the Central function button in case the...

Page 64: ...e left for selection to the right 7 Select the desired final date of your absence with the and buttons for a later final date for a earlier final date 8 Apply your input with OK The display shows the...

Page 65: ...nt until input menu 14 Follow the instructions in step 9 to step 10 Use the individual settings for every room 15 Use the and buttons to select the Apply menu point and press OK or The display shows t...

Page 66: ...the menu 17 In order to change the temperature use the and buttons to select the Reduce to menu point and press OK or The display shows the Absent until input menu 18 Selectthedesiredroomtargettemper...

Page 67: ...out this change if the Absent room mode is active and the sym bol is shown in the central main display 1 Press the Central function button in case the central main display is still not displayed The...

Page 68: ...ess OK or The display shows the Absent selection menu with the final date of your presence 7 Continue with step 11 in section 5 4 6 Absent until for a room group page 61 5 4 8 Ending absence for a roo...

Page 69: ...ction menu 4 Use the and buttonstoselect the Central active interventions menu point and press OK or The display shows the Central active interventions selection menu 5 Use the and buttons to select t...

Page 70: ...ess the Menu function button The display shows the Menu selection menu 3 Use the and buttons to select the Settings menu point and press OK or The display shows the Settings selection menu 4 Select th...

Page 71: ...not displayed The display shows the room main display 2 Press the Menu function button The display shows the Menu selection menu 3 Select the Information menu point and press OK The display shows the...

Page 72: ...ain display 2 Press the Menu function button The display shows the Menu selection menu 3 Select the Information menu point and press OK The display shows the Information selection menu 4 Select the En...

Page 73: ...splay is still not displayed The display shows the room main display 2 Press the Menu function button The display shows the Menu selection menu 3 Select the Information menu point and press OK The dis...

Page 74: ...election menu in case you want to have other temperature specifications shown or wait until the dis play automatically shows the main display again Display the maximum temperature 11 In order to the d...

Page 75: ...he display shows the room main display 2 Press the Menu function button The display shows the Menu selection menu 3 Select the Information menu point and press OK The display shows the Information sel...

Page 76: ...nd press OK The display shows the Contact person display menu 5 Return with back to the Information selection menu or wait until the display automatically shows the main dis play again 6 6 Displaying...

Page 77: ...ations of symbols menu point and press OK The display shows the Explanations of symbols dis play menu 5 Use and to select the desired symbol The display shows the brief designation of the dis played s...

Page 78: ...guring central control functions With the Central Control several Geniax room user inter faces or as the case may be rooms which are included in the central control can be controlled from one Central...

Page 79: ...In order to include the Central Control room in the central control select the Include room for centr contr menu point and press OK The display shows the Menu selection menu The third menu point in no...

Page 80: ...The menu items of the rooms which are excluded from the central control are ticked 7 2 Editing the week profile Up to three different time areas can be created for each weekday in the week profile Yo...

Page 81: ...ction menu via Settings Room Week profile The display shows the Edit week profile selection menu 3 Use and to select the weekday whose time areas you want to edit 4 Use and to select the time area of...

Page 82: ...K to open the input menu 13 Use and to enter the room target temperature 14 Apply your input with OK Set underfloor heating 15 In order to set the temperature of the underfloor heating select Floor te...

Page 83: ...o exit the selection menu without applying the input press back Delete time area 22 In order to delete the time area select Deactivate time area and confirm with OK Apply values 23 In order to apply t...

Page 84: ...ress Central in case the central main display is still not displayed The display shows the central main display 2 Press Menu and navigate to the Week profile selection menu via Central control Central...

Page 85: ...menu 7 Use and to enter the starting time 8 Apply your input with OK 9 In order to set the end time of the time area select Up to and use OK to open the input menu 10 Use and to enter the end time 11...

Page 86: ...ryer select Towel dryer and use OK to open the input menu 19 Use and to enter the tempering stage 20 Apply your input with OK The display shows the selection menu Do not apply values 21 In order to ex...

Page 87: ...order to enter or change other time areas start again with step 3 Do not save week profile 25 To not save the week profile press Cancel The display shows the Close dialogue 26 Cancel with Yes or retu...

Page 88: ...ations for the room You can use this function to set the temperature specifi cations for the room 1 Press Room in case the room main display is still not dis played The display shows the room main dis...

Page 89: ...ions selection menu Change room frost protection temperature 9 In order to change the room frost protection temperature select the Room frost protection menu point and press OK The display shows the R...

Page 90: ...up You can use this function to set the temperature specifi cations for a room group 1 Press Central in case the central main display is still not displayed The display shows the central main display...

Page 91: ...ng the input to return to the Temperature specifications selection menu Change room frost protection temperature 9 In order to change the room frost protection temperature select the Room frost protec...

Page 92: ...d are used as period specification in the presence time profiles The periods are stored in the factory 13 3 Factory configuration page 109 You can change the default values incase your heating habits...

Page 93: ...nu 7 Set the time at which the night ends with the and buttons 8 Apply your input with OK or use back without applying the input to return to the Day night area selection menu 7 4 2 Setting day night...

Page 94: ...ange night period 6 In order to change the night period select Night ends at menu point and press OK The display shows the Night ends at input menu 7 Set the time at which the night ends with the and...

Page 95: ...ng selection menu 3 Select the View menu point and press OK The display shows the View presetting dialogue 4 Use and to select the weekday for which you want to see the presettings 5 Return to the Pre...

Page 96: ...tion to view the factory saved week profile for a room group 1 Press Central in case the central main display is still not displayed The display shows the room main display 2 Press Menu and navigate t...

Page 97: ...Presetting selection menu via Central control Central settings Name of the room group Presetting The display shows the Presetting selection menu 3 Select the Restore menu point and press OK Restore pr...

Page 98: ...ng start screen 1 Press Room in case the room main display is still not dis played The display shows the room main display 2 Press Menu and navigate in the Unit selection menu via Settings Unit The di...

Page 99: ...put with OK or use back without applying the input to return to the Unit selection menu 7 6 3 Setting the contrast 1 Press Room in case the room main display is still not dis played The display shows...

Page 100: ...austic cleaning agent which could damage the housing material 9 Disposal Proper disposal and recycling of this product prevents damage to the environment and risks to personal health 1 Use public or p...

Page 101: ...er ature Present The normal operation is currently being overrid den The room will be heated up to the preset temperature Until the end of the currently active time area or Until a time which can be f...

Page 102: ...perature will not be done Heating up optimisation The Geniax System provides heating to the room in such a way that the room target temperature is achieved within the selected time Heating optimisatio...

Page 103: ...ormation Key lock The key lock is activated A deactivation is done by simultaneously pressing the two function buttons Outdoor temperature Current outdoor temperature is displayed Brightness The devic...

Page 104: ...your building to suit your individual needs andyournormal daily routine Youcan pre program up to three heating up and cooling off periods for each weekday and assign the respective comfort and energy...

Page 105: ...ase the Wilo Geniax Decentralised Pump System automatically ensures sufficient frost protection in win ter 11 4 Sensibly ventilate residential rooms Wilo recommends only opening the windows for brief...

Page 106: ...t This can lead to the performance of the radiator of this heated room to not being sufficient to heat up the room up to the desired comfort temperature Although the heating is in opera tion the room...

Page 107: ...Besides this it should always remain accessible to you for operation 11 8 Close roller blinds At night the lower outdoor temperatures result in greater heating loss by glass and frames of windows and...

Page 108: ...t until back Outdoor temperature Temperature specifications Contact person Energy saving tip Symbols Help back Room Key lock Device Date time Help back Comfort Frost protection Maximum Save Minimum He...

Page 109: ...y Central settings Menu Help back Brie y away Warmer colder Present today Present until Absent until With home week profile Exclude rooms Home Room back Week profile Temperature specifications Day nig...

Page 110: ...sions W x H x D mm 91 x 89 x 29 Weight kg 0 2 Permitted field of application Permitted ambient temperature C 0 to 60 Storage temperature C 20 to 65 Relative humidity 0 to 95 non condensing Electrical...

Page 111: ...ystemwhich is suggested when creating a new time area in the week profile Energy saving temperature 16 C The default value of the Geniax System for absence Minimum temperature 10 C The lowest room tem...

Page 112: ...End of time area 2 Temperature 21 C Room temperature for time area 2 comfort temperature Towel dryer Stage 3 Tempering stage of a towel dryer for time area 2 available stages 0 to 5 Floor tempering St...

Page 113: ...apply values 17 exiting 16 18 main menu 14 select 15 N navigation button 6 O operating concept fundamentals 14 operating elements 10 14 function key 14 navigation button 14 Q quick heating up 31 quic...

Page 114: ...agnetische Vertr glichkeit Richtlinie 2004 108 EG Electromagnetic compatibility directive Compatibilit lectromagn tique directive Niederspannungsrichtlinie 2006 95 EG Low voltage directive Directive b...

Page 115: ...i e dostarczony wyr b jest zgodny z nast puj cymi dokumentami Sm rnice o elektromagnetick kompatibilit 2004 108 ES dyrektyw dot kompatybilno ci elektromagnetycznej 2004 108 WE 2004 108 EG Sm rnice pro...

Page 116: ...Bedienungsanltg_comfort_control book Seite 2 Donnerstag 20 Oktober 2011 10 35 10...

Page 117: ...Platt Pumps Ltd Pune 411019 T 91 20 27442100 service pun matherplatt co in Indonesia WILO Pumps Indonesia Jakarta Selatan 12140 T 62 21 7247676 citrawilo cbn net id Ireland WILO Engineering Ltd Limeri...

Page 118: ...01805 W I L O K D 9 4 5 6 5 3 F 0231 4102 7126 kundendienst wilo com T glich 7 18 Uhr erreich bar 24 Stunden Technische Notfallunterst tzung Kundendienst Anforderung Werksreparaturen Ersatzteilfragen...

Reviews: