background image

N

ominal range

O

verload

,

max

.

pressure

O

verload

,

min

.

pressure

G

auge pressure

0

1

.

5

psig

200

psig

-

3

psig

0

3

psig

290

psig

-

6

psig

0

6

psig

430

psig

-

12

psig

0

15

psig

500

psig

-

15

psig

0

35

psig

700

psig

-

15

psig

0

70

psig

950

psig

-

15

psig

0

150

psig

1300

psig

-

15

psig

0

350

psig

1900

psig

-

15

psig

0

900

psig

2900

psig

-

15

psig

-

15

0

psig

500

psig

-

15

psig

-

15

25

psig

700

psig

-

15

psig

-

15

70

psig

950

psig

-

15

psig

-

15

150

psig

1300

psig

-

15

psig

-

15

350

psig

1900

psig

-

15

psig

-

15

900

psig

2900

psig

-

15

psig

-

0

.

7

0

.

7

psig

200

psig

-

3

psig

-

1

.

5

1

.

5

psig

290

psig

-

6

psig

-

3

3

psig

430

psig

-

12

psig

-

7

7

psig

500

psig

-

15

psig

A

bsolute pressure

0

1

.

5

psi

200

psi

0

psi

0

15

psi

500

psi

0

psi

0

35

psi

700

psi

0

psi

0

70

psi

900

psi

0

psi

0

150

psi

1300

psi

0

psi

0

350

psi

1900

psi

0

psi

0

900

psi

2900

psi

0

psi

R

eference conditions and actuating variables

(

similar to

DIN EN

60770

-

1

)

R

eference conditions according to

DIN EN

61298

-

1

-

T

emperature

+

15

+

25

°

C

(

+

59

+

77

°

F

)

-

R

elative humidity

45

75

%

-

A

ir pressure

860

1060

mbar

/

86

106

k

P

a

(

12

.

5

15

.

4

psig

)

D

etermination of characteristics

L

imit point adjustment according to

IEC

61298

-

2

C

haracteristics

linear

R

eference installation position

upright

,

diaphragm points downward

P

rocess pressure transmitter

IPT

-

11

V

ers

.

4

.

0

-

ceramic sensor

P

ro

bus

PA

43

10

S

upplement

31547

-

EN

-

081211

Summary of Contents for IPT-11

Page 1: ...Operating Instructions Process pressure transmitter IPT 11 Vers 4 0 ceramic sensor Profibus PA ...

Page 2: ... 4 2 Mounting steps 11 5 Connecting to power supply 5 1 Preparing the connection 13 5 2 Connection procedure 14 5 3 Wiring plan single chamber housing 15 5 4 Wiring plan double chamber housing 16 5 5 Switch on phase 18 6 Set up with the indicating and adjustment module 6 1 Short description 20 6 2 Insert indicating and adjustment module 20 6 3 Adjustment system 22 6 4 Setup procedure 23 6 5 Menu s...

Page 3: ... come with the delivery You can find them listed in chapter Product description Instructions manuals for accessories and replacement parts Tip To ensure reliable setup and operation of your IPT 1 Vers 4 0 we offer accessories and replacement parts The associated documents are l Operating instructions manual External indicating and adjustment unit Process pressure transmitter IPT 11 Vers 4 0 ceramic ...

Page 4: ...em 1 3 Symbolism used Information tip note This symbol indicates helpful additional information Caution If this warning is ignored faults or malfunctions can result Warning If this warning is ignored injury to persons and or serious damage to the instrument can result Danger If this warning is ignored serious injury to persons and or destruction of the instrument can result Ex applications This sy...

Page 5: ...eyond that described in the operating instructions manual may be carried out only by personnel authorised by the manufacturer Arbitrary conversions or modifications are explicitly forbidden 2 3 Warning about misuse Inappropriate or incorrect use of the instrument can give rise to application specific hazards e g vessel overfill or damage to system components through incorrect mounting or adjustment 2...

Page 6: ...ware for DTM IPT 1 Vers 4 0 HART PA or FF l DTM IPT 1 Vers 4 0 for adjustment software PACTware l Indicating and adjustment module for sensor software The parameter adjustment of the basic sensor functions is indepen dent of the software version The range of available functions depends on the respective software version of the individual components The software version of IPT 1 Vers 4 0 can be det...

Page 7: ...using with electronics optionally available with plug connector l Housing cover optionally available with indicating and adjustment module The components are available in different versions 1 2 3 Fig 1 Example of a IPT 1 Vers 4 0 with process fitting G1 A and plastic housing 1 Housing cover with integrated indicating and adjustment module optional 2 Housing with electronics 3 Process fitting with mea...

Page 8: ...instrument master files and bitmap files necessary for planning your Profibus DP PA communication network are available from the download section on the WIKA homepage www wika com under Service There you can also find the appropriate certificates In a PDM environment an EDD Electronic Device Description is also required to enable the full range of sensor functions also available as a download A CD with...

Page 9: ...possible transit damage immediately at receipt Ascertained transit damage or concealed defects must be appropriately dealt with Up to the time of installation the packages must be left closed and stored according to the orientation and storage markings on the outside Unless otherwise indicated the packages must be stored only under the following conditions l Not in the open l Dry and dust free l N...

Page 10: ...supply and tighten the cable gland You can give your instrument additional protection against moisture penetration by leading the connection cable downward in front of the cable entry Rain and condensation water can thus drain off This applies mainly to outdoor mounting as well as installation in areas where high humidity is expected e g through cleaning processes or on cooled or heated vessels Fig...

Page 11: ...mperature ranges 1 Process temperature 2 Ambient temperature Make sure that the upper temperature limits for the environment of electronics housing and connection cable specified in chapter Technical data are not exceeded 4 2 Mounting steps To mount IPT 1 Vers 4 0 a welded socket is necessary Use components from the line of WIKA mounting accessories à Note the applicable welding standards segment w...

Page 12: ...Use the seal corresponding to the process fitting Sealing Screwing in hy gienic fittings 12 Process pressure transmitter IPT 11 Vers 4 0 ceramic sensor Profibus PA 4 Mounting 31547 EN 081211 ...

Page 13: ... appropriate terminating resistors In systems with potential equalisation connect the cable screen directly to ground potential at the power supply unit in the connection box and at the sensor The screen in the sensor must be connected directly to the internal ground terminal The ground terminal outside on the housing must be connected to the potential equalisation low impedance In systems without...

Page 14: ... compression nut of the cable entry 4 Remove approx 10 cm 4 in of the cable mantle strip approx 1 cm 0 4 in insulation from the ends of the individual wires 5 Insert the cable through the cable gland into the sensor 6 Lift the opening levers of the terminals with a screwdriver see following illustration 7 Insert the wire ends into the open terminals according to the wiring plan Fig 5 Connection st...

Page 15: ...t completely encircle the cable 12 Screw the housing cover on The electrical connection is finished 5 3 Wiring plan single chamber housing The following illustrations apply to the non Ex as well as to the Ex ia version 1 2 3 5 4 5 5 4 4 Fig 6 Material versions single chamber housing 1 Plastic 2 Aluminium 3 Stainless steel Housing overview Process pressure transmitter IPT 11 Vers 4 0 ceramic sensor ...

Page 16: ... of the cable screen 4 Spring loaded terminals for voltage supply I2C Display 1 1 2 5 6 7 8 Fig 8 Wiring plan single chamber housing 1 Voltage supply Signal output 5 4 Wiring plan double chamber housing The following illustrations apply to the non Ex as well as to the Ex ia version Electronics and connec tion compartment Wiring plan 16 Process pressure transmitter IPT 11 Vers 4 0 ceramic sensor Pr...

Page 17: ...ressure compensation 5 Cable entry or plug 1 3 2 Display 1 2 5 6 7 8 I C Fig 10 Electronics compartment double chamber housing 1 Plug connector for service 2 Internal connection cable to the connection compartment 3 Terminals for the external indicating and adjustment module Housing overview Electronics compart ment Process pressure transmitter IPT 11 Vers 4 0 ceramic sensor Profibus PA 17 5 Connec...

Page 18: ...IPT 1 Vers 4 0 is connected to voltage supply or after voltage recurrence the instrument carries out a self check for approx 30 seconds The following steps are carried out l Internal check of the electronics l Indication of the instrument type the firmware as well as the sensor TAGs sensor designation l Status byte goes briefly to fault value Connection compart ment Wiring plan Switch on phase 18 Pr...

Page 19: ...tput signal will be outputted to the cable 2 2 The values correspond to the actual measured level as well as to the set tings already carried out e g default setting Process pressure transmitter IPT 11 Vers 4 0 ceramic sensor Profibus PA 19 5 Connecting to power supply 31547 EN 081211 ...

Page 20: ...an be inserted and removed at any time It is not necessary to interrupt the voltage supply For mounting proceed as follows 1 Unscrew the housing cover 2 Place the indicating and adjustment module in the desired position on the electronics you can choose any one of four different positions each displaced by 90 3 Press the indicating and adjustment module onto the electronics and turn it to the right...

Page 21: ...e instrument with an indicating and adjustment module for continuous measured value indication a higher cover with an inspection glass is required Process pressure transmitter IPT 11 Vers 4 0 ceramic sensor Profibus PA 21 6 Set up with the indicating and adjustment module 31547 EN 081211 ...

Page 22: ...he next higher menu The sensor is adjusted via the four keys of the indicating and adjustment module The LC display indicates the individual menu items The functions of the individual keys are shown in the above illustration Approx 10 minutes after the last pressing of a key an automatic reset to measured value indication is triggered Any values not confirmed with OK will not be saved Key functions...

Page 23: ... the influence of the mounting position or static pressure on the measurement It does not influence the adjustment values Information The steps 1 3 and 4 are not necessary for instruments which are already preset according to customer specifications You can find the data on the type label on the instrument or in the menu items of the min max adjustment The indicating and adjustment module enables the ...

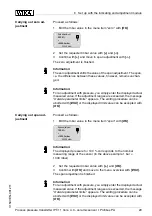
Page 24: ...tching over to adjustment in a height unit in the example from bar to m the density also has to be entered Proceed as follows 1 Push the OK button in the measured value display the menu overview is displayed 2 Confirm the menu Basic adjustment with OK the menu item Units of measurement will be displayed 3 Activate the selection with OK and select the requested unit with in the example m 4 Confirm wi...

Page 25: ... P 0000 mbar 53 mbar 2 Select with e g to accept actual measured value Position correction Accept current measured value Accept Edit 3 Confirm with OK and move to min zero adjustment with Proceed as follows 1 Edit the value in the menu item Min adjustment with OK Min adjustment 000 0 0000 0 mbar 0000 0 mbar 2 Set the requested percentage value with and 3 Edit the requested mbar value with OK 4 Set ...

Page 26: ...g you simply enter the displayed actual measured value If the adjustment ranges are exceeded the message Outside parameter limits appears The editing procedure can be aborted with ESC or the displayed limit value can be accepted with OK Process pressure measurement Set up IPT 1 Vers 4 0 in the following sequence 1 Select application Process pressure measurement 2 Select the unit of measurement 3 C...

Page 27: ...re measurement 1 Push the OK button in the measured value display the menu overview is displayed 2 Select the menu Service with and confirm with OK Basic adjustment Display Diagnostics Service Info 3 Select the menu item Application with and edit with OK Warning Note the warning Output can change 4 Select with OK and confirm with OK 5 Select Process pressure from the list and confirm with OK In this ...

Page 28: ...Activate the selection with OK and select Temperature unit with à Activate the selection with OK and select the requested unit with e g F à Confirm with OK The temperature unit is hence switched over from C to F Proceed as follows 1 Activate in the menu item Position correction the selection with OK Position correction Offset P 0000 mbar 53 mbar 2 Select with e g to accept actual measured value Posi...

Page 29: ...Proceed as follows 1 Edit the mbar value in the menu item span with OK Span adjustment 100 0 P 1000 0 mbar 0000 0 mbar Information The displayed pressure for 100 corresponds to the nominal measuring range of the sensor in the above example 1 bar 1000 mbar 2 Set the requested mbar value with and OK 3 Confirm with OK and move to the menu overview with ESC The span adjustment is finished Information Fo...

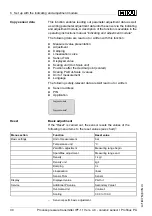
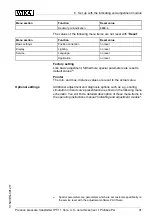
Page 30: ...ta are not read out or written l Sensor address l PIN l Application Copy sensor data Copy sensor data Basic adjustment If the Reset is carried out the sensor resets the values of the following menu items to the reset values see chart 7 Menu section Function Reset value Basic settings Unit of measurement bar Temperature unit C Zero Min adjustment Measuring range begin Span Max adjustment Measuring ...

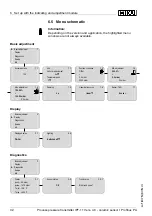
Page 31: ...distance values are reset to the actual value Additional adjustment and diagnosis options such as e g scaling simulation or trend curve presentation are shown in the following menu schematic You will find a detailed description of these menu items in the operating instructions manual Indicating and adjustment module 8 Special parameters are parameters which are set customer specifically on the servi...

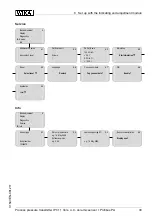
Page 32: ...ar 1 4 Max adjustment 100 00 100 00 mbar 0 0 mbar 1 5 Damping 0 s 1 6 Linearisation curve linear 1 7 Sensor TAG Sensor Display 2 Basic adjustment Display Diagnostics Service Info 2 1 Displayed value PA Out 2 4 Lighting Switched off Diagnostics 3 Basic adjustment Display Diagnostics Service Info 3 1 Pointer p min 5 8 mbar p max 167 5 mbar T min 12 5 C T max 85 5 C 3 2 Sensor status OK 3 3 1 Trend cu...

Page 33: ... 4 7 Copy sensor data Copy sensor data 4 8 PIN Enable 4 9 Application Level Info 5 Basic adjustment Display Diagnostics Service Info 5 1 Sensor type Serial number 12345678 5 2 Date of manufacture e g 16 May 2008 Software version e g 3 50 5 3 Last change using PC e g 16 May 2008 5 4 Sensor characteristics Display now Process pressure transmitter IPT 11 Vers 4 0 ceramic sensor Profibus PA 33 6 Set up...

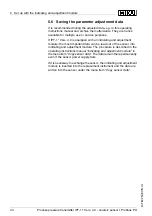
Page 34: ...adjustment module The procedure is described in the operating instructions manual Indicating and adjustment module in the menu item Copy sensor data The data remain there permanently even if the sensor power supply fails If it is necessary to exchange the sensor the indicating and adjustment module is inserted into the replacement instrument and the data are written into the sensor under the menu ...

Page 35: ...re available as EDD The instrument descriptions are already implemented in the current version of PDM For older versions of PDM a free of charge download is available via Internet Go via www wika com to the item Service Process pressure transmitter IPT 11 Vers 4 0 ceramic sensor Profibus PA 35 7 Setup with PDM 31547 EN 081211 ...

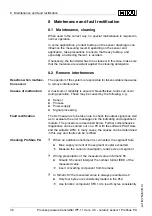
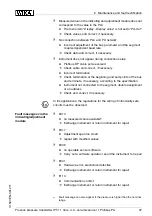
Page 36: ...put signals as well as to evaluate the error messages via the indicating and adjustment module The procedure is described below Further comprehensive diagnostics can be carried out on a PC with the software PACTware and the suitable DTM In many cases the causes can be determined in this way and faults can be rectified When an additional instrument is connected the segment fails l Max supply current...

Page 37: ...he segment double assignment of an address à Check and correct if necessary In Ex applications the regulations for the wiring of intrinsically safe circuits must be observed E013 l no measured value available9 à Exchange instrument or return instrument for repair E017 l Adjustment span too small à repeat with modified values E036 l no operable sensor software à Carry out a software update or send t...

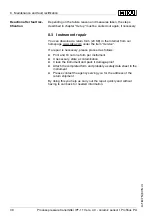
Page 38: ...form per instrument l If necessary state a contamination l Clean the instrument and pack it damage proof l Attach the completed form and probably a safety data sheet to the instrument l Please contact the agency serving you for the address of the return shipment By doing this you help us carry out the repair quickly and without having to call back for needed information Reaction after fault rec ti...

Page 39: ...ic products etc Take note of chapters Mounting and Connecting to power supply and carry out the listed steps in reverse order 9 2 Disposal Note When disposing of old instruments take note of the valid legal and municipal regulations The appropriate parts must be recycled Process pressure transmitter IPT 11 Vers 4 0 ceramic sensor Profibus PA 39 9 Dismounting 31547 EN 081211 ...

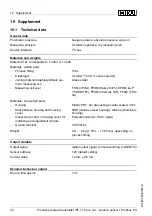
Page 40: ...hemraz 535 FFKM FDA 3A Materials non wetted parts Housing Plastic PBT Alu die casting powder coated 316L Seal between housing and housing cover NBR stainless steel housing silicone Aluminium housing Inspection window in housing cover for indicating and adjustment module Polycarbonate UL 746 C listed Ground terminal 316Ti 316L Weight 0 8 8 kg 1 764 17 64 lbs depending on process fitting Output varia...

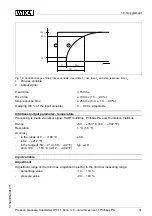
Page 41: ...ter temperature Processing is made via output signal HART multidrop Profibus PA and Foundation Fieldbus Range 50 150 C 58 302 F Resolution 1 C 1 8 F Accuracy in the range of 0 100 C 32 212 F 3 K in the range of 50 0 C 58 32 F and 100 150 C 212 302 F typ 4 K Input variable Adjustment Adjustment range of the min max adjustment relating to the nominal measuring range percentage value 10 110 pressure v...

Page 42: ... kPa 1 bar 100 kPa 1 1 5 bar 100 150 kPa 50 bar 5000 kPa 1 bar 100 kPa 1 5 bar 100 500 kPa 65 bar 6500 kPa 1 bar 100 kPa 1 10 bar 100 1000 kPa 90 bar 9000 kPa 1 bar 100 kPa 1 25 bar 100 2500 kPa 130 bar 13000 kPa 1 bar 100 kPa 1 60 bar 100 6000 kPa 200 bar 20000 kPa 1 bar 100 kPa 0 05 0 05 bar 5 5 kPa 15 bar 1500 kPa 0 2 bar 20 kPa 0 1 0 1 bar 10 10 kPa 20 bar 2000 kPa 0 4 bar 40 kPa 0 2 0 2 bar 2...

Page 43: ... 6 psig 3 3 psig 430 psig 12 psig 7 7 psig 500 psig 15 psig Absolute pressure 0 1 5 psi 200 psi 0 psi 0 15 psi 500 psi 0 psi 0 35 psi 700 psi 0 psi 0 70 psi 900 psi 0 psi 0 150 psi 1300 psi 0 psi 0 350 psi 1900 psi 0 psi 0 900 psi 2900 psi 0 psi Reference conditions and actuating variables similar to DIN EN 60770 1 Reference conditions according to DIN EN 61298 1 Temperature 15 25 C 59 77 F Relati...

Page 44: ... 0 1 x TD Outside the compensated temperature range 0 05 0 15 x TD Thermal change zero signal and output span with absolute pressure measuring range 0 1 bar reference temperature 20 C 68 F In the compensated temperature range 0 100 C 32 212 F 0 1 0 1 x TD Outside the compensated temperature range 0 15 0 15 x TD Applies also to instruments with analogue 4 20 mA current output and refers to the set ...

Page 45: ...M A P 75 5 KW75F 40 120 C 40 248 F 1 h 140 C 284 F cleaning temperature FFKM Kalrez 6375 10 120 C 14 248 F FFKM Chemraz 535 30 120 C 22 248 F Product temperature version with extended temperature range depending on the meas cell seal as well as order specification FKM VP2 A 20 150 C 4 302 F EPDM A P 75 5 KW75F 40 150 C 40 302 F FFKM Kalrez 6375 10 150 C 14 302 F FFKM Chemraz 535 30 150 C 22 302 F V...

Page 46: ...al indicating and adjustment module optional or l 1 x plug depending on the version 1 x blind stopper M20 x 1 5 plug M12 x 1 for the external indicating and adjustment module optional Spring loaded terminals for wire cross sec tion up to 2 5 mm AWG 14 Indicating and adjustment module Voltage supply and data transmission through the sensor Indication LC display in dot matrix Adjustment elements 4 k...

Page 47: ...es Protection Housing standard IP 66 IP 6716 Overvoltage category III Protection class II Approvals Depending on the version instruments with approvals can have different technical data For these instruments please note the corresponding approval documents They are included in the scope of delivery 16 Instruments with gauge pressure measuring ranges cannot detect the am bient pressure when submerge...

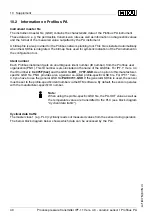
Page 48: ...of the GSD file For IPT 1 Vers 4 0 the ID number is 0 x 076F hex and the GSD file BR__076F GSD As an option to this manufacturer specific GSD file PNO provides also a general so called profile specific GSD file For IPT 1 Vers 4 0 you have to use the general GSD file PA139701 GSD If the general GSD file is used the sensor must be set to the profile specific ident number via the DTM software By default the sen...

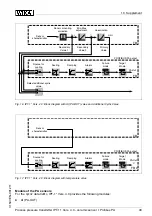
Page 49: ...6 IPT 1 Vers 4 0 Block diagram with AI PA OUT value and Additional Cyclic Value PROFIBUS PA output Target Mode Failure mode Alarms Scaling Source for scaling ti Damping Sensor characteristics PA Out C TB FB 2 Fig 17 IPT 1 Vers 4 0 Block diagram with temperature value Module of the PA sensors For the cyclic data traffic IPT 1 Vers 4 0 provides the following modules l AI PA OUT Process pressure transm...

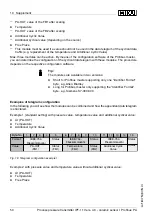
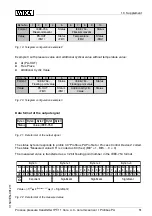
Page 50: ... e g Allen Bradley l Long for Profibus master only supporting the Identifier Format byte e g Siemens S7 300 400 Examples of telegram configuration In the following you will see how the modules can be combined and how the appendant data telegram is structured Example 1 standard setting with pressure value temperature value and additional cyclical value l AI PA OUT l Temperature l Additional Cyclic Val...

Page 51: ...gnal The status byte corresponds to profile 3 0 Profibus PA Profile for Process Control Devices coded The status Measured value OK is coded as 80 hex Bit7 1 Bit6 0 0 The measured value is transferred as a 32 bit floating point number in the IEEE 754 format Byte n Byte n 1 Bit 7 VZ Exponent Bit 6 2 Bit 5 2 Bit 4 2 Bit 3 2 Bit 2 2 Bit 1 2 Bit 0 2 Bit 7 2 Bit 6 2 Bit 5 2 Bit 4 2 Bit 3 2 Bit 2 2 Bit 1 2 B...

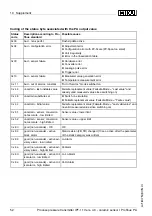
Page 52: ...ute set l Switch on simulation l Failsafe replacement value Failsafe Mode Fsafe value 0 x 4c uncertain initial value Failsafe replacement value Failsafe Mode Last valid value and no valid measured value since switching on 0 x 51 uncertain sensor conversion not accurate low limited Sensor value lower limit 0 x 52 uncertain sensor conversion not accurate high limited Sensor value upper limit 0 x 80 ...

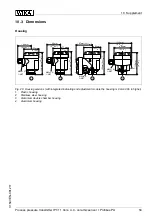
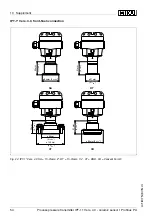
Page 53: ... 9 16 116mm 4 9 16 ø 84mm 3 5 16 120mm 4 23 32 87mm 3 27 64 ø 84mm 3 5 16 Fig 23 Housing versions with integrated indicating and adjustment module the housing is 9 mm 0 35 in higher 1 Plastic housing 2 Stainless steel housing 3 Aluminium double chamber housing 4 Aluminium housing Process pressure transmitter IPT 11 Vers 4 0 ceramic sensor Profibus PA 53 10 Supplement 31547 EN 081211 ...

Page 54: ... 51mm 2 1 64 ø 51mm 2 1 64 ø 84mm 3 5 16 RT SA 3R 55mm 2 11 64 ø 66mm 2 19 32 ø 105mm 4 9 64 3T Fig 24 IPT 1 Vers 4 0 SA Tri Clamp 2 RT Tri Clamp 1 3T DRD 3R Varivent Form F 54 Process pressure transmitter IPT 11 Vers 4 0 ceramic sensor Profibus PA 10 Supplement 31547 EN 081211 ...

Page 55: ...Process pressure transmitter IPT 11 Vers 4 0 ceramic sensor Profibus PA 55 10 Supplement 31547 EN 081211 ...

Page 56: ...372 132706 e mail support tronic wika de www wika de Printing date All statements concerning scope of delivery application practical use and operating conditions of the sensors and processing systems correspond to the information avail able at the time of printing Subject to change without prior notice 31547 EN 081211 ...

Reviews: