61
APPENDIX A – CREATING A PRE-IP NETWORK
ny EMX console can be networked with up to three other
PRE-IP or WNIP-compatible devices (PC or audio server,
Razor I/O Interface, M4IP-USB Blade, talent station, etc.)
using the five-port Gigabit switch built into each PR&E Mix
Engine. When additional AoIP devices need to be
networked with your EMX, or if you want to network your
EMX with additional EMX and/or DMX consoles, one or more AoIP switches
(e.g., a Wheatstone-approved 1GB Ethernet switch) must be used to
support the additional audio streams propagated over a PRE-IP network.
PR&E MIX ENGINE ETHERNET SWITCH
The PR&E Mix Engine contains a Netgear GS105Ev2 5-port Gigabit
ProSafe Plus Ethernet switch. It was configured at the factory for a stand-
alone EMX studio with the PR&E Mix Engine connected to Port 5 and the
EMX Surface connected to Port 4. Ports 1 – 3 are available to connect
additional PRE-IP devices like a Razor I/O Interface, a talent station, or a
media server using the WNIP audio driver.
When the EMX console will be networked with additional EMX or DMX
consoles, or if additional AoIP devices need to connect to the EMX, an
external AoIP switch needs to be added to not only add network ports, but
to also function as an “IGMP querier” to control audio streaming across the
network. To connect the EMX switch to the external AoIP switch, use Port
1 on the built-in switch since that port is designated as the “IGMP
Snooping Static Router Port.”
The built-in Netgear switch configuration should not need to be changed
even when it’s connected to an external AoIP switch. It is advisable
however, to edit the switch IP address to assign a unique IP to each EMX
switch when creating a PRE-IP network. Doing this will allow you to access
each switch remotely, from the system admin PC, using the Netgear
ProSafe Plus Utility (V2.7.2 or later).
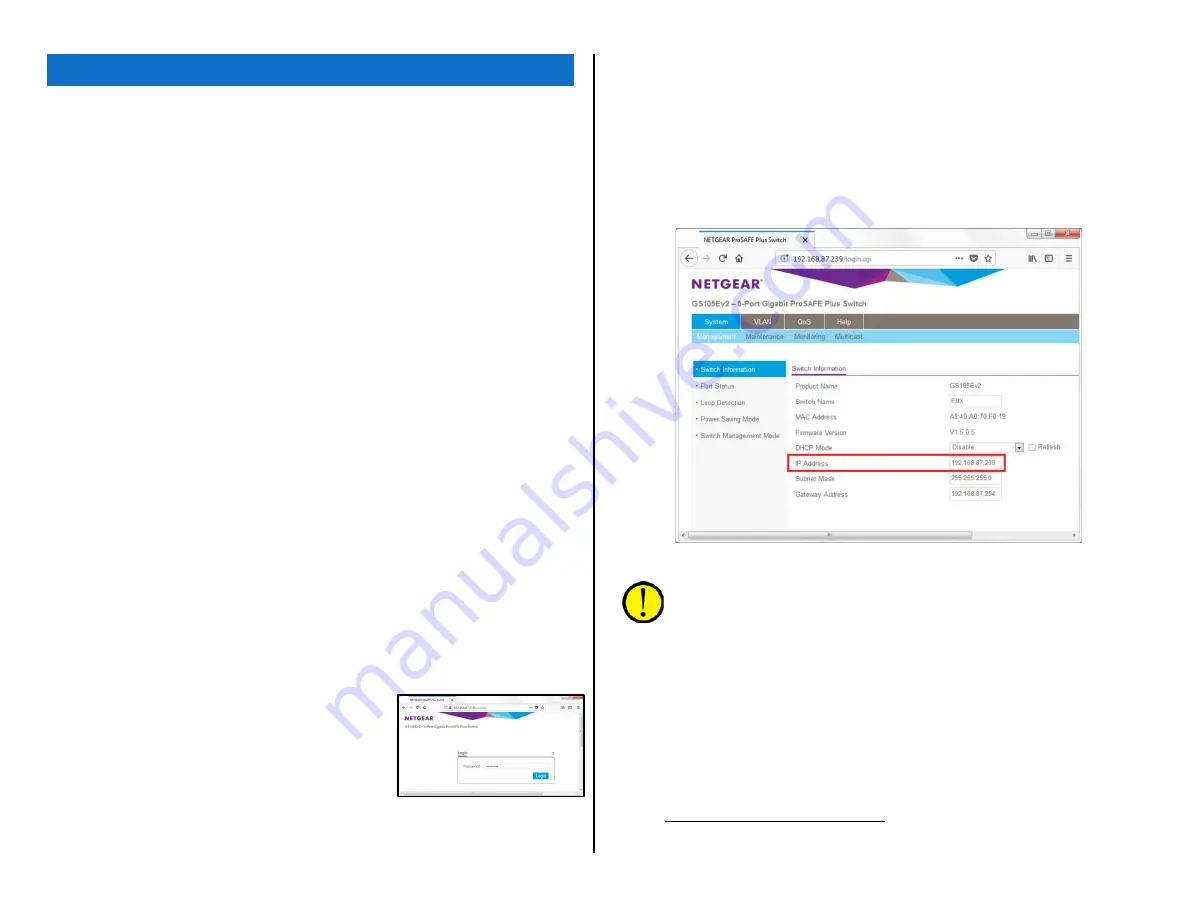
You can also view the switch settings on a
stand-alone EMX using a web browser on the
admin PC. Enter 192.168.87.239 (the IP
address assigned to each switch at the
factory) into the search bar. A log-in window
appears (Figure A-1). The default password is
password. After entering that password the
System Management page is displayed (Figure
A-2) which shows the switch’s IP address. To
be able to remote into multiple console switches from the system admin
PC, each Netgear switch will need to be assigned a unique IP address prior
to networking the EMX and DMX consoles.
To change the Netgear IP address, edit the IP Address entry (highlighted
in Figure A-2) then click Apply. We recommend using 192.168.87.240,
then .241, and so on, up to .254 as the IP addresses assigned to the Mix
Engine switches. Leave 192.168.87.239 open so when a new EMX or DMX
Mix Engine is networked it can be accessed by the admin PC to edit its
default IP address.
Figure A-2 Netgear Switch System Management Page
Note: Creating an IP address table--whether using an Excel
spreadsheet or one that’s handwritten is essential. The list should
have every device that will connect to your PRE-IP network: Mix
Engines, Surfaces, Razors, M4IP-USB Blades, PCs, audio servers,
talent stations, SS-8 panels, etc. with every device being assigned
a unique IP address since a PRE-IP network, like every AoIP
network, does not support DHCP.
The default IP addresses assigned to new “factory-fresh” EMX and DMX
consoles and Razors should be reserved so that a new device can be
plugged into the network and then assigned a unique IP. Reserve these IP
addresses: 192.168.87.101 (PR&E Mix Engine); 192.168.87.201 (DMX and
EMX Surface); 192.167.87.50 (Razor-16A); 192.167.87.60 (Razor-16D);
and 192.167.87.70 (Razor-16AD).
The PR&E System Configuration Tool can then be used to assign a new
IP address and setup default signal names for each new device. The setup
A
Figure A-1 Netgear Switch
Login Page
Summary of Contents for EMX
Page 4: ...4 ...


