


26
In this case the Aux1 Level and/or Aux2 Level would be set to maximum
and the Aux Send would be set on using the Advanced Channel Feature
controls. Here’s a summary of what the AUX page tab settings do:
Pre On, when checked, means that the audio going to that Aux Send is
always present and is not affected by the channel of/off. When unchecked,
the Send audio follows the channel on switch so it is turned on and off just
as with the audio going to the PGM buses.
Checking Pre On by itself, as shown for Aux Send 1 in Figure 3-8, might
be used to do voice tracking by allowing the talent mic to be recorded
even though the talent mic channel is off. Unchecking Pre Fader allows the
talent to still use their channel fader to adjust their record level.
Pre Fader, when checked, means the channel faders do not affect the
audio level going to the Aux Send bus. When unchecked, the fader affects
the Aux Send level.
Checking Pre Fader might be used when the Aux Send bus feeds an FX
unit so that changing the channel fader does not affect the amount of
audio going to the FX unit. The FX unit return would be on another channel
and its fader would control the overall FX level.
Setting an Aux Send to both Pre On and Pre Fader (Aux Send 2 in Figure
3-8) could be used to create a “summed direct out” from multiple
channels. One use for this would be to sum the board operator, host
and/or producer mic to allow for multiple mic talkback. The Aux bus would
be connected to “EMXTkBk” so multiple mics can talk to the studio, the
callers or remotes, or to an external location.
VDips Page Tab
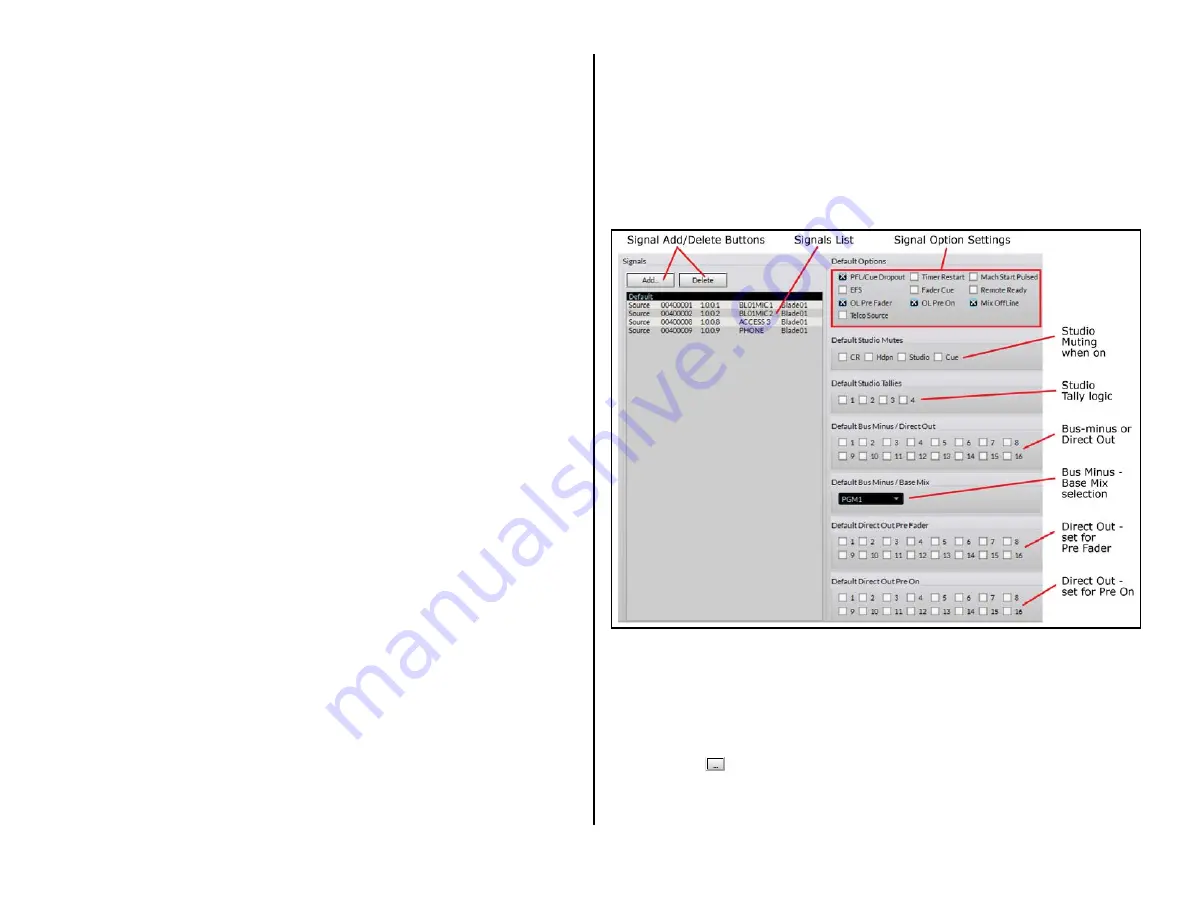
EMX console controls and logic features that are associated with audio
sources are made on this page tab (Figure 3-9). Mix Engine and Razor
source signals are manually added to the Signals list. Clicking on a signal
row both highlights that signal name and displays its current settings in
the seven assignment sections on the right half of the page tab.
These assignments can then be edited, as required. Click Apply to
transmit the updated settings to the Surface. Clicking Apply should be
done after every new signal is added, or updated, to ensure the Surface,
and the setup app, get updated properly.
Default Settings
Before adding any signals to the Signals List, read through the
descriptions of the assignment selections in this section. You may find
some selections should be applied to most sources. These common
selections can be enabled so they get added to every new source that you
add. Click the Default row in the Signals list (as shown in Figure 3-9)
then check the desired set of “Default Options” to apply to each newly
added signal. Be sure to click Apply to save the Default settings before
adding your first new source.
The Default Options settings PFL/Cue Dropout, OL Pre Fader, OL Pre On,
and Mix Off Line are checked in Figure 3-9. Every new signal added to the
Signals list will have these settings applied automatically. Of course, any
default setting can be changed after a signal is added to the list. Likewise
the default settings can be changed again by clicking the Default row to
highlight it and changing the Default Options settings. Be sure to click
Apply after making any changes to ensure they get applied.
Figure 3-9 VDips Page Tab Sections
Adding Sources to the Signals List
Sources must be manually added to the Signals list to initially populate
it. Figure 3-10 on page 27 shows Mic 1 and Mic 2 on the Mix Engine are
already in the list. To add another signal, click Add…, just above the
Signals List, to open the Add Signal pop-up selector. Click the Picker
button (the
icon) to open the Source Picker. Double-click a signal row
to select that source (which also closes the Source Picker). Clicking OK
adds that source to the Signals list and closes the Add Signal dialog box.
Summary of Contents for EMX
Page 4: ...4 ...


