


42
WARN, by double-clicking on the name in the Name: entry box and
entering a new name of up to eight characters.
Clicking the LIO Info tab opens the Logic Assignments window (Figure
3-31 on page 41). On a new logic-only signal click Add… to open the
Assign LIO window (also shown in Figure 3-31). To add output logic,
select Output as the Direction:. Next, select the Function: from the drop
down menu items. To create a CR WARN command, select Studio 1 In-Use
since Studio 1 is typically set as the Control Room warning logic output.
The physical pin number on the LOGIC connector is highlighted to indicate
the pin with that logic command (each is set for input or output logic).
Click Apply to set that logic command then click Close to close the window.
Switch to the Crosspoint map (System > Crosspoint tab) and locate
the logic source for the console: EMXTally. That signal carries all the
internal logic commands from the console so it must connect to the new
CR WARN destination by clicking its crosspoint. A green square indicates
it’s a logic-only connection, as shown in Figure 3-16 on page 33, which
also shows a second LIO destination named STU WARN which is also
connected to EMXTally.
In the example, when a CR mic channel is turned on, the Logic jack will
have a contact closure between pin 2 (CR WARN) and pin 1 (ground). With
a second LIO assigned to pin 3, and labeled STU WARN since its Function
is Studio 2 In-Use, when a Studio mic channel is turned on, they’ll be a
contact closure between pin 3 (STU WARN) and pin 1 (ground). These
logic outputs are then physically connected to a hot studio warning
interface; to a mic arm light; to a mic skimmer; etc.
Spare Button Logic Assignments
A Spare button can also be set to manually trigger external logic and/or
to light up in response from an external logic input by adding a new LIO
only Destination, as outlined in the previous section, using the Output
Function: Switch 1 or the Input Function: Switch LED 1. The logic
destination is then connected to a Spare button, using the crosspoint grid,
so it triggers the outgoing logic and/or lights up following incoming logic.
A Spare button can also be set to make a momentary connection or to
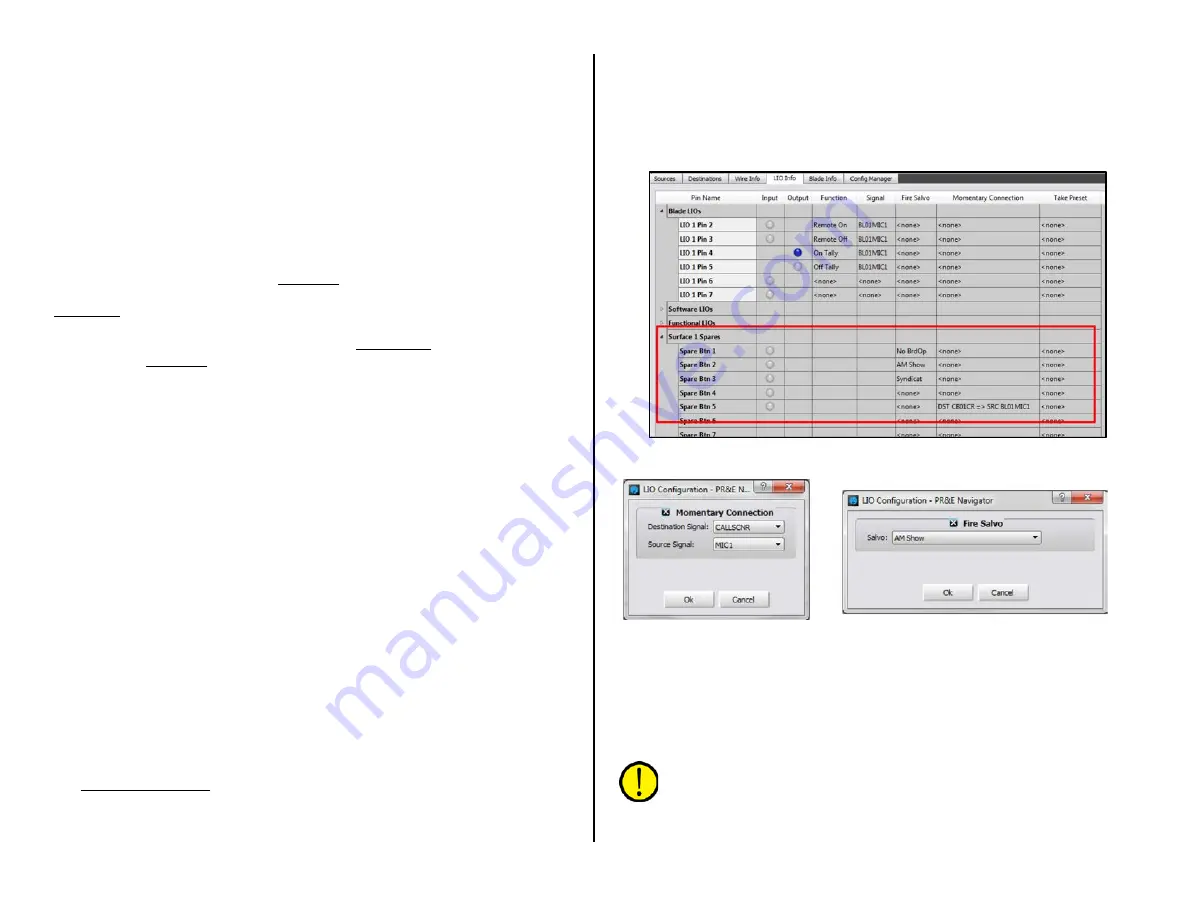
fire a salvo using the Blade > LIO Info tab (Figure 3-32). The five Spare
buttons are listed under Surface 1 Spares (Spare Btn 1 – Spare Btn 5).
Spare Btn 5 is typically set as a momentary talk button since it’s labeled
as EXT TB. The Momentary Connection column in the LIO Info tab is
used to setup how a board operator can talk to an output, like a call
screener that’s getting pre-delay at their position. The Spare Button 5 is
set for Momentary/Surface LED (so its button lights up when pressed) in
the EMX Surface Setup Buttons page tab. In the LIO Info tab, double-click
on <none> in the Momentary Connection column for Spare Btn 5 to
open the dialog box shown in Figure 3-33, left. Click the checkbox to
activate the Source and Destination signal selections. In the example, the
source is MIC1 (the board operator mic) and the destination is the call
screener’s output (CALLSCNR in this example). Clicking OK closes that
dialog box and adds the entry to the Momentary Connection column for
Spare Btn 5 (Figure 3-32). Pressing EXT TB then switches the board
operator mic into the call screener’s speaker. When the EXT TB button is
released the monitor audio is reconnected to the speakers.
Figure 3-32 Blade > LIO Info tab
Figure 3-33 LIO Dialog Boxes
To assign a spare button to fire a Salvo, double-click <none> in the Fire
Salvo column for the Spare Btn you want to use to fire a salvo. The Fire
Salvo window opens (Figure 3-33 on page 42, right). Check the Fire Salvo
checkbox to activate the Salvo: drop down list. Choose a salvo to fire then
click OK to close the window and add the salvo name to the LIO Info
window (like NoBrdOp, AM Show, and Syndicat shown in Figure 3-32).
Note: Even though most users assign a spare button to one
action, they can be set to do any combination of: Fire a Salvo;
make a Momentary Connection; and send out an LIO and/or SLIO
command. This allows a spare button to be set up to accomplish
very complex actions at one press of a button.
Summary of Contents for EMX
Page 4: ...4 ...


