


Granudos 45/100-CPR Touch XL + Touch + S5
Dosing unit
Index: 02
Date modified: 06/06/2019
OI No.: BA SW 003-02 Granudos 45-100 CPR Touch+Touch+S5-Dosiereinheit EN.docx Page 46 of 58
7.1.2.4
Individually replace the dosing screw
a)
Pull the dust cover from the dosing motor, remove the old gasket set from the dust
cover, thoroughly clean the dosing motor’s shaft, apply fresh silicon grease to the ball
bearings, press sealing washer 19/4x0.5 EPDM (11) on the shaft. Thoroughly grease
and attach the felt washer (12), push the dust cover over it, undo the old Teflon tape
and apply approx. 3 layers of new tape.
b)
Apply a layer of silicon grease to the front surface of the new dosing screw's adapter.
c)
Push the dosing screw on the shaft so that the threaded pin is located on the flat part of
the motor shaft, press firmly against motor and tighten the threaded pin.
d)
Push the motor with dosing screw back into the cleaned (!) bracket, tighten the flange -
not too tight - and push the protective covers on the screw heads.
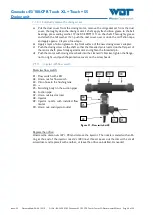
7.1.3
Injector with flow switch
Overview flow switch:
81.
Flow switch with LED
82.
Union nut for flow switch
83.
Viton hose to the flushing tank
84.
---
85.
Switching body (in the suction pipe)
86.
Suction pipe
87.
Union nut injector Inlet
88.
Injector
89.
Injector nozzle with installed flow
limiter
90.
Union nut; and injector outlet
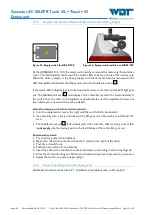
Replace the orifice:
Unscrew the union nuts (87 + 90) and remove the injector. The nozzle is sealed with an O-
ring at the end of the injector nozzle’s (89) inner thread. Lever out the disc with a small
screwdriver and replace it with another, or leave the orifice uninstalled. As needed.
83
87
90
89
88
82
81
86
85
Figure 31, Flow switch d-40


