Granudos 45/100-CPR Touch XL + Touch + S5
Dosing unit
Index: 02
Date modified: 06/06/2019
OI No.: BA SW 003-02 Granudos 45-100 CPR Touch+Touch+S5-Dosiereinheit EN.docx Page 37 of 58
Replace the drum:
1.
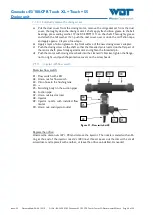
Push the dust protection pipe (12) downward.
2.
Release the spring bolt (14) of the drum holder and rotate the turning device with the
empty drum clockwise from the dosing position upward; while doing so, keep the dosing
pipe covered with a finger to prevent any granulate from escaping. Relock the turning
device. (This point does not apply during the initial commissioning.)
3.
Release the safety belt (9) and the tension bands (8). Remove the empty drum from the
turning device. Unscrew the dosing hopper with a counter-clockwise turn and place it
next to the dosing device. (This point does not apply during the initial commissioning.)
4.
Unscrew the lid from the new drum and remove the measuring cup, if present.
5.
Place and screw the dosing hopper on the drum so that the drum's recessed grips are
oriented laterally and the control cable is on the right side.
ATTENTION!
Ensure that the dosing hopper correctly engages with the drum's
thread without jamming and that a proper connection exists after it
has been screwed in.
6.
Place the new drum on the turning device so that it is leaning against the posterior tracks
and the lower spacers and the holding rod engages with the drum's cross ribs.
7.
Next, pull the tension bands around
the drum and close the tension
lever. The tension lever must be
tightly closed; however, do not use
excessive force when turning the
tension lever. The length of the
tension band must be adjusted
correspondingly at the screw ends.
8.
Insert the safety pins in the tension
lever!
9.
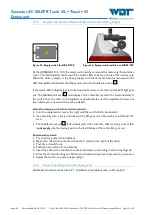
Pull the safety belt's support belt
(
69
) over the heating pipe from
behind so that the bolt's clamp lock
(71) is located on the front of the
hopper. Insert the tension belt's
(74) clamping lever (72) in the clamp lock (71), pull it tight and secure with the safety
pin. If the tension belt is not tight, adjust the length of the adjusting belt (70)
correspondingly. Insert the safety pin (73)!
ATTENTION!
Ensure that all safety pins have been inserted!
10.
Unlock the drum holder by turning the spring bolt (14) upward. Cover the dosing pipe
with a finger and slowly turn the drum counter-clockwise in the dosing position. Lock
the drum holder by turning the tension bolt downward. Ensure that the control cable
does not get entangled.
11.
Orient the dust protection pipe in the flushing tank lid so that any potential air current
does not blow away the fine chlorine dust. (Distance of the protection pipe's upper edge
from the dosing hopper approx. 1-2cm). Minimise air draft - close doors!
Figure 26, Dosing head
69
70
71
72
73
74


