background image

OXISWIM MANUAL 


P a g e  

42 | 45


CONDITIONS OF WARRANTY 

This warranty only applies where: 

1.


The products requiring installation have been sold with installation included and 
have been installed by a licensed plumber, electrician, or person who has completed 
an accredited course in swimming pool care and maintenance or a person with more 
than 12 months on the job learning or a person supervised by one of these people, in 
accordance with any written installation instructions provided. 

2.


The products have been installed and operated in accordance with written 
instructions supplied by Waterco; 

3.


The purchaser is able to provide proof of purchase that specifies the date of 
purchase; 

4.


The product has been serviced or maintained regularly. 

5.


Installed in an area that is free from flooding or excessive outside contact with 
water; 

6.


Any pool and spa equipment has been used in water: 

a.


With a temperature not exceeding 40°C degrees Celsius; 

b.


With a pH range maintained between 7.2 

 7.6; 

c.


That has been chemically balanced in accordance with the Langelier saturation 
index within a range of -0.2 to + 0.2 to ensure that it is not corrosive or scale 
forming; 

d.


That is not saltwater (other than mild saline water conditions which are 
compatible with swimming pool saltwater chlorination systems) 

 unless 

otherwise stated by Waterco in both the respective product labels and 
brochures that it is suitable for seawater applications; and 

e.


That has been regularly treated with a sanitising system using bromine, chlorine 
in one of its compound forms, or generated in-situ, in concentrations (doses) 
recommended by the relative state or territory health departments. (In areas 
outside of Australia please refer to the local health department 
recommendations before use); 

7.


Electrical equipment has been adequately protected from salt air environments and 
from salt water, and all repairs and replacements shall be carried out by Waterco or 
its authorised service dealer unless otherwise authorised in writing by Waterco. 

If an authorised service dealer is not available within 25 km (15 miles) of the purchaser's 
area: 


The purchaser must contact the place of purchase or Waterco for further 
instructions and; 


The purchaser is responsible for any freight or infield labour costs. 


Summary of Contents for OXISWIM

Page 1: ...D U A L S A N I T I S A T I O N Installation and Operation manual Version 1 1 3 December 2022 ...

Page 2: ...er installation will void the warranty If you cannot obtain the information to a particular question from this guide please contact the place of purchase or your nearest Waterco branch for further information Notice to Installer This manual contains important information about this product s installation operation and safe use Once the product has been installed this manual must be given to the ow...

Page 3: ...oints to the Chemical Dosing Unit 19 6 5 Assemble the Foot Filter Weight 21 6 6 PUMP PROGRAMMING PROCEDURE OXISWIM 22 6 6 1 Set Time 23 6 6 2 Set Timer 24 7 WATER PREPARATION 27 7 1 Balance the Pool Water 27 8 MAINTENANCE 29 8 1 Regular Care 29 8 1 1 Water testing and balancing 29 8 1 2 Low levels of hydrogen peroxide 31 8 1 3 Shock dose 31 9 RECOMMENDED CHEMICAL LIST 32 9 1 Chemical Supply 33 9 2...

Page 4: ... valve maintenance 35 10 GREEN WATER POOL RECOVERY 36 10 1 Green Pool Recovery Using Chlorine 36 10 2 Changing from Hydrogen peroxide to chlorine 38 10 3 Changing from Chlorine to Hydrogen Peroxide 39 11 GENERAL SAFETY GUIDELINES 40 WARRANTY 41 ...

Page 5: ...stem Perox Start Up Protects the surface of your pool and pipework from calcium deposits reducing the consumption of hydrogen peroxide and chlorine Aqua Health Concide Aquachlor Long Life Algaecide Activates hydrogen peroxide in the pool water and helps prevent algae growth Perox Perfect Used for green pool recovery or phosphate removal C5 Tablets Prevents formation of biofilm and will reduce cons...

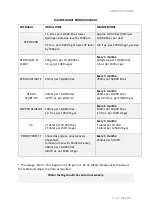
Page 6: ...mL per 10 000Litres 3 20 fl oz per 1000 US Every 6 months 250mL per 10 000 litres gal 3 20 fl oz per 1000 US gal COPPER ALGICIDE 100mL per 10 000 litres 1 3 fl oz per 1000 US gal Every 6 months 100mL per 10 000 litres 1 3 fl oz per 1000 US gal C5 1 Tablet per 10 000 litres 1 Tablet per 2500 US gal Every 3 months 1 tablet per 50 000 1 tablet per 12500 US gal PEROX PERFECT Shock dose green pool reco...

Page 7: ...users as just like a refreshing swim in a natural spring The Oxiswim system uses new catalytic technology that removes the need to use ozone However the advanced oxidation process continues to be the cornerstone of the system when operating on hydrogen peroxide Using the advanced oxidation process is a chemical reaction generated by combining Perox a chlorine free hydrogen peroxide based sanitiser...

Page 8: ... misuse of this product that may cause damage to persons and or materials Only a certified service technician should perform servicing requirements to reduce the risk of injury The use of chemicals other than those recommended may result in the system not functioning correctly failure of the system may be hazardous or may cause adverse effects to your swimming pool or bathers ...

Page 9: ...equired but not supplied in kit The following items may be required to install the Hybrid system but are not supplied in the kit 40mm 48mm 1 in or 50mm 63mm 2 in pipe and fittings UPVC Pipe Adhesive and Primer Mounting screws for wall mounted panel Cable Ties Hole saw 22mm 55 64 in Recommended Tools The following tools will be required as a minimum for the installation Cordless Drill Hammer Drill ...

Page 10: ...ction point If not recycling break crush puncture and bury empty containers in local authority landfill If not available bury the container below 500mm 20in in a disposal pit specifically marked and set up for this purpose clear of waterways desirable vegetation and tree roots Empty containers and products should not be burnt SAFETY DIRECTIONS Corrosive Attacks eyes nose throat and skin Protect ey...

Page 11: ...OXISWIM MANUAL P a g e 11 45 INSTALLATION AND COMMISSIONING ...

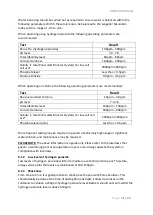
Page 12: ...eration of the existing system 5 1 Water Chemistry When operating with hydrogen peroxide the following operating parameters are recommended Test Result Perox Pro Hydrogen Peroxide 100ppm 300ppm pH level 7 2 7 6 Total Alkalinity level 60ppm 80ppm Calcium Hardness 180ppm 400ppm Salinity total Pool salt Mineral Crystals For low salt cell use 2000ppm 3000ppm Phosphate level Less than 0 5ppm Chlorine D...

Page 13: ...Crystals For low salt cell use 2000ppm 3000ppm Phosphate level ppm Less than 0 5ppm PLEASE NOTE The above information is a guide only Please refer to the local laws that govern a swimming pool or spa operation in your area Always operate the system in compliance with local laws IMPORTANT When refilling a pool use municipal or tank water only It is not recommended that Bore or Well water is used to...

Page 14: ... any other chemicals other than Perox Perfect provided Perox pH control is used to control the pH Diatomaceous Earth filters are not recommended for use with Hydrogen Peroxide Copper ionisers can be used in conjunction with the Oxiswim system but total copper levels must not exceed 1ppm 5 3 Planning Before commencing the installation take time to plan That the chemical drums will be at least 1 5m ...

Page 15: ...OXISWIM MANUAL P a g e 15 45 Oxiswim Typical Installation Layout ...

Page 16: ...tion based on the installation diagram Refer to 6 2 for instructions on how to install a tapping saddle Refer to 6 3 and 6 4 on how to fit the chemical tube to injectors and foot valves 6 1 5 Plug the power cord from the Hybrid system into a 10amp power outlet Ensure the POWER supply is off until ready to commission the unit 6 1 6 Plug the Oxiswim Sanitiser OS unit into the GPO located on the Oxis...

Page 17: ...head of the chemical injection point V Use a 22mm 55 64 in hole saw drill the first hole and clean the swarf Figures 6 1 and 6 2 VI Install the lower and upper clamps Figures 6 3 and 6 4 so that the hole is directly beneath the open head of the upper clamp Then secure the clamps together using the nuts and bolts provided tightening with an adjustable wrench or 10mm 25 64 in socket wrench Figure 6 ...

Page 18: ...l Radical The injection point should be on the inlet side of the Hydroxyl Radical Generator See illustration below 6 3 Connect the Chemical Supply Tubes The Electrochlor pH is supplied with ample chemical supply tubes which may be cut to length using a sharp utility knife 6 3 1 Connect to chemical injection assembly use Figure 6 11 as a reference for the assembly of the connection point of the tub...

Page 19: ...and tight See the images below Figure 6 12 Connecting acid feed line to the injector 6 4 Connect Chemical Injection Points to the Chemical Dosing Unit Cut the chemical supply tube connected to the chemical injection point to a suitable length allowing enough slack Then feed the tightening nut and holding ring over the tube Next push the open end of the tube onto the pipe holder in the base of the ...

Page 20: ... or chlorine Repeat so both tubes are now connected with one end joined to the chemical injection point and the other joined to the RIGHT HAND SIDES discharge sides of the chemical dosing unit pumps 6 4 1 Connect chemical dosing unit to chemical supply tanks Ensure that the supply tanks are positioned no less than 1 5m 5ft apart ...

Page 21: ... end of the chemical tube with pointy nose pliers or similar before fitting the foot filter See fig 6 16 and 6 17 6 5 3 Fit the foot filter over the end of the expanded chemical tube and then pull the ceramic weight back over the end of the tube See fig 6 18 6 5 4 Remove the external housing and front cover to enable easy connection of the chemical tubes See fig 6 21 Connect the inlet and outlet c...

Page 22: ...ick reference guide for the appropriate percentages of feed and timer operation times for your specific size pool Steps 1 Set Time 2 Set Timer Program Welcome Screen The welcome screen will look similar to the above The only buttons needed for programming are the buttons in blue on the bottom panel The up and down arrows will let you scroll through the menu or individual digits To enable programmi...

Page 23: ...tting change the date and time to the current Australian Eastern Standard Time AEST To scroll through the setting in each menu use the tick button to scroll right and the ESC button to scroll left Use the up and down button to change the setting values When completing any changes in the menu always click the tick button to get to the end of the changes to save the settings Please ensure the SW set...

Page 24: ... setting is for a 50 000 litre pool To increase or decrease the acid dose rate change the feed in the top right hand corner Refer to the dose charts located in the quick reference guide for assistance with determining the correct setting for your particular size pool To scroll through the setting in each menu use the tick button to scroll right and the ESC button to scroll left Use the up and down...

Page 25: ...000 3 8 5 5 5 3 50 000 3 8 5 4 60 000 3 8 5 5 70 000 3 8 5 6 80 000 3 8 5 7 90 000 3 8 5 8 100 000 3 8 5 9 110 000 3 8 5 10 120 000 3 8 5 11 pH Control Pool size Tube Size L min Summer Run Time hr Winter Run Time hr Setting 10 000 3 1 1 6 20 000 3 1 1 7 30 000 3 1 1 8 40 000 3 1 1 9 50 000 3 1 1 10 60 000 3 1 1 11 70 000 3 1 1 12 80 000 3 1 1 13 90 000 3 1 1 14 100 000 3 1 1 15 110 000 3 1 1 16 12...

Page 26: ...5 6 50 000 3 8 5 8 60 000 3 8 5 10 70 000 3 8 5 12 80 000 3 8 5 14 90 000 3 8 5 16 100 000 3 8 5 18 110 000 3 8 5 20 120 000 3 8 5 22 pH Control Pool size Tube Size L min Summer Run Time hr Winter Run Time hr Setting 10 000 3 1 1 7 20 000 3 1 1 8 30 000 3 1 1 9 40 000 3 1 1 10 50 000 3 1 1 11 60 000 3 1 1 12 70 000 3 1 1 13 80 000 3 1 1 14 90 000 3 1 1 15 100 000 3 1 1 16 110 000 3 1 1 17 120 000 ...

Page 27: ...l water is balanced within the parameters set out in section 5 1 and within these tolerances be balanced to the Langelier Saturation Index within a range of 0 5 0 5 II Standard pool balancing chemicals may be used for Calcium Hardness III Alkalinity and pH If you need to lower the pH Perox pH Control can be used IV Add sanitiser directly into the pool to achieve the recommended level as per the in...

Page 28: ...OXISWIM MANUAL P a g e 28 45 OPERATION AND MAINTENANCE ...

Page 29: ... the system to maintain healthy crystal clear water adequately 8 1 Regular Care Waterco recommends that you have your water regularly tested by your local pool professional who is trained and accredited in the operation of Hydroxypure or the Oxiswim system A record of testing should always be kept for reference 8 1 1 Water testing and balancing It is important to ensure the water is balanced for t...

Page 30: ...OX START UP 250mL per 10 000Litres 3 20 fl oz per 1000 US Every 6 months 250mL per 10 000 litres gal 3 20 fl oz per 1000 US gal COPPER ALGICIDE 100mL per 10 000 litres 1 3 fl oz per 1000 US gal Every 6 months 100mL per 10 000 litres 1 3 fl oz per 1000 US gal C5 1 Tablet per 10 000 litres 1 Tablet per 2500 US gal Every 3 months 1 tablet per 50 000 1 tablet per 12500 US gal PEROX PERFECT Shock dose ...

Page 31: ... 150ppm Calcium Hardness 180ppm 400ppm Salinity total Pool salt Mineral Crystals For low salt cell use 2000ppm 3000ppm Phosphate level ppm Less than 0 5ppm More frequent testing may be required in periods of extremely high usage or significant water dilution and maintenance may be required PLEASE NOTE The above information is a guide only Please refer to the local laws that govern a swimming pool ...

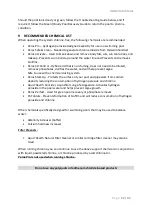
Page 32: ...e with a chemical dosing system Perox Start Up Protects the surface of your pool and pipework from calcium deposits reducing the consumption of hydrogen peroxide and chlorine Aqua Health Concide Aquachlor Long Life Algaecide Activates hydrogen peroxide in the pool water and helps prevent algae growth Perox Perfect Used for green pool recovery or phosphate removal C5 Tablets Prevents formation of b...

Page 33: ...are turned off during this procedure Once the process is completed turn the dosing pumps back on 9 4 Topping up The Pool If you fill the pool with new water please refer to the installation guide Please refer to 7 WATER PREPARATION for instructions It is not recommended that Bore or Well Water is used to fill or top up a pool unless it has been tested and recommended for this purpose When topping ...

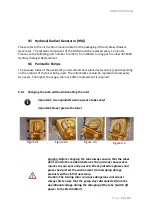
Page 34: ... every two years The higher the usage the more often replacement is required 9 6 1 Changing the tube without dismantling the rotor Important Use original Oxiswim squeeze tubes only Important Never grease the tube Figure 9 1 Figure 9 2 Figure 9 3 Figure 9 4 Caution Before changing the tube always ensure that the tubes don t contain the residual chemical The acid may cause severe injuries to your ey...

Page 35: ...hs The ball bearing located on the injector s outlet should be checked for correct operation by placing a blunt object into the end of the injector to check the ball is moving freely Make sure caution is taken when completing this process and personal protective equipment is in place When using liquid chlorine the injector may become blocked up more often ...

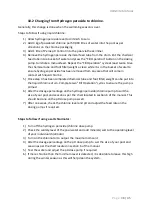
Page 36: ...dd sodium bicarbonate alkalinity increaser at a rate of 1 5kg per 50 000L 8 Circulate on the Filter position for 72 hours 9 Backwash filter If still cloudy constantly filter until clear 10 If after running the filter nonstop for 72 hours there is any sediment on the bottom of the pool this must be vacuumed to waste 11 Backwash filter 12 Identify the cause of the green pool and resolve NOTE Pool mu...

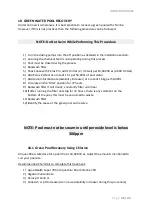
Page 37: ...trol Concentrate into the skimmer the pump should be running when this is done 5 Run all reticulation system nonstop for 3 14 days or until you see the algae die off and the pool becomes a cloudy blue look 6 After 1 hour complete a chlorine test on the water If the chlorine level is not equal to or greater than 8ppm add more chlorine until it is After 3 14 days of running complete these steps 1 Ba...

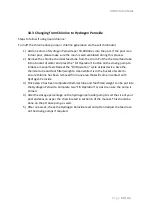
Page 38: ...ted chemical tube and foot filter weight can be put into the liquid chlorine drum Complete two Fill Operation cycles to ensure the pump is primed 6 Alter the dosage percentage on the hydrogen peroxide chlorine pump to suit the size of your pool and season as per the chart located in section 6 of the manual This should be done on the pH dose pump as well 7 After one week check the chlorine level an...

Page 39: ...a manual feed Repeat the Fill Operation cycle at least twice Give the chemical tube and foot filter weight a clean while it is in the bucket of water to ensure chlorine has been removed from any area that will come in contact with Hydrogen Peroxide 3 Once step 2 has been completed chemical tube and foot filter weight can be put into the Hydrogen Peroxide Complete two Fill Operation cycles to ensur...

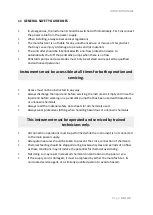
Page 40: ...liquid end before servicing the instrument Empty and rinse the liquid end before working on a peristaltic pump that has been used with hazardous or unknown chemicals Always read the material safety data sheets for all chemicals used Always wear protective clothing when handling hazardous or unknown chemicals This instrument must be operated and serviced by trained technicians only All connection o...

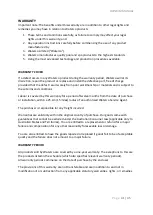
Page 41: ...period of twelve months from the date of purchase or installation within a 25 km 15 miles radius of an authorised Waterco Service Agent The purchaser is responsible for any freight incurred Warranties are valid only within the original country of purchase Our goods come with guarantees that cannot be excluded under the Australian Consumer Law applicable only to Australian States and Territories Yo...

Page 42: ...rdance with the Langelier saturation index within a range of 0 2 to 0 2 to ensure that it is not corrosive or scale forming d That is not saltwater other than mild saline water conditions which are compatible with swimming pool saltwater chlorination systems unless otherwise stated by Waterco in both the respective product labels and brochures that it is suitable for seawater applications and e Th...

Page 43: ...tutory requirements Warranty for installation of thermal overload protection is the sole responsibility of the licensed electrical contractor and not Waterco LIMITATIONS OF LIABILITY To the extent permitted by law Waterco excludes all liability it may have to the purchaser for indirect special or consequential loss arising from or related to any defect in any Waterco product or any act or omission...

Page 44: ... have your water regularly tested by your local pool professional A record of testing should always be kept for reference Some jurisdictions do not allow the exclusion or limitation of incidental or consequential damages so any such limitation may not apply This warranty gives specific legal rights In addition the purchaser may have other rights depending on the jurisdiction in which the Waterco p...

Page 45: ... 521 733 f 44 0 1795 522 085 w http www waterco eu France Parc d Activite ENTRIMMO 3 rue Paul Rieupeyroux 69800 SAINT PRIEST p 33 4 72 79 33 30 f 33 4 72 79 33 39 w http www waterco eu e sales info waterco eu USA Augusta Georgia 1864 Tobacco Rd Augusta GA 30906 p 1 706 793 7291 f 1 706 790 5688 w http www waterco us e sales Sales waterco us Canada 2645 Boul Jacques Cartier Est Longueuil QC Canada ...

Reviews: