9
Setup
Installing the Retriever & Pup Launch Utility software (RPLU)
The installation program is available on the USB flash
drive that shipped with the Retriever and on the
Spectrum website. Run the RPLU setup.exe file to
install the launch utility. The RPLU desktop icon (right)
can then be used to open the program.
Powering Up and Syncing the Retriever and Pups
Follow these steps to set up the Retriever and Pups wireless
network.
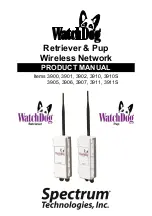
1. Verify that all the Retriever and Pup units
are on the same channel by checking the
Network Channel Selection switch. If not,
use a screwdriver to change the channel
selection. If using multiple wireless
networks, each network should use a
unique channel.
2. Attach the antenna
only to the Retriever
.
3. Install batteries in the Retriever. The LED will flash green
while powering up. Following power-up, the Retriever should
be in Setup mode (flashing amber). If it isn’t, hold Retriever’s
button for 2 seconds.
4. Put the Pups within proximity of the Retriever and power
them up by installing the batteries. The LED will flash green
several times. They will automatically broadcast a request to
join the Retriever’s network following power-up. This is
indicated by several amber flashes (request to join) followed
by 3 quick, green flashes (successful reply). If the Pups don’t
automatically join within one minute, hold the Pup’s button for
8 seconds to manually join. The Retriever’s amber flash
sequence will accelerate. The Pup’s connection status can
also be seen in the RPLU software (p. 10)
5. See
Configuration
(pg. 10 - 17) for details on configuring
Retrievers, Sensor Pups, and Station Pups. Configuration
can be done with RPLU software. Retrievers connected to a
DataScout modem can also be configured with the
SpecConnect web utility.


