background image

15 

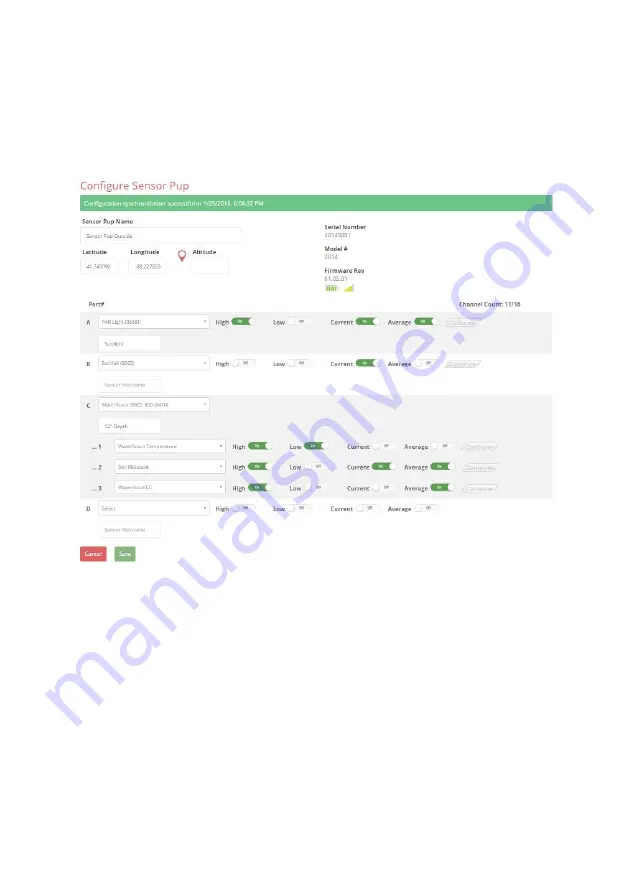
5.  In  the  “Configure  Sensor  Pup”  screen  (fig.  6),  set  the  Pup 
parameters.  The  latitude,  longitude  &  altitude  (optional)  can  be 
keyed in. Alternately, if the pindrop icon is clicked, a map image 
will be displayed that allows you to locate the device. See 

Data 

Logging  &  Storage 

(p.  24)  for  details  on  setting  the  data 

channels. Click “Save” to store any changes. Repeat for all Pups. 


6. The configuration will be sent to the DataScout modem which 
communicates the settings to the Retriever. 

Figure 6. SpecConnect Pup Configuration Screen 

Summary of Contents for 3900

Page 1: ...1 Retriever Pup Wireless Network PRODUCT MANUAL Items 3900 3901 3902 3910 3910S 3905 3906 3907 3911 3911S...

Page 2: ...ups are compatible with existing WatchDog 2000 Series Weather Mini Stations and offer the ability to plug in and transmit the full data set to the end receiver along with data from other Sensor Pups a...

Page 3: ...rmation 35 Updating Firmware 25 TABLE OF CONTENTS This manual will familiarize you with the features and operation of your new WatchDog Retriever Pups Wireless Network Please read this manual thorough...

Page 4: ...ilometer or less between Pups with no more than four hops back to the Retriever for the most remote Pups Pups have the ability to send their sensor data to the Retriever within minutes of measurement...

Page 5: ...box containing the following Antenna antenna stabilizer sleeve 6 AA batteries OR rechargeable battery pack 3910S 3911S only Mounting bracket U bolt clamp and nuts Screws 2 for back of unit Station co...

Page 6: ...rt for PC interface cable item 3661U or 3927 4 AUX port for wireless communication connection DataScout Cellular or WiFi or data power cord item 3927C75 To connect a solar panel or PC direct connectio...

Page 7: ...tal sensor can be connected to any port Station Pups The Station Pup is shipped with a cable with 2 modular connectors One end plugs into the weather station s AUX port The other end plugs into the St...

Page 8: ...green flashes Open launch software or power up DataScout RPLU program loaded on USB flash drive or on Spectrum website Configure units Use RPLU or SpecConnect Save to Retriever Save settings from RPLU...

Page 9: ...will flash green while powering up Following power up the Retriever should be in Setup mode flashing amber If it isn t hold Retriever s button for 2 seconds 4 Put the Pups within proximity of the Retr...

Page 10: ...the desktop icon 1 Upon start up the RPLU will automatically recognize any COM ports on your computer If the Retriever doesn t automatically connect select the COM port of the USB serial cable and cl...

Page 11: ...s serial number Entering latitude and longitude is optional These can be entered in decimal or Degree Minute Second format Select the sensor type from the drop down menu for each port Select up to 4...

Page 12: ...ver and Pup information must be entered manually 1 Insert the flash drive into the PC and bring up the RPLU software Open the File menu fig 4 2 If a configuration for the desired Retriever is already...

Page 13: ...the File menu fig 4 The program will bring up a browser screen Save the configuration to the root directory of the flash drive The configuration file will have the name setup txt Eject the flash driv...

Page 14: ...be keyed in Alternately if the pindrop icon is clicked a map image will be displayed that allows you to locate the device The logging interval is how often a Pup sends data to the Retriever The Upload...

Page 15: ...on is clicked a map image will be displayed that allows you to locate the device See Data Logging Storage p 24 for details on setting the data channels Click Save to store any changes Repeat for all P...

Page 16: ...weather station to a PC 2 In Specware 9 Pro open the WatchDog Properties using the WatchDog Manager or the Launch Set Properties for 1000 or 2000 Series button In the WatchDog Configuration Utility cl...

Page 17: ...the selected interval and the Station Pup will send this log to the Retriever as part of the wireless network This can be confirmed by connecting the Retriever to the Retriever Pup Launch Utility The...

Page 18: ...nutes This longer communication interval is used to conserve battery life To switch between Active mode and Setup mode press and hold the button for two seconds The LED will initially blink slowly but...

Page 19: ...s is indicated by the LED The explanation of the different LED colors is shown in figure 8 Additionally the LED on the Pup will flash green when it is receiving data from the Retriever and amber when...

Page 20: ...tallations give better performance The maximum range between Pups is 2500 ft about mile or kilometer for 900 MHz and 300 m for 2 4 GHz The most remote Pup should not exceed 4 hops back to the Retrieve...

Page 21: ...ossible since all Pup data is routed to the Retriever 2 Mount using provided hardware bracket u bolt nuts screws 3 Mount solar panel if being used Connect to Retriever with DC adapter see p 6 Deploy t...

Page 22: ...stop flashing amber which saves battery life Otherwise the Retriever will automatically transition to Active mode after 4 hours 2 After at least one logging interval check that all the Pups are commun...

Page 23: ...p mode Install batteries in the new Pup The Pup will flash amber while it tries to join When successful it will flash green 3 times If it doesn t join hold the red button on the Pup for 8 10 seconds T...

Page 24: ...10 or more it may be beneficial to set the upload interval to be shorter than the logging interval Data Channels Up to four data types can be recorded for each sensor measurement These data channels a...

Page 25: ...the Retriever and insert ash drive While holding the button re attach the battery Release the button when LED glows amber Update is complete when LED flashes green Retriever will return to Setup mode...

Page 26: ...er of the Retriever This is the only file available for a flash drive inserted at the time of data collection A flash drive left in the Retriever will also contain a unique data file for each day of d...

Page 27: ...The COM port is selected in the File Preferences Communication tab Direct Connection field fig 12 Click the Retriever button fig 11 to download the data received from the Pups The Erase records from R...

Page 28: ...g Reports From the SpecConnect Web Portal Data exports from SpecConnect are done from the Reports feature Select the desired report type from the Reports screen fig 14 Select the Pup date range and an...

Page 29: ...29 Figure 15 Sample report options screen...

Page 30: ...ower cord item 3926 PC Direct connection 50 ft cable kit item 3297 USB flash drive item 3388USB 75 Powered Direct Connect 75 ft Retriever Extension Cable Kit 3927C75 DataScout Cellular or WiFi modem m...

Page 31: ...NiMH Battery Life 8 months typical Operating Temperature 22 to 130 F 30 to 55 C with non rechargeable AA batteries 14 to 130 F 10 to 55 C with rechargeable NiMH battery pack PC Aux Port Baud Rate 9600...

Page 32: ...al batteries While no immediate damage will occur if the alkaline batteries are left in unused alkaline batteries tend to corrode over time and can damage the device A solar Retriever 3910S can also b...

Page 33: ...s Wireless Sensor Network Plan out your sensor network before deploying Take notes while deploying the network Keep an equipment library for future reference Serial Number Name Location Sensors A C B...

Page 34: ...ntation 3 Single Pup not being updated in SpecConnect Confirm that the Pup is on the same channel as the rest of the network The batteries may be dead Check last reported value for battery strength in...

Page 35: ...ignal strength 2 second button push Check that the modem and Retriever antennas are firmly attached in an upright orientation 6 Not seeing data from an individual Pup sensor Check that sensors are ful...

Page 36: ...a valid RMA number or for the loss of the package by any shipping company Spectrum Technologies Inc 3600 Thayer Court Aurora IL 60504 800 248 8873 or 815 436 4440 Fax 815 436 4460 E Mail info specmet...

Reviews: