


38
Ordinary and extraordinary maintenance
6
© WASP S.r.l.
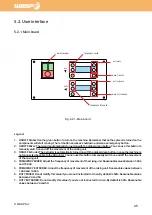
7.2. Cleaning
7.2.1. Machine cleaning
ATTENTION:
Cleaning the machine after the use is a crucial part of the maintenance and will extend the lifetime of
the product.
ATTENTION:
Avoid any chemicals , solvents and very abrasive tools when cleaning the machine to prevent
unwanted damages and wearing.
The cleaning procedure must be carried out when the 3D printer is not working
In case the machine is not connected to a 3D printer turn OFF the extrusion unit using the relative ON/OFF
button before proceeding. (see 5.2 “User Interface)
To perform a correct cleaning of the machine proceed this way:
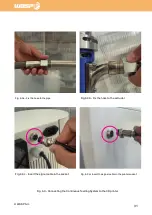
1. Unscrew the hose from the extruder. (Fig. 7.2.1 a)
Note: If after this operation the material starts flowing our of the hose it means you missed step 1.
2. Turn OFF the 3D printer and the extrusion unit should automatically start to purge the material (Fig 7.2.1 b)
In case the machine is not connected to a 3D printer turn ON the extrusion unit using the relative ON/OFF button
(see 5.3 “User Interface”).
Wait until there’s no more material coming out from the hose.
3. Turn off the machine by unplugging the power cable (Fig. 7.2.1 c)
4. Unscrew the hose from the pipe of the machine (Fig. 7.2.1 d)
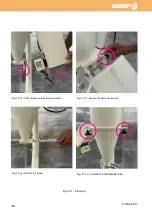
5a. Open the clamp and lift the extrusion motor (Fig 7.2.1 e)
5b. Use the secure to fix in position the extrusion motor (Fig. 7.2.1 f)
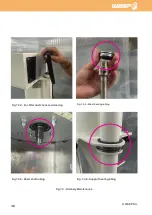
6. Extract the screw from the pipe by pulling it on the side of the motor (Fig. 7.2.1 g)
7. Loosen the two black knobs without completely removing them (Fig. 7.2.1 h)
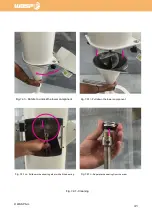
8. Rotate clockwise the lower component than is cone-shaped (Fig. 7.2.1 i)
9. Pull down the lower component to remove it from the assembly. (Fig. 7.2.1 l)
Note: when there’s still material inside the procedure can be helped by gently rotating the component to help it
slide down.
10. Open the inspection window and pull down the mixed by grabbing it together with the bearing. (Fig. 7.2.1 m)
Note. Be careful not to lose the bearing during this step.
11. Separate the bearing from the screw and save it. (7.2.1 n)


