


30
First use of the machine
6
© WASP S.r.l.
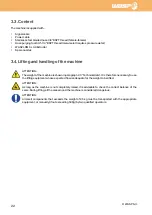
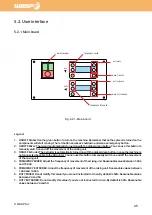
6.3. Connecting the Continuous Feeding to the 3D printer
NOTE:
This paragraph shows the connection of the system to a compatible Delta WASP 40100 Clay.
If you are not in posses of such machine ignore this paragraph.
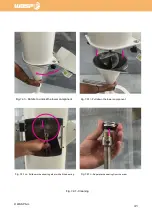
PLACEMENT
Before connecting the machine to the 3D printer make sure that the relative position of the two is correct as
displayed below in Fig 6.3.
If the cables get tensioned or the hose gets excessively bent during the print it’s possible that the placement of
the machine is not correct.
CONNECTION
To connect the machine to the 3D printer follow the steps below:
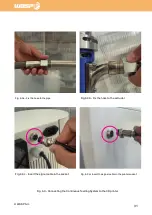
1. Fix the hose to the pipe, make sure its not too tightened (Fig 6.3 a)
No tightening additional to the one that can be done by hand is required or advised.
If you have problem in screwing the part they are probably misaligned. Try to lift the hose.
Adding some grease on the thread can help the unscrewing.
2. Fix the hose to the extruder. (Fig 6.3 b)
No tightening additional to the one that can be done by hand is required or advised.
If you have problem in screwing the part they are probably misaligned. Try to lift the hose.
Adding some grease on the thread can help the unscrewing.
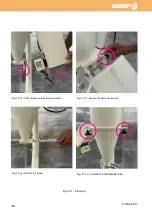
3. Insert signal cable in the socket on the back of the machine. (Fig. 6.3 c)
Make sure to secure it with the threaded crown.
4. Insert signal cable in the socket on the side of the 3D printer. (Fig. 6.3 d)
Make sure to secure it with the threaded crown.
Make sure the machine is close enough to the 3D printer to prevent tensions on the cable.
Fig. 6.3 - Correct placement of the machine near the 3D printer


