Page 2
63398 D2
Step by Step Instructions:
1. Remove the factory bumper and tire carrier. On TJ models, remove the license plate
and license plate mount from body. Save the mounting hardware.
2. Remove the tire carrier, bumper, and hardware from boxes.
3. On 97-01 TJ models, some of the rear 8 frame holes may not be in the frame.
These holes are the inner four, two on each side of vehicle. They must be drilled to
7/16”. Use figure 2 to locate these holes.
NOTE:
Some TJ model vehicles may not have all 8 mounting locations on the
rear frame area. If not all 8 locations are in the frame, measure the supplied
bumper mounting points and match these measurements on the frame. Drill the
frame holes to 7/16”.
See Figure 1.
Figure 1
WARNING
Drilling operations can cause flying metal chips.
WEAR SAFETY
GOGGLES.
Flying metal chips can cause eye injury.
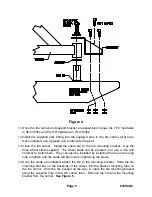
4. Place the new bumper against the back of the vehicle frame. Using the 3/8”
hardware provided, insert a bolt, lock washer, and washer through the appropriate
frame stiffener, rear frame section, ½” thick spacer (on CJ models) OR ¼” thick
spacer on YJ/TJ models, and start into the bumper. On CJ models, use the 3/8” x 1-
3/4” bolts on the all eight rear frame holes. On YJ/TJ models, use 3/8” x 1-3/4” bolts
in the four outer hole locations and the 3/8” x 1-1/2” bolts on the four inner hole
locations.
See Figure 2 or 3 depending on vehicle
.
Do not tighten bolts at this
time.
HOLES
MAY NOT
EXIST
HOLES
EXIST

