Page 5
63398 D2
6. Once the tire carrier is installed on the post in the bumper, finger tighten all eight
bolts that mount the bumper to the frame. Then, insert the single oblong hole
spacers between the bottom of the frame and the bottom tabs on the bumper. Insert
the 7/16” x 1 ½” bolts, lock washers and washers through the bottom tabs on the
bumper and the spacer and finger tighten.
7. Once all of the fasteners are finger tight, adjust bumper position if necessary.
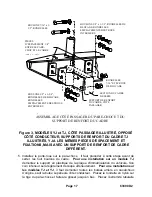
Tighten the 3/8” fasteners to 30-34 ft/lbs and the 7/16” fasteners to 46-50 ft/lbs.
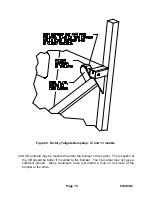
8. Using a drill and 7/16” bit, drill through the inner frame rail using the stiffening
bracket and existing outer frame holes on the out side of frame. A good precaution
would be to place a piece of metal between the inner frame rail and the gas to
prevent from damaging anything on the inside of the frame rails. Checks to see if
any wires or lines are attached in the drilling locations. If lines or wires are found,
temporarily move them out of the way during the drilling process. Repeat this for
the other side of vehicle.
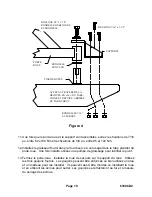
See Figure 2 or 3 depending on vehicle.
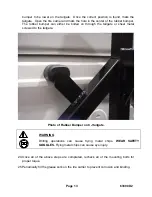
WARNING
Drilling operations can cause flying metal chips.
WEAR SAFETY
GOGGLES.
Flying metal chips can cause eye injury.
9. Insert the 7/16” x 4” bolts and flat washers through the frame stiffener bracket and
frame rail and finger tighten using the supplied 7/16” hardware. Torque the 7/16”
hardware to 46-50 ft/lbs.
See Figure 2 or 3 depending on vehicle.
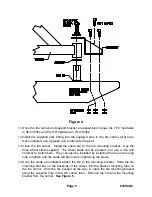
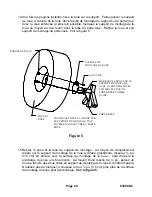
10. Install the post support bracket to the bumper. Using the supplied 5/8 x 1 ½” bolt,
lock washer, and washer, hand tighten the bracket to the post. Then install the 3
supplied 7/16 x 1 ½” bolts and washers through the support bracket and the bumper.
Install a 7/16” washer, lock washer and nut on each bolt inside the bumper. It may
be necessary to use a magnet or needle nose pliers to install the nuts and washers
onto the bolts. On CJ models it may be necessary to install the two bolts that are
furthest forward and match drill the 3
rd
rear hole. This is due to the tight packaging
of the bumpers ends.
See Figure 4
.

