background image

890557_d•en•01.07.2014

We reserve the right to carry out improvements

100

Wisotronic 1-channel 

Operating instructions

8.2  Measured values 

history

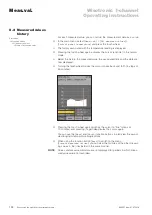
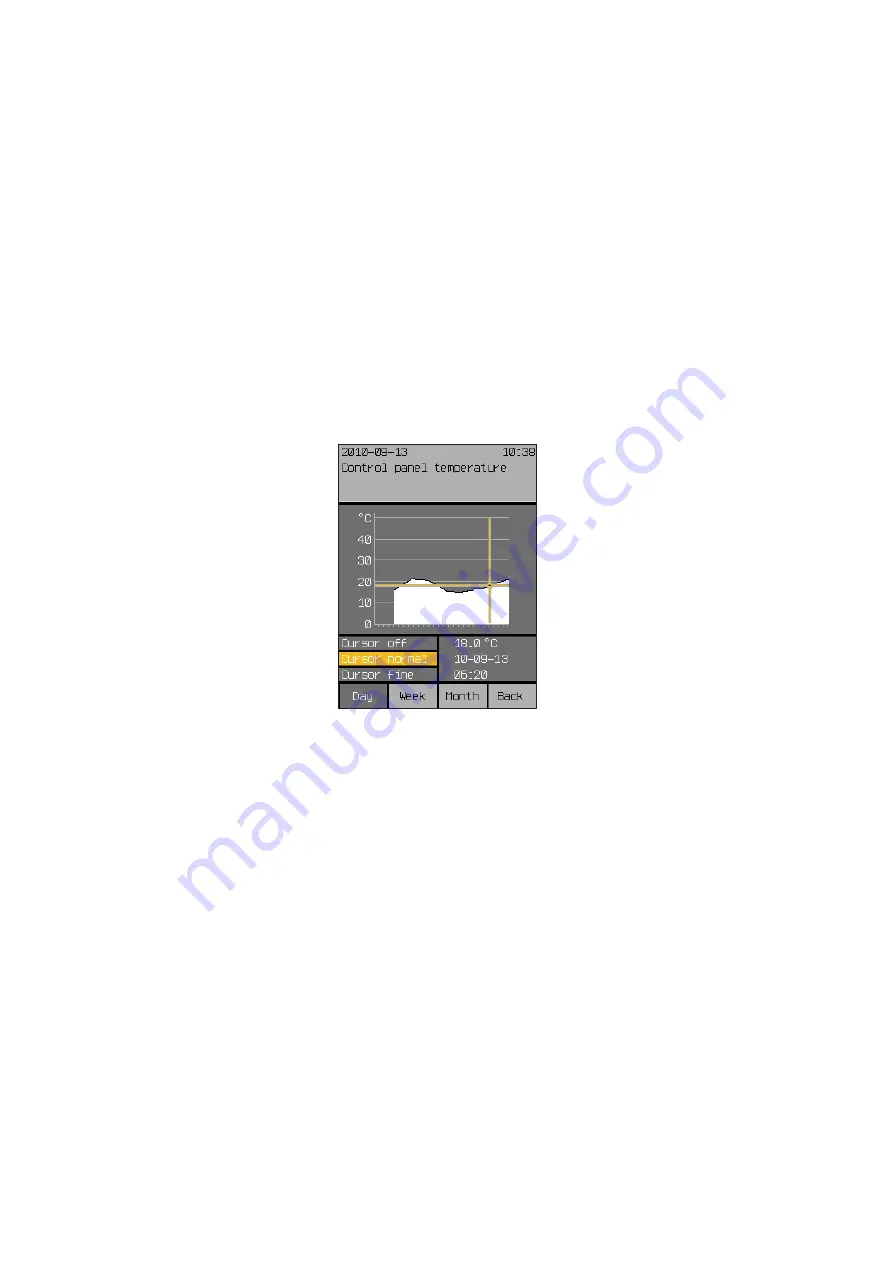
For each measured value, you can call up the measurement data as a curve. 


In the main menu, select [

Meas.val.

] > [

All measured values

] > 

[

Control panel temperature

] and press the touch wheel. 


The history associated with the temperature reading is displayed. 


Pressing the touch wheel again activates the cursor (a reticle) in the normal 

mode. 


Below the history, the measured value, the associated time and the date are 

now displayed. 


Turning the touch wheel moves the cursor moves back and forth (in steps of 

30 minutes).


Pressing the touch wheel again switches the cursor to “fine” (steps of 

10 minutes) and pressing it again deactivates the cursor again. 
You can use the [

Week

] and [

Month

] function buttons to also view the associ-

ated long-term temperature progressions.


When using the function button [

Back

] to switch to the menu 

[

Current measured values

], you can view the histories of the other measur-

ing values in the lines below in the same manner.

NOTE


Curves and measurement data are not displayed for periods in which meas-

ured values were not recorded.

Start menu


Measured values


All measured values


"Name of measured value"

Meas.val.

Summary of Contents for Wisotronic

Page 1: ...Wisotronic 1 channel Operating instructions Keep for future use Photo Habermaass GmbH Sun Light WAREMA Valid from 1st July 2014 890557_d en...

Page 2: ...s Head office WAREMA Renkhoff SE Hans Wilhelm Renkhoff Stra e 2 D 97828 Marktheidenfeld P O Box 13 55 D 97828 Marktheidenfeld Telephone 49 9391 20 0 Telefax 49 9391 20 4299 http www warema de info war...

Page 3: ...functions 20 4 Menu structure 21 4 1 Main menus 21 4 2 Convenience functions 22 4 3 Safety functions 23 4 4 Manage channels groups scenes 23 4 5 System 24 5 Getting started 25 5 1 Start menu 25 5 1 1...

Page 4: ...e 47 7 2 2 11 Active during absence 47 7 2 2 12 Measured value dawn dusk 47 7 2 2 13 Automatic status 47 7 2 2 14 Auto control status 47 7 2 2 15 Using dawn dusk control correctly 48 7 2 2 16 The dawn...

Page 5: ...ition 73 7 2 9 2 Slat angle 73 7 2 9 3 Current state absent 73 7 2 10 Manual operation 74 7 2 10 1 Position DOWN 74 7 2 10 2 Slat angle DOWN 74 7 2 10 3 Holding time hh mm 75 7 2 10 4 The manual opera...

Page 6: ...sor allocation 95 7 7 Clean control panel 95 7 8 Service 96 7 9 Safety functions 96 7 9 1 Wind monitoring 96 7 9 2 Ice monitor 97 7 9 2 1 Automatic reset ice alarm 97 7 9 2 2 Manual reset ice alarm 98...

Page 7: ...ing against damaging weather conditions and offers a comprehensive range of comfort and safety functions In addition the Wisotronic can be op erated via EWFS transmitters the radio receiver was integr...

Page 8: ...poten tial danger DANGE warns of an imminently dangerous situation Possible consequences may include serious injuries and even death personal injury property or environmental damage WARNIN warns of a...

Page 9: ...gates are observed WARNIN The Wisotronic may only be used to control such window drives where the movement of the window cannot cause any injuries These windows include partial list according to DIN...

Page 10: ...ety instructions The control system controls your sun shading product automatically You must therefore observe the following safety instructions WARNIN An automatically controlled mechanism can start...

Page 11: ...ase use suitable safety devices for personal protection Never place or store any items in the motion area of automatically operated mechanisms e g ladder against a house wall with an articulated arm a...

Page 12: ...d information on the cor responding topic in the control unit documentation This is the only way to ensure trouble free retrofitting modification Exercise special care when components of different ver...

Page 13: ...Fig 1 The Wisotronic operating elements Display The illuminated display informs you on everything you can view and set on the Wisotronic For example you can view the current measured val ues of the o...

Page 14: ...em A narrow scroll bar on the right edge of the screen indicates the section of the menu in which you are located and whether further menu items exist Turning the touch wheel clockwise moves the selec...

Page 15: ...the extreme values that can be set are shown at the left and right of the bar graph By turning the touch wheel the bar moves to the right or left the value changes accordingly You will see a box in ea...

Page 16: ...l during installation When you select a channel in the main menu by pressing the touch wheel the operating menu appears In the operating menu the channel type is displayed graphically as follows Artic...

Page 17: ...is a complete solution for controlling your sun shading prod uct Whatever the season Wisotronic will lower your energy consumption and provide for a pleasant climate The multisense weather station de...

Page 18: ...hutters NOTE To actuate multiple products through a single channel of the Wisotronic additional components may be required such as motor control units Fig 4 Example channels of the Wisotronic Example...

Page 19: ...of a conservatory together NOTE The group inherits the product properties of the first assigned channel if this is a roller shutter for example then the operating behaviour of the group corresponds t...

Page 20: ...and basic functions Safety functions Wind monitoring Ice monitor Comfort functions Sun control Dawn Dusk control Temperature control Diff temp control Precipitation monitoring this is a safety functi...

Page 21: ...ain menu Settings Basic functions Convenience functions continue with a Safety functions continue with b Manage channels groups scenes continue with c Leave time System continue with d Sensor allocati...

Page 22: ...ting instructions 4 2 Convenience functions Convenience functions Sun control Dawn Dusk control Temperature control Precipitation monitor Intermittent ventil from a Time switch Cold protection Leave A...

Page 23: ...ions Safety functions Wind monitoring from b Ice monitor Fig 7 Safety functions menus 4 4 Manage channels groups scenes Manage channels groups scenes Manage groups Manage scenes from c Sort channels g...

Page 24: ...carry out improvements 24 Wisotronic 1 channel Operating instructions 4 5 System System Date time Display Measured values start menu Language from d Sensor compensation Wind test Restore settings Soft...

Page 25: ...anguage then you are automatically in the main menu The following figure shows the Wisotronic start menu Fig 10 Wisotronic start menu The start menu elements A Display of date and time The header is f...

Page 26: ...following functions are assigned to the buttons in the start menu The Main function button leads to the main menu where you can access scenes channels and groups With the Auto button you can switch t...

Page 27: ...moves the line one line up NOTE If the scroll bar on the right display edge has two colours you can use the touch wheel to scroll the table up or down The first line for example contains a so called s...

Page 28: ...by turning the touch wheel Pressing the touch wheel sets the hours and switches to setting the minutes After the minutes have been set pressing the touch wheel ends the input of the time the new valu...

Page 29: ...ack once more leads you to the Settings menu 5 4 Example for operation Set display Proceed as follows if you want to adjust the appearance of the display or change the behaviour of the control element...

Page 30: ...es The brightness is increased by turning the touch wheel in a clock wise direction The Stand function button sets the factory setting of 20 Brightness at operation Set the Brightness at operation in...

Page 31: ...cannot be damaged This is how to operate a product on the Wisotronic control panel The following displays are examples and may differ from the display on your Wisotronic Press on the Main function but...

Page 32: ...al vene tian blinds UP short The slats tilt up UP long The product moves up STOP Product stops DOWN short The slats tilt down DOWN long The product moves down Other sun shading products such as awning...

Page 33: ...ress Sett in the main menu and go to the Basic functions menu The following view appears in the display the header may show the channel name you selected instead of Channel 1 and the setting values ma...

Page 34: ...product is lowered The setting range is 0 99 minutes Adjust the value for the delay of the movements by turning the touch wheel the bar graphic at the right changes accordingly The value 0 min deacti...

Page 35: ...e selected channel set or delete the checkmark in the Precipitation monitor ON OFF line The Stand function button sets the precipitation monitor to the standard setting typical for the channel type CA...

Page 36: ...Stand function button sets the channel dependent factory setting NOTE Please contact your WAREMA dealer if you prefer a different setting of the following safety functions 7 1 11 Wind monitoring This...

Page 37: ...as controlling the sun shading products on the basis of brightness is a funda mental requirement A weather station can be employed to measure bright ness When the measuring value PHOTO exceeds the se...

Page 38: ...t position and slat angle The setting range is 0 99 minutes Turn the touch wheel to set the value for the SUN delay A setting of 0 min deactivates the delay the function button Stand sets the factory...

Page 39: ...the value to the factory setting 7 2 1 6 Limit value CLEAR This limit value specifies the brightness at which a sun shading product is to move to a medium position and in the case of external or inter...

Page 40: ...unchanged Turn the touch wheel to set the limit value Position CLEAR The function button Stand sets the product specific factory setting 7 2 1 9 Slat angle CLEAR This setting is required when you hav...

Page 41: ...d when you have chosen a slat product as channel type external or internal venetian blinds If you have connected a slat product such as an external venetian blind you can specify how the slats are to...

Page 42: ...photo The line Measured value Photo indicates the outdoor brightness currently measured and is for information only 7 2 1 18 Correct use of the sun control The setting values for the sun control descr...

Page 43: ...value CLOUD is undercut at Point Nothing hap pens initially because the CLOUD delay is started first the sun shading product is therefore not raised yet The UP delay has finally elapsed at Point and t...

Page 44: ...eds the set limit value DAWN for the duration of 5 minutes a move command is triggered and the sun shading product moves to the DAWN position When the measuring value Dawn dusk falls below the set lim...

Page 45: ...s to the upper limit position and a value of 100 to the lower limit position To set the value Position DAWN turn the touch wheel the value increases or reduces depending on the direction of rotation T...

Page 46: ...sessment the function button Stand sets the limit value DUSK to the product specific factory setting 7 2 2 7 Position DUSK The Position DUSK value specifies the position to which the sun shading produ...

Page 47: ...y setting 7 2 2 10 Active during leave In this menu line you can activate or switch off the dawn dusk control during your leave Set or delete the checkmark in the line Active during leave to activate...

Page 48: ...The activation delay of 5 minutes this cannot be changed now begins to run At Point of the curve this time has elapsed and the limit value is still exceeded the sun shading product now moves to the se...

Page 49: ...control can assess either the internal device sensor OR an external sensor weather station but not several at the same time Example Sample application Weather station In the Wisotronic temperature mea...

Page 50: ...s also called Temperature controlled sun control and can be used to enable disable the sun control it must have first been activated by setting the checkmark in the Sun control menu The Enable disable...

Page 51: ...re control ON OFF menu The following view appears in the display 7 2 3 2 Temperature control ON OFF In this menu line activate or deactivate the temperature control To activate or deactivate the tempe...

Page 52: ...s the factory setting 7 2 3 5 Slat angle WARM This setting is only useful when you have chosen a slat product external or internal venetian blinds If you have connected a slat product such as an exter...

Page 53: ...cordingly Turn the touch wheel to set the value Slat angle COLD The function button leaves the slat angle unchanged function button Stand sets the factory setting 7 2 3 9 Operating mode selecting Five...

Page 54: ...d value exceeds or falls below the limit value Additional move commands are trig gered according to adjustable step durations if measured values continue to exceed or fall below limit values Example F...

Page 55: ...Difference temperature with steps of the tempera ture control You can use it to cool and ventilate a room activating your win dow depending on the inside and outside temperature The difference tempera...

Page 56: ...ng it In the course of the day the outside tem perature continues to rise because of the solar radiation If it becomes too hot outside to cool the room by venting the current outside temperature lies...

Page 57: ...the window is opened Example Your max comfort temperature is for example 26 C and it has already been reached If the outside temperature is lower than the inside temperature of the set difference temp...

Page 58: ...gle unchanged the function button Stand sets the value for the Slat angle D temp COOLER to the product specific factory setting Limit value D temp WARMER The D temp WARMER limit value specifies by how...

Page 59: ...slat product such as an external venetian blind you can specify how the slats are to be set after movement to the D temp WARMER position is completed Turn the touch wheel to set the value Slat angle...

Page 60: ...e you can enable or disable the temperature control during your absence To activate or deactivate the temperature control set or delete the checkmark in the line Active during absence The function but...

Page 61: ...on are released again Press the function button Sett in the main menu and go to the Comfort functions Precipitation monitor menu The following view appears in the display 7 2 4 1 Precipitation monitor...

Page 62: ...alue Position precipitation The function button sets the value to Position unchanged the Stand function button sets the Position precipitation value to the factory setting 7 2 4 4 Slat angle PRECIPITA...

Page 63: ...r delete the checkmark in the line Active during absence to acti vate or deactivate the precipitation monitor during your absence The Stand function button sets the factory setting 7 2 4 7 Meas value...

Page 64: ...s Intermittent ventilation menu The following view appears in the display the header may show the channel name you selected instead of Channel 1 and the setting values may be dif ferent 7 2 5 1 Interm...

Page 65: ...n the touch wheel to set the value Ventilation step The function button Stand sets the product specific factory setting 7 2 5 5 Active during leave In this menu line you can activate or deactivate int...

Page 66: ...day till Sunday x Four programmable switch times are available for each day Furthermore the position and subsequent tilting of the slats of a slat product can be pro grammed with different slat angles...

Page 67: ...ine leads you to the respective submenu where you can set the switching times for the respective day or together for the selected days An example is provided here showing the settings for Monday the s...

Page 68: ...osen a slat product external or internal venetian blinds If you have connected a slat product such as an external venetian blind you can specify how the slats are to be set after movement to the ST1 p...

Page 69: ...you have chosen a slat product external or internal venetian blinds If you have connected a slat product such as an external venetian blind you can specify how the slats are to be set after movement...

Page 70: ...12 Auto control status The State auto control line shows the current status of the automatic control and is for informational purposes only Press the Back function button to return to the higher leve...

Page 71: ...protection ON OFF to acti vate or deactivate the cold protection The function button Stand sets the product specific factory setting 7 2 7 2 Blocking temperature The Blocking temperature limit value s...

Page 72: ...ve The setting range is 0 100 a value of 0 corresponds to the upper limit position and a value of 100 to the lower limit position Turn the touch wheel to set the value Position The function button set...

Page 73: ...of 100 to the lower limit position Turn the touch wheel to set the value Position The function button sets the value for the position to the function button Stand sets the value also to i e the posit...

Page 74: ...n leaves the position unchanged the function button Stand sets the value for the Position DOWN to the factory setting NOTE When the function button DOWN is pressed again while the sun shading product...

Page 75: ...unction has triggered an alarm regardless of the view in the display of the control When a comfort function has triggered a move command counter control or stopping is possible When a safety function...

Page 76: ...transmitter channels or delete hand held trans mitters already assigned NOTE The WAREMA range includes transmitters in an enclosure for wall mounting These EWFS Wall mounted transmitters have exactly...

Page 77: ...e battery compart ment The channel and the ID serial number of the EWFS Hand held transmitter is now shown on the right in the display The Delete function button deletes this assignment again the Canc...

Page 78: ...in the main menu according to your preferences Press the function button Sett in the main menu and then go to the menu Manage channels groups scenes The following view appears in the display Making a...

Page 79: ...s follows for this purpose Move switch manually to the desired position In the main menu select the line Scene 1 or the name of the scene you specified Select the menu item Learn scene by pressing the...

Page 80: ...wn in the selection field below it The so called Alias name of the scene may consist of upper case letters lower case letters numbers and symbols You can change the alias names of a scene Turn the tou...

Page 81: ...g time runs down they are executed after the holding time has expired NOTE The following applies to a disabled product If the global automatic control has been deselected in the main menu the last mov...

Page 82: ...lly above it moves down Select the next menu line you want to move with the touch wheel and pro ceed as above After all lines are in the desired sequence you return to the menu Manage channels groups...

Page 83: ...the lower frame Press the touch wheel to enter the selected symbol in the input field Push the function button to delete a symbol in the input field to the left of the blinking cursor Press the touch...

Page 84: ...The setting range reaches from 01 01 to 31 12 Turn the touch wheel to set the day of the Leave begin hh mm value A push on the touch wheel causes the display to jump to the month Set the month in the...

Page 85: ...85 7 5 System settings In this menu you perform basic settings for the control and the sensors Press the Sett function button in the main menu and then go to the System menu The following view appear...

Page 86: ...ry setting Now select the line Day by turning the touch wheel and enter the day in the same manner Proceed in the same manner with month year and weekday After you have selected the Standard time dayl...

Page 87: ...st menu line Press the touch wheel the value on the right becomes editable and the dis play is dimmed to the indicated value By turning the touch wheel to the right or left the bar moves and the brigh...

Page 88: ...ry setting 7 5 2 4 Standbyduration After 15 minutes without manual operation in the operator mode the display changes to standby mode The duration of standby mode is selected in the Standby duration m...

Page 89: ...eme you can change the colours of the display Two col our schemes are available dark and light Dark colour scheme Light colour scheme Select the desired scheme in the Colour scheme menu line by turnin...

Page 90: ...ed values that appears in the Start menu For each measured value only the sensors that are actually available are offered for selection Using the touch wheel select a measured value and assign a senso...

Page 91: ...time of printing of these instructions the following languages were im plemented as operating languages German English French Spanish Italian Norwegian To set the operating language toggle between the...

Page 92: ...y setting 7 5 5 2 Weather station 1 2 3 outside temperature The Multisense 1 Outside temperature value specifies by how many degrees Celsius the measured value of weather station 1 is corrected up or...

Page 93: ...Press the Sett function button in the main menu and then go to the System Restore settings menu The following questions appears on the left in the menu line From service setting Pressing on the YES bu...

Page 94: ...nd the connected devices are displayed in this menu This information is helpful for example if you want to expand your sun shading control system or if a problem has oc curred with your control You ca...

Page 95: ...ish to make changes to this item 7 7 Clean control panel This menu facilitates cleaning of the control panel The display is thereby largely cleared to be able to better see dirt contamination The func...

Page 96: ...onic please contact your specialist dealer 7 9 Safety functions 7 9 1 Wind monitoring The wind monitor safety function prevents destruction of your sun shading products by wind by moving them early en...

Page 97: ...stead of Channel 1 and the setting values in the right column may be different 7 9 2 1 Automatic reset ice alarm In this menu line you specify whether the ice monitor is to reset an ice alarm automati...

Page 98: ...If the sun shading product is operated when iced over any warranty and liability claims become void Proceed as follows to manually reset an ice alarm Use the touch wheel to select the Reset ice alarm...

Page 99: ...scribed in the following sections 8 1 Current measured values In this menu you see the current measuring values of the connected sensors Press the function button Meas val in the main menu and then go...

Page 100: ...e and the date are now displayed Turning the touch wheel moves the cursor moves back and forth in steps of 30 minutes Pressing the touch wheel again switches the cursor to fine steps of 10 minutes and...

Page 101: ...menu The following view appears in the display the entries in the left column may be different You can see a list of the channels that may also have freely selectable names At the right the last i e...

Page 102: ...nu Channel Trigger history or the channel name assigned by you in which you will see a list of the trig gers in chronological descending sequence The triggers are now shown at the left while their tri...

Page 103: ...left table are different Example You will see a numbered list of faults in chronologically ascending order Each line contains Fault number Fault type Affected device Date and time Turning the touch wh...

Page 104: ...ic on the sun shading product itself or in the immediate vicinity of the sun shading product first de energise the unit and secure it against reactivation 10 Maintenance There are no parts within the...

Page 105: ...g system resulting from operation under icy conditions The device meets the requirements on interference resistance and interfer ence emission for use in residential and commercial areas 13 Informatio...

Page 106: ...mmand Button press too short Repeat command Interfering ambient influences Reduce distance to Wisotronic Safety function active Wait until the cause precipitation wind ice is no longer present Wind te...

Page 107: ...programming of control timer Sun shading is lowered too late in the sun shine Delay LOW limit value is set too high sun control Change the limit value Sun shading is lowered when there is little sunsh...

Page 108: ...240 x 320 pixels Program user guidance Menu guided text display Program entry 4 capacitive buttons touch wheel HF receiver Receiving frequency ASK OOK 433 92 MHz Range environment without interfer enc...

Page 109: ...rol panel temperature 92 Convenience functions 37 Correct use of the sun control 42 Current measured values 99 Current triggers 101 D Date time 86 Dawn dusk 34 Dawn Dusk control 34 44 48 Delay CLEAR 4...

Page 110: ...29 Operating mode selecting 53 Outdoor brightness 42 P Pictograms 8 Position 72 73 Position CLEAR 40 Position CLOUD 41 Position COLD 53 71 Position DAWN 45 Position DOWN 74 Position DUSK 46 Position...

Page 111: ...ls 26 System settings 85 T Technical data 108 Temperature 35 Temperature control 35 49 51 operating modes 50 Tilting product 15 Timer switch ON OFF 67 Time switch 36 66 Touch wheel 13 Trigger 101 102...

Page 112: ...WAREMA Renkhoff SE Hans Wilhelm Renkhoff Stra e 2 97828 Marktheidenfeld Main Germany http www warema de info warema de...

Reviews: