11.01
2
MA11.
M.
AGITADOR
AGITADOR
CHOPPER
AGITATORE
- USO Y MANTENIMIENTO
-
USO E MANUTENÇÃO
- OPERATION AND MAINTENANCE
- USO E MANUTENZIONE
INSTALLAZIONE SU DI UN MI-
SCELATORE GIÀ ESISTENTE
E PREDISPOSTO PER IL MON-
TAGGIO DELL’AGITATORE
INSTALACIÓN EN UN MEZCLA-
DOR YA EXISTENTE Y PREPA-
RADO PARA EL MONTAJE DEL
AGITADOR
Algunos mezcladores están pre-
parados para el montaje del agi-
tador en momentos sucesivos.
En estos casos en la posición pre-
vista para el alojamiento del agi-
tador está instalado el tapón “1”
que logra la continuidad interna
del mezclador “3”.
Desmontar por lo tanto el tapón
e instalar el agitador del siguien-
te modo:
- quitar la tuerca “4” de bloqueo
de los útiles “5” y extraer los úti-
les del árbol “6”;
- introducir el agitador en la bri-
da “2” ;
- bloquear el cuerpo “7” en la bri-
da “2”;
- a través de las tapas de inspec-
ción presentes en el mezclador,
volver a montar los útiles “5” y
bloquearlos apretando a fondo
la tuerca “4”;
- conectar neumática y eléctrica-
mente el agitador como se ha
descrito en las Pág. M.21 y
M.22.
ATENCIÓN
Terminado el montaje, verificar
con atención el ajuste de cada
perno. En particular verificar el
correcto apriete de la tuerca “4”
de bloqueo de los útiles.
Girar manualmente las aspas
del mezclador y verificar que no
haya interferencias con el árbol
del agitador. Si se presentan in-
terferencias recortar los útiles
implicados.
Alcuni miscelatori sono predi-
sposti per il montaggio dell’agi-
tatore in tempi successivi. In
questi casi nella posizione pre-
vista all’alloggiamento dell’agita-
tore è installato in tappo “1” che
realizza la continuità interna del
miscelatore “3”.
Smontare quindi il tappo e pro-
cedere all’installazione dell’agita-
tore nel seguente modo:
- togliere il dado “4” di bloccag-
gio degli utensili “5” e sfilare gli
utensili dall’albero “6”;
- inserire l’agitatore nella flangia
“2” ;
- bloccare il corpo “7” alla flangia
“2”;
- attraverso i portelli d’ispezione
presenti sul mescolatore, rimon-
tare gli utensili “5” e bloccarli
serrando a fondo il dado “4”;
- collegare pneumaticamente ed
elettricamente l’agitatore come
descritto nelle pag M.21 e M.22.
ATTENZIONE
Terminato il montaggio, verifi-
care accuratamente il serrag-
gio di ogni bulloneria. In parti-
colare verificare il corretto ser-
raggio del dado “4” di blocco
degli utensili.
Ruotare manualmente le pale
del miscelatore e verificare la
mancata interferenza con l’al-
bero dell’agitatore. In caso
contrario procedere alla rifila-
tura degli utensili interessati.
INSTALAÇÃO SOBRE UM MIS-
TURADOR JÁ EXISTENTE E
PRÉ-DISPOSTO A MONTAGEM
DO AGITADOR
INSTALLATION ON AN EXIST-
ING MIXER ALREADY PRE-EN-
GINEERED FOR A CHOPPER
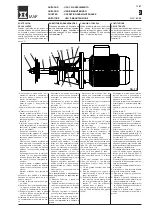
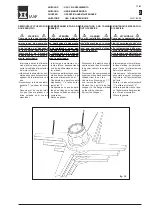
fig. 9
Some mixers are factory pre-
engineered for the later addition
of a chopper.
In these cases, the chopper
mounting is covered by a plug “1”
to ensure the mixer’s smooth in-
side surface “3”.
Remove this plug and install the
chopper as follows:
- remove the tool “4” locking nut
“5” and remove the tools from
the shaft “6”;
- insert the chopper through the
flange “2” ;
- attach casing “7” to flange “2”;
- working through inspection
hatch on the mixer, replace the
tools “5” and lock them tighten-
ing them all the way down with
nut “4”.
- make the electric and pneumat-
ic hook ups to the chopper as
described in pag. M.21 and
M.22).
WARNING
When you have finished in-
stalling the chopper, check
the tightening level of all the
nuts and bolts. In particular,
check to make sure that tool
locking nut “4” is correctly
tightened.
Turn the mixer tools by hand
and check to make sure
there is no interference with
the chopper shaft. If there is,
trim the tail ends of the plough
tools involved.
Alguns misturadores são pré-
dispostos para a montagem do
agitador sucessivamente. neste
caso nas posições previstas ao
alojamento do agitador é instala-
da uma tampa “1” que dá conti-
nuidade ao interno do mistura-
dor “3”.
Desmonte a tampa e prossiga
com a instalação do instalador
do seguinte modo:
- retire o parafuso “4” do blo-
queio das ferramentas “5” e
desparafuse as ferramentas
do eixo “6”;
- insira o agitador no flange “2”;
- bloqueie o corpo “7” ao flange
“2”;
- pelas portas de inspeção pre-
sentes no misturador, remonte
as ferramentas “5” e bloqueie-
as apertando bem a porca “4”;
- conecte pneumaticamente e
eletricamenteo agitador como
descrito nas páginas M.21 e
M.22.
ATENÇÃO
Terminada a montagem, ve-
rifique com cuidado se to-
dos os parafusos estão
apertados. Em particular ve-
rifique se a porca “4” de blo-
queio das ferramentas, está
apertada.
Gire manualmente as pás do
misturador e verifique se
não há interferência com o
eixo do agitador. Caso con-
trário avance com a afiação
das ferramentas
•
2
•
1
•
3
•
4
•
5
•
6
•
7
18


