


39
Finish 270 / 250
GB
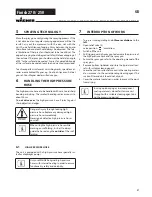
4
StARtuP
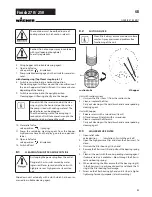
4.1
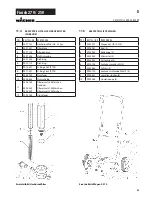
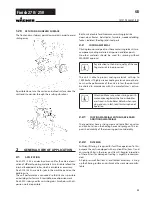
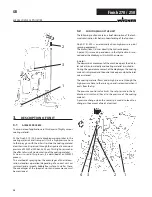
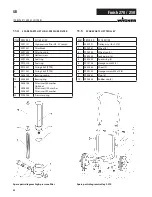
unIt WItH SuctIOn SySteM
1. Unscrew the dust protective cap (Item 1).
2. Ensure that the sealing surfaces of the connections are
clean.
Ensure that the red inlet (2) is inserted in the coating ma-
terial inlet (5).
3. Use the enclosed 41 mm wrench to screw the union nut
(3) at the suction hose (4) onto the coating material inlet
(5) and tighten it.
4. Screw the union nut (6) at the return hose (7) to the con-
nection (8) (22mm).
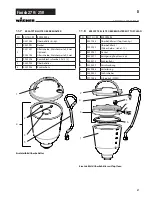
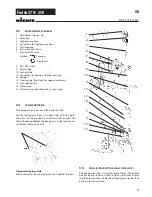
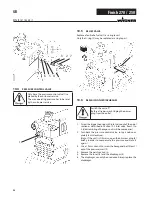
4.3
HIGH PReSSuRe HOSe And SPRAy Gun
1. Screw the high pressure hose (10) onto the hose connec-
tion
2. Screw the spray gun (11) onto the high pressure hose
3. Tighten all union nuts on high pressure hose so that no
coating material can escape.
4. Screw the tip holder with the selected tip onto the spray
gun, align tip and tighten union nut.
When unscrewing the high pressure hose,
hold firmly on the hose connection with a
22mm wrench.
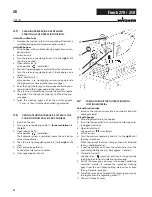
4.2
unIt WItH uPPeR HOPPeR (5 lItReS)
1. Unscrew the dust protective cap (Item 1).
2. Ensure that the sealing surfaces of the connections are
clean.
Ensure that the red inlet (2) is inserted in the coating ma-
terial inlet (5).
3. Screw the union nut (6) on the return pipe (7) onto the
connection (8).
3. Hang the return pipe (7) into the hopper and screw the
upper hopper (9) onto the coating material inlet (5).
if using hopper with cleaning ring (topclean) step 5 and 6
5. Fix TopClean on hopper upside
6. Plug in return pipe into TopClean and screw on union nut
startup
4.4
cOnnectIOn tO tHe MAInS netWORk
Connection must always be carried out via
an appropriately grounded safety outlet with
residual-current-operated circuit-breaker.
Before connecting the unit to the mains supply, ensure that
the line voltage matches that specified on the unit’s rating
plate.
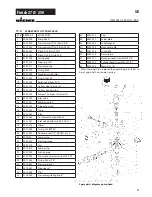
2
5
6
1
4
3
9
8
7
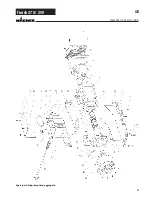
7
8
11
10
Summary of Contents for Finish 250
Page 19: ...19 Finish 270 250 10 9 Schaltplan d reparaturen am ger t...
Page 24: ...24 Finish 270 250 ersatzteile und zubeh r Ersatzteilbild Pumpenaggregat d...
Page 48: ...48 Finish 270 250 GB Repairs at the unit 10 9 Connection diagram...
Page 53: ...53 Finish 270 250 GB Spare parts diagram pump aggregate Spare parts and accessories...
Page 77: ...77 Finish 270 250 10 9 Sch ma lectrique F R parations sur l appareil...
Page 107: ...107 Finish 270 250 10 9 Elektrisch schema Reparaties aan het apparaat NL...
Page 112: ...112 Finish 270 250 Onderdelenafbeelding pompaggregaat NL Accessoires en onderdelen...
Page 118: ...118 Finish 270 250 NL CE Verklaring van overeenstemming...
Page 119: ...119 Finish 270 250 NL CE Verklaring van overeenstemming...


