


44
Finish 270 / 250
GB
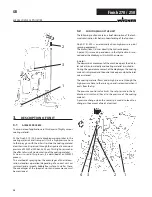
cleanIng the unIt / servIcIng
8.4
cleAnInG tHe AIRleSS SPRAy Gun
1. Rinse the Airless spray gun with a suitable cleaning agent
under lower operating pressure.
2. Clean the tip thoroughly with a suitable cleaning agent so
that no suitable coating material rests remain.
3. Do not store the tip in solvent because this reduces the
durability considerably.
4. Clean the outside of the Airless spray gun thoroughly.
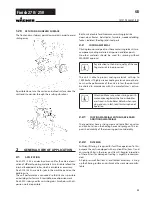
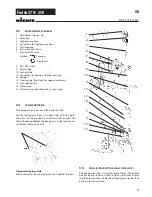
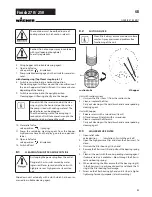
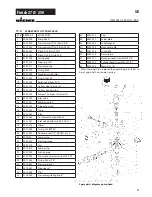
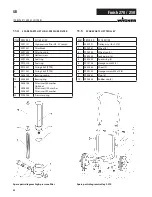
Removal
1. Pull the protective bracket (1) forwards.
2. Screw the grip (2) out of the gun housing. Pull out the in-
sertion filter (3).
3. If the insertion filter is clogged or defective, replace it.
Installation
1. Slide the insertion filter (3) with the longer cone into the
gun housing.
2. Screw the grip (2) into the gun housing and tighten it.
3. Latch in the protective bracket (1).
1
3
2
Insertion filter in the Airless spray gun
9.1
GeneRAl SeRVIcInG
An annual expert check is higly recomended
to be sure to have an safe unit
You can servicing of the unit carried out by
the Wagner Service. Favorable conditions can
be agreed with a service agreement and/or
maintenance packages.
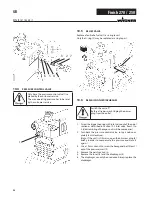
Minimum check before every startup:
1. Check the high-pressure hose, spray gun with rotary joint,
power supply cable with plug for damage.
2. Check whether the pressure gage can be read.
check at periodical intervals:
1. Check inlet-, outlet-, relief valve according wear. Clean it
and replace worn out parts.
2. Check all filter inserts (spray gun, suction system) clean it
and replace if necessary.
9
SeRVIcInG
9.2
HIGH-PReSSuRe HOSe
Inspect the high-pressure hose visually for any notches or
bulges, in particular at the transition in the fittings. It must be
possible to turn the union nuts freely. A conductivity of less
than
1 MΩ must exist across the entire length.
Have all the electric tests carried by the Wag-
ner Service.
Summary of Contents for Finish 250
Page 19: ...19 Finish 270 250 10 9 Schaltplan d reparaturen am ger t...
Page 24: ...24 Finish 270 250 ersatzteile und zubeh r Ersatzteilbild Pumpenaggregat d...
Page 48: ...48 Finish 270 250 GB Repairs at the unit 10 9 Connection diagram...
Page 53: ...53 Finish 270 250 GB Spare parts diagram pump aggregate Spare parts and accessories...
Page 77: ...77 Finish 270 250 10 9 Sch ma lectrique F R parations sur l appareil...
Page 107: ...107 Finish 270 250 10 9 Elektrisch schema Reparaties aan het apparaat NL...
Page 112: ...112 Finish 270 250 Onderdelenafbeelding pompaggregaat NL Accessoires en onderdelen...
Page 118: ...118 Finish 270 250 NL CE Verklaring van overeenstemming...
Page 119: ...119 Finish 270 250 NL CE Verklaring van overeenstemming...


