


Series S34 Instruction Manual
Chapter 2 Installation
M-000-00030
2-7
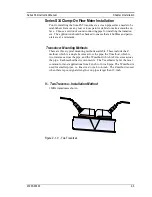
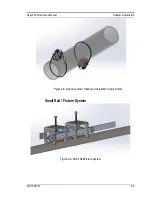
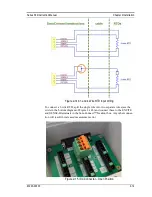
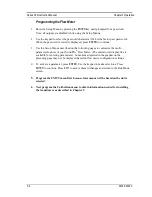
Opposite Side Transducer Installation
1.
Program all the calibration menu items of the flow meter for the fluid and pipe
specifics to obtain the transducer mounting locations.
2.
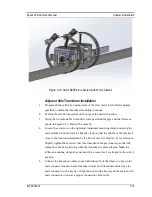
Position the first transducer mounting clamp on the pipe in the desired location.
3.
String the mounting chain from the front adjustable hook to the rear attachment
hook. Start with a loose fit.
4.
Apply a thin coat of coupling grease to the first transducer. If the coupling grease
that came with your SonoPro® flow meter unit runs out, contact VorTek Instru-
ments to order a replacement container.
5.
Place the transducer in the mounting clamp. Tighten the screw with plastic knob
on the top of the mounting clamp so the end of the screw fits into the divot on the
top of the transducer.
6.
Tighten the chain using the thumb nut on the front adjustable hook so the mount-
ing clamp fits tight on the pipe.
7.
Tighten the screw with plastic knob on the top of the transducer mounting clamp
so the transducer fits tight on the pipe. Do not over tighten.
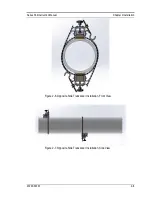
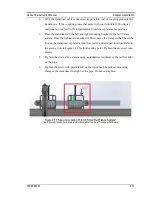
8.
Position the second transducer mounting clamp on the pipe at the location
determined by the flow meter and 180 degrees around the pipe from the first one.
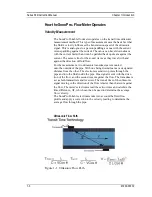
See Figure 2-6, 2-7, and 2-8 for reference.
9.
String the mounting chain from the front adjustable hook to the rear attachment
hook. Start with a loose fit.
10.
Apply a thin coat of coupling grease to the second transducer. If the coupling
grease that came with your SonoPro® flow meter unit runs out, contact VorTek
Instruments to order a replacement container.
11.
Place the transducer in the mounting clamp. Tighten the screw with plastic knob
on the top of the mounting bracket so the end of the screw fits into the divot on
the top of the transducer.
12.
Tighten the chain using the thumb nut on the front adjustable hook so the mount-
ing clamp fits tight on the pipe.
13.
Tighten the screw with plastic knob on the top of the transducer mounting clamp
so the transducer fits tight on the pipe. Do not overtighten.
Summary of Contents for SonoPro S34 Series
Page 34: ...Series S34 Instruction Manual Chapter 3 Operation 3 5 M 000 00030 Output Menu...
Page 69: ...Series S34 Instruction Manual Appendix A Specifications A 2 M 000 00030...
Page 73: ...Series S34 Instruction Manual Appendix C Sound Speed and Pipe Data C 2 M 000 00030 Pipe Chart...
Page 74: ...Series S34 Instruction Manual Appendix C Sound Speed and Pipe Data C 3 M 000 00030...
Page 75: ...Series S34 Instruction Manual Appendix C Sound Speed and Pipe Data C 4 M 000 00030...
Page 76: ...Series S34 Instruction Manual Appendix C Sound Speed and Pipe Data C 5 M 000 00030...
Page 77: ...Series S34 Instruction Manual Appendix C Sound Speed and Pipe Data C 6 M 000 00030...
Page 78: ...Series S34 Instruction Manual Appendix C Sound Speed and Pipe Data C 7 M 000 00030...
Page 79: ...Series S34 Instruction Manual Appendix C Sound Speed and Pipe Data C 8 M 000 00030...


