background image

ENVI Series: VTD-13FN / VTD-13VN / VTD-20VN 


81 


20.


Installing and Uninstalling 

20.1.


Installing ENVI Series Viewer 

Connect to the Vitek Camera/Server using Internet Explorer, and click Live View on the main page. 
Then ENVI Series Viewer will be automatically downloaded and installed. If an Internet connection 
is not available, it's possible to manually install the program file in advance (from supplied CD) and 
connect to the Vitek Camera / Server later. 

20.1.1.


Installing on Web Browser 

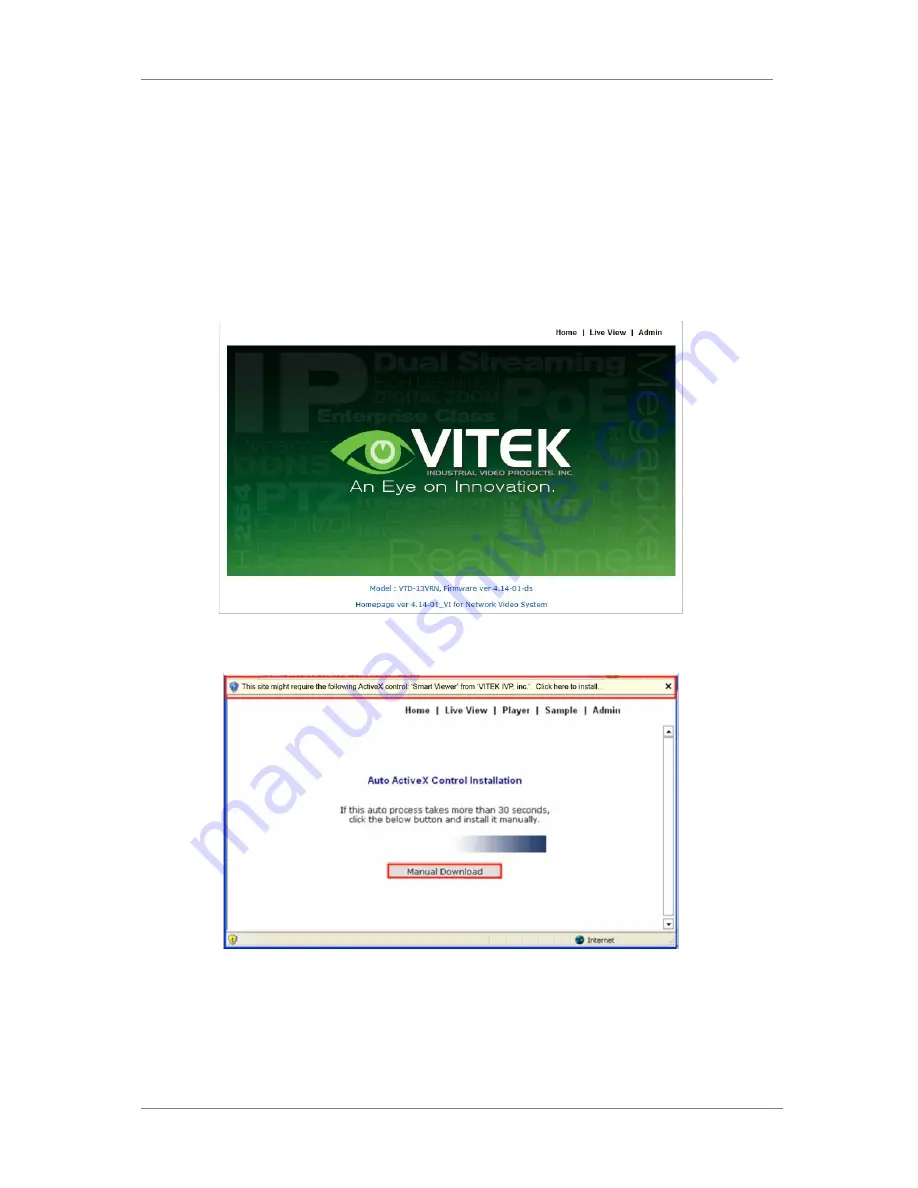
Click 'Live View' after access to Vitek® Server on Internet Explorer. 


If you're using Windows XP Service Pack 2 or later, the Information message will show upas 

seen below. Click the Information message. 


If the Information message doesn't come up due to the problems like network failure, you can 
start the manual installation as shown in the next section. 

Summary of Contents for VTD-13FN

Page 1: ...el Models 4 3 1 3 MegaPixel Models Video format Secondary video output for installation maintenance H 264 MJPEG Dual Streaming Minimal Latency with up to 16 simultaneous user connections Onvif Complia...

Page 2: ...aller 20 10 Using IP Installer 23 10 1 Starting the Program 23 10 2 Search Product 24 10 3 Manual Network Setup 25 10 4 Automatic Network Setup 27 10 5 Using DHCP Server 30 10 6 Using PPPoE 30 10 7 Up...

Page 3: ...P RTSP Setup 50 15 Device Configuration 52 15 1 Privacy Zone 52 15 2 Camera Motion 54 15 2 1 Camera Configuration 56 16 Advanced Configuration 60 16 1 Advanced Services 61 16 1 1 E mail Service Config...

Page 4: ...0 21 4 Extended Features 91 21 4 1 Pausing Live Video 91 21 4 2 FPS Control 91 21 4 3 Flip Control 92 22 EN V R Introduction 93 23 Requirements for Installation 94 23 1 EN V R Versions 94 23 2 System...

Page 5: ...Condition Search Mode 131 32 3 1 Advanced Search Mode 132 33 Video Playback Controls 133 34 Extra Features 134 34 1 Window Control 134 34 2 Recording Period 134 34 3 Backup 135 34 4 Snapshot 136 34 5...

Page 6: ...Configuration 160 37 6 User Management 161 37 6 1 User Registration 162 37 6 2 User Modification 162 37 6 3 User Deletion 163 37 7 Disk Setup 163 37 7 1 Disk Setup 163 37 7 2 Disk Quota Modification...

Page 7: ...Series CD 2 Included Accessories Self Tapping Screws For mounting dome to ceiling wall etc Type Phillips head ST4x30 Qty 2 Secondary Video Output Cable To be used with a service monitor for adjusting...

Page 8: ...a Via Ethernet Use only with POE switch 100 Meters max distance b 12VDC Use with 12VDC 500mA NOTE If your camera is PoE you do not need to apply separate power 2 Ethernet connection a Insert one end...

Page 9: ...ry video cable between the camera and the monitor BNC as shown below 6 Adjusting Camera View You can adjust the camera s Pan Tilt 7 Removable Storage For recording directly on the camera you will need...

Page 10: ...camera base 5 VTD 13VN VTD 20VN Installation 5 1 Connections 1 Power Depending on the type of installations apply power to the camera by one of the options below a Via Ethernet Use only with POE switc...

Page 11: ...e data port sample switch router etc 2 Remove the dome cover from the camera using a coin 3 Place the camera in the desired location and install usingsupplied screws 4 With the help of a hand held mon...

Page 12: ...s Near N to infinity 6 Adjusting Camera View You can adjust the camera s Pan Tilt 7 Removable Storage a For recording directly on the camera you will need to install a microSD card this will allow you...

Page 13: ...ENVI Series VTD 13FN VTD 13VN VTD 20VN 12 8 After the camera adjustments are completed place the dome cover back on to the camera base...

Page 14: ...arted the main window of IP Installer program will appear on the screen as shown below 4 Search for the installed camera on the network by clicking the search product icon the camera should appear as...

Page 15: ...was configured by the program automatically you will be able to get access by a Right click over the camera information Go Product Homepage b Click over the icon Connect Product Homepage 8 From the H...

Page 16: ...VI Series VTD 13FN VTD 13VN VTD 20VN 15 On Live View you will be able to see live video from your camera NOTE For more information refer to Section 11Admin Menu of VITEK VTD 13 VTD 20 Series on page 3...

Page 17: ...f Compliance SD memory card slot for Local recording 12VDC Operation Optional PoE Power over Ethernet Available in Ivory or Black VTD 13VN VTD 20VN ENVI Indoor 1 3 2 0 MegaPixel IP Dome Camera Series...

Page 18: ...Network Cameras Video Servers and Network Video Recorders Capable of firmware updating Support automatic and manual IP setup 9 Installing and Uninstalling It s recommended to install this program as...

Page 19: ...8 You may be prompted to continue running the installation program Click Yes button then the following window will be shown on the screen To continue the installation click Next The following window w...

Page 20: ...installation is C Program Files IP Installer It is recommended to install in this folder if you want to change it to a different location click the Browse button to choose location Now click the Inst...

Page 21: ...ollowing window will be shown Click the Finish button to complete the installation 9 2 Uninstalling IP Installer If you want to remove the IP Installer program from your PC click Start All Programs IP...

Page 22: ...s button then the following window will be shown on the screen Click on the Next button and you will see the following window Click on the Uninstall button to start removing the IP Installer program f...

Page 23: ...ENVI Series VTD 13FN VTD 13VN VTD 20VN 22 Click on the Finish button to close the window...

Page 24: ...here are no network devices shown as it is the first time running the program and nothing has been registered Search Product Scan the network and shows the list of all the Vitek products that IP Insta...

Page 25: ...pop up to show the progress of the search Wait until it reaches 100 or you may press the Cancel button to stop the search at any given timeand proceed with the results made until that moment After sea...

Page 26: ...r by clicking Manual IP Setupbutton on the main Toolbar When one IP device is selected the following screen will appear MAC Address MAC address of the selected device is shown Server Name Input desire...

Page 27: ...will not be saved in the Camera memory which means if the IP device is turned off the changes are lost and the previous setting will be applied back Click Set button to apply the changed values to IP...

Page 28: ...given the server name of NetCam and Apply to all button is pressed it will be automatically changed to NetCam1 and the next IP device will have NetCam2 and so on The same applies to the IP address fi...

Page 29: ...min Password Password for the IP device Default password for Vitek products is root Save Configuration Option Select whether the configured contents is to be saved in the Camera memory or not Save Con...

Page 30: ...13FN VTD 13VN VTD 20VN 29 Note If your network has more than one IP address Zone at the same time the confirmation window will be displayed as below You need to choose the one you are going to use for...

Page 31: ...Network Setup on page 25 After filling the fields with appropriate values click Set button to apply the changed values to IP device If you don t want it click Cancel button to restore the previous va...

Page 32: ...or Vitek products is root unless already changed Save Configuration Option Select whether the configured contents is to be saved in the Camera memory or not Save Configuration Changed values will be s...

Page 33: ...pdate the firmware first create a folder on your computer for the update firmware than download the latest firmware to that folder Then select the IP device to be updated on IP Installer window then c...

Page 34: ...pdating in a single step Select the files to update by holding CTRL key and selecting which IP devices to update Click Start Update button You will see the update window brought up with multiple IP de...

Page 35: ...kmark inMAC Address or IP Range to set the range for searching You can set the range of IP addresses to scan as shown below In this example all the IP devices having MAC address starting with 1C 7C 45...

Page 36: ...the IP devices are accessible with the new settings The best way to do it is by connecting to the homepage of each IP device s built in server and starting Live View feature Select Go Product Homepage...

Page 37: ...d If you have not installed the ENVI Series Viewer program before it will ask for a confirmation to install it Allow it and you will be able to find out whether the configuration by IP Installer progr...

Page 38: ...es in the VITEK camera you re connected to 11 1 EnteringAdmin Menu Click Admin then you ll see a login window In the login window enter root for both ID and password as they are the factory defaults P...

Page 39: ...e one you would like to configure 12 1 Step 1 Changing Server Name Click Server Name on System Configuration menu then Server Name Setup windows will be displayed Refer to Section 13 1Server Name Setu...

Page 40: ...h microSD card on page 72to see how to set up 12 6 Finish After clicking Finish on the VTD 13 VTD 20 Series all changes will be saved automatically to the camera server 13 System Configuration Menu Wh...

Page 41: ...under System ConfigurationFill the Date and Time fields with your local time and date information If you re in a different time zone put a checkmark on Change Time Zone then select the correct region...

Page 42: ...ra using the new password 13 4 Access Control Click Access Control on System Configuration menu The following windows will be displayed From the Access Permission window select either one you would li...

Page 43: ...defines the permission level for registered users to the VITEKcamera All Channels Access User can use all the features except for Configuration in Admin Page General Access only live viewing access U...

Page 44: ...e existing user s name password and access permission User ID is not allowed to change Once selecting a user ID to edit the procedure is the same as in Add section To see existing users click Select U...

Page 45: ...ettings After apply program will ask to close web browser for updates which will take 20 30 seconds If Back button is clicked all values will be discarded If Refresh button is clicked the program will...

Page 46: ...t for VITEKcameras to communicate with the Client PC HTTP Port is the network port that is used when a Client PC connects to the VITEKcamera Web page It can be assigned between 80 and 65535 The defaul...

Page 47: ...width control is enabled users connected to the VITEKcamera will share network bandwidth limit Note This bandwidth control feature works well in M JPEG video transmission But for H 264 dropping data p...

Page 48: ...tatus Notify is set to Enable VITEKcameras network status will be emailed to a specific person in case of the following events When it is set to Dynamic IP in theNetwork Configuration menu and the VIT...

Page 49: ...nt After finishing the setup click Apply to save settings 14 8 IP CCTV DNS Setup Note Refer Section 36 IPCCTVDNS Registration on page 142 for further details on configuration IP CCTV DNS service provi...

Page 50: ...o IP CCTV DNS server Users have to register products into IPCCTVDNS server and IP CCTV DNS service should be enabled There are 3 options in UPnP Port Forwarding Manual User Assigned Portissued when us...

Page 51: ...e environment within a firewall There are two types of usage one for Unicast address condition and the other for Multicast address condition For Unicast Address Use rtsp network video server ip addres...

Page 52: ...number you want to use e g port number 445 rtsp network video server ip address 445 cam0_0 RTP Start Port The starting number of the port for video transfer Each time video transfer connection is mad...

Page 53: ...the region click Privacy Zone from Device Configuration category To Add a Privacy zone click Newbutton aGreen colored box will appear click on the Green box and it will turn Red at this point you can...

Page 54: ...0VN 53 Users can add up to 8 Privacy Zones per screen by repeating above steps If you add more than 8 an error message will display on the screen To delete a privacy zone click the zone and click Dele...

Page 55: ...264 compression But because of its higher quality of still image it is adequate for detailed reviewing of stored video H 264 In this format each frame data is related to other nearby frames For this r...

Page 56: ...Feature not available on this model Video with IP address If Enabled video data will contain the IP address of the video server Feature not available on this model Audio not available on all models Se...

Page 57: ...e Control Mode H 264 Rate Control Mode VBR Variable Bit Rate Video frames are encoded with selected image quality and GOP Encoded frames have different data size from each other Image Quality one of 6...

Page 58: ...click Apply button to save the setting If you click Default button the entire configuration will be reset to the original values Camera Control Select Models Select Camera Control on the bottom of Ca...

Page 59: ...day mode Select between 1 and 32 and lower the value the earlier the transition point Vertical Flip this is to rotate the image 180 Vertically Horizontal Flip this is to rotate the image 180 Horizont...

Page 60: ...ctive grid will turn Green then click on any box inside scene to take out that area from Motion Detection box will turn Red then clickApply to save Motion Sensitivity Set the sensitivity of motion def...

Page 61: ...re continuouslybeing stored in a buffer memory of thecamera server for a certain period of time When the camera server is triggered by an event or schedule the images or alarm statusjust before and af...

Page 62: ...tal number of frames for Pre Alarm Buffer and Post Alarm Buffer is limited to 10 frames Pre Alarm Speed You can set the buffering speed If it s set to Fastest the server will store images as fast as i...

Page 63: ...server s address for sending email Authentication Login Select Enable if SMTP server requires ID and password User ID Enter User ID to log in to SMTP server Password Enter Password to log in to SMTP s...

Page 64: ...setup Pre Alarm Images The number of image frames to store before Alarm Post Alarm Images The number of image frames to store after Alarm Pre Alarm Speed This field shows the speed of Pre Alarm Config...

Page 65: ...g click Save button If you want to cancel it click Back Service This shows what service this condition is for Module ID Module ID for current setup Camera ID Channel ID for current setup Enable Disabl...

Page 66: ...FTP Buffered Service Select Enable to use the FTP Buffered service Otherwise select Disable Server Address FTP Server Address Base Directory Name The directory in FTP server where the data will be upl...

Page 67: ...is created with month If File Name is checked new file name is created with month Day If Directory Name is checked new directory name is created with day If File Name is checked new file name is creat...

Page 68: ...Services for video buffer setup Pre Alarm Images The number of image frames to store before Alarm Post Alarm Images The number of image frames to store after Alarm Pre Alarm Speed This field shows th...

Page 69: ...Name is checked new directory name is created with weekday If File Name is checked new file name is created with weekday Year If Directory Name is checked new directory name is created with year If Fi...

Page 70: ...me versions of VITEK IP cameras will have a microSD card slots on the back Those models can record and playback video from the microSD card ifinstalled Vitek IP cameras can Support cards up to a 32GB...

Page 71: ...k back button followed by clicking SD Status Format Click on 1st SD and the following screen will be displayed Note Be sure to turn off the device before installing a SD card Otherwise the SD card may...

Page 72: ...creen will display asking if you want to do a Partition and formatting click OK to continue or Cancel to stop After clicking OK the following screen will be displayed Note if program is terminated dur...

Page 73: ...ard info 17 2 Recording Configuration with microSD card Each camera has 2 streams referred as Camera 1 Camera 2 see image below which can be configured for recording options in this section Configurat...

Page 74: ...Below is an example of configuring the motion detection triggered recording It starts by clicking Recording Configuration and clicking on Camera1 the following screen will be display Select Condition...

Page 75: ...edule only etc in this example we will be selecting Event Only Schedule Under Scheduleyou can select time and date for motion recording if left blank motion recording will be 24hrs 7 days a week In th...

Page 76: ...ENVI Series VTD 13FN VTD 13VN VTD 20VN 75 18 Utilities In Utilities part of the Admin menu you can view the System Log file Save Configuration Reboot FactoryDefault and System Update...

Page 77: ...og data consists of date time category IP address user ID 18 2 Save Configuration VITEK cameras save the configurations after every step 18 3 Reboot It is recommended to reboot the system after making...

Page 78: ...Utilities menu A confirmation screen will be displayed as shown Click Factory Default button otherwise click Back button to cancel it The second confirmation screen will appear Click OK button to rest...

Page 79: ...above picture the firmware version of this product is 4 14 01 ds while the latest firmware version available is 4 16 B0 ds VI as you can see at Vitek s homepage http www vitekcctv com Downloads asp I...

Page 80: ...llowed to update the firmware if the correct password is not provided After the password is entered the Start Update button will be enabled now Click the button to see the following window for selecti...

Page 81: ...ras Servers Plays audio transmitted from VitekCameras Servers supported cameras Transmits audio from PC with ENVI Series Viewer to VitekCamera Servers Stores live video screen as image files Stores li...

Page 82: ...ilable it s possible to manually install the program file in advance from supplied CD and connect to the Vitek Camera Server later 20 1 1 Installing on Web Browser Click Live View after access to Vite...

Page 83: ...82 Click the Install ActiveX Control and the pop up window will be displayed as above Click the Install button Click YES to allow program to run After the installation is successfully completed ENVI...

Page 84: ...the supplied CD usingENVI Series Viewer program file Execute the downloaded file and you will see the ENVI Series Viewer Setup Wizard window as shown below Click the Install button to start installing...

Page 85: ...ENVI Series Viewer program from your computer Before uninstalling close all the Internet Explorer windows 20 2 1 Uninstalling with Program Menu Click Uninstall and the following window will be shown C...

Page 86: ...ries VTD 13FN VTD 13VN VTD 20VN 85 20 2 2 Uninstalling on Control Panel Click Start button on the screen then select the Control Panel In the Control Panel window double click the Add or Remove Progra...

Page 87: ...ewer button You will see the Uninstall or change a program list Click ENVI Series Smart Viewer button and then right click Uninstall Changebutton Then it will start uninstalling the program 21 Startin...

Page 88: ...deo Server Network Camera or Network Video Recorder ENVI Series Viewer window for Network Video Server or Network Camera 21 1 Control Bar Displays and hides Channel control bar System Information Disp...

Page 89: ...yed can be captured and saved as an image file either in JPEG or BMP format Select the live view video you want saved and click Snapshot button on OSD Channel Buttons The following window will be disp...

Page 90: ...ill be stopped after 10 min if left un clicked In video files recorded from M JPEG format video the time information file will be generated in SMI subtitle format which puts time stamp every second Wh...

Page 91: ...r program To finish click the icon again Max duration is 1 minute and recording will be stopped after 1 minute 21 3 4 Instant Playback For network cameras with local storage microSD Instant Playback i...

Page 92: ...Live Video Click the Pause button to stop and resume live view video 21 4 2 FPS Control FPS Frame per Second can be controlled only in MJPEG mode In MPEG4 and H 264 video mode FPS control is not supp...

Page 93: ...es VTD 13FN VTD 13VN VTD 20VN 92 21 4 3 Flip Control Flip Control The horizontal view of the image can be changed using the mirror function The vertical view of the image can be changed using the flip...

Page 94: ...G MPEG 4 H 264 stream supported Supports various vendors IP devices Multi Vendor Version only for recording and retransmission of video voice and data Supports Megapixel cameras up to 3M pixels Users...

Page 95: ...Yes 160 TB Compression of Channels Resolution Recommended CPU Memory H 264 16 Channels D1 Intel Core2Duo T5200 1 0GB 720P Intel Core2Duo E7550 1 5GB 1080P Intel Core i 5 2500S 2 0GB 32 channels D1 In...

Page 96: ...4 Installing EN V R After downloading EN V R double click EN V R Setup icon to start installation The following window will be displayed on the screen Before installing check the version of the EN V R...

Page 97: ...tall button You will see the progress of copying install files to the hard drive as shown below once is completed click on NEXT Click Finish to complete the Installation After installing EN V R progra...

Page 98: ...gurator window on the screen To use EN V R Configurator program refer toSection 27Starting EN V R Configuratoron page 100 25 Uninstalling EN V R 25 1 Closing Active EN V R If you need to uninstall EN...

Page 99: ...and click the right mouse button You ll see the pop up menu Select Exit Then the EN V R icon disappears and you know that EN V R is no longer running on your computer Now you re ready to start uninsta...

Page 100: ...ter modify and delete IP devices and users with this program It also provides configuring tools for recording alarm event and other functions 26 2 EN V R Service EN V R program is a Windows service an...

Page 101: ...enu will show You can open EN V R Configurator or EN V R Controller program from this menu or you can go to the Home page of the EN V R program for live view or playback 27 Starting EN V R Configurato...

Page 102: ...security window as below Click Yes button to continue Once EN V R program starts a log in window will be displayed as below Type in the proper admin password and click the OK button The default admin...

Page 103: ...e viewing etc 28 1 EN V R Configurator User Interface The following picture shows the main window of EN V R Configurator program Items Descriptions A Main Toolbar Frequently used menu items are shown...

Page 104: ...r program 28 2 Searching for IP Devices Click the first button on the Main Toolbar You are now given a choice to register the IP devices by search and register or manually To make it easy choose Searc...

Page 105: ...in the middle of searching the EN V R will retain only the IP devices found until that moment 28 3 Registering IP Devices After scanning is finished you have a list of IP devices found on your networ...

Page 106: ...window shows up and it s for entering the network parameters and camera resolutions of the IP device you ve chosen You may need to enter the Login ID and Password here Click Save to finish registering...

Page 107: ...VTD 20VN 106 Click Apply after registering one or more IP devices cameras The image below represents the configurator with multiple IP devices registered After clicking Apply the program will ask you...

Page 108: ...ning by viewing the live video from those devices To view the EN V R home page click the Go NVR Home button on the main toolbar Below is an image of the EN V R home page Click Live View on top right p...

Page 109: ...28 5 Recording Video The essential feature of EN V R is recording the video from IP devices Before starting the recording it is required to prepare the hard drive of your PC where EN V R program is r...

Page 110: ...ossible Maximum Quota the available of free space on your HDD Possible Minimum Quota the minimum amount required Set Quota desired amount of HDD to be use for recording To set up the recording feature...

Page 111: ...see Configure Recording Condition window as below The recording feature is already enabled and recording conditions are configured in default settings In the example shown above you can see that Came...

Page 112: ...l be available to configure C If Event is selected the event section will be available to configure D After conditions are selected click Apply to condition E After apply to condition click Apply to c...

Page 113: ...V R Controller program from this menu or you can go to the Home page of the EN V R program for live view or playback You can find out from this window that the service is running at that moment If no...

Page 114: ...ftware for PC and network cameras equipped with microSD card as well as standalone NVR Network Video Recorder devices 29 2 Key Features Transformingrecorded video into AVI FJP IDX formats Supports Pri...

Page 115: ...han click on the Install ActiveX control After the installation is successfully completed Smart Player window will be displayed 30 1 1 Manual Installation When an Internet connection is not available...

Page 116: ...FN VTD 13VN VTD 20VN 115 The following window will appear Click Next The following window will be displayed Click Install After installation is successfully completed the following window will be disp...

Page 117: ...se all the Internet Explorer windows 30 2 1 Uninstalling on Program Menu Click Uninstall and the following window will be shown Click the Yes button Live View Play Back To live view and play back your...

Page 118: ...N 117 Look for icon on right side of taskbar as shown below windows XP and windows 8 might show it different Right click icon The following window will display Click on Open Smart NVR Controller Click...

Page 119: ...Click on Go Home to view Smart Player Home Page Click on Live View The following screen will be display were you can configure your live view Server Control Bar Allows you to view cameras servers that...

Page 120: ...ol Bar In order to view video cameras must be assigned to a group in this section you create groups with cameras you want to view Create Group In order to create a group in Group Control Bar right cli...

Page 121: ...time for Circulation and click OK A new group with the assigned name will be created as shown below To add cameras to the new group drag from server control bar and drop on newly created group You ca...

Page 122: ...io Control Bar Controls Speaker and Mic volume When audio is available click on Connect and adjust speaker and mic levels when done click Disconnect Full Normal Screen Select full screen as seen below...

Page 123: ...ENVI Series VTD 13FN VTD 13VN VTD 20VN 122 Group Circulation Start sequencing between groups...

Page 124: ...ENVI Series VTD 13FN VTD 13VN VTD 20VN 123 Layout settings You can change the screen layout between 1 2 4 etc Image in Original Size This allows for digital zoom...

Page 125: ...ENVI Series VTD 13FN VTD 13VN VTD 20VN 124 Draw Image by Maintaining Aspect Ratio Maintains the aspect ratio of the camera Draw Image by Filling the Screen...

Page 126: ...ENVI Series VTD 13FN VTD 13VN VTD 20VN 125 Enhanced Draw Mode On Off Enhance image for a better reproduction...

Page 127: ...ENVI Series VTD 13FN VTD 13VN VTD 20VN 126 About Smart Viewer You can see the status of the Smart Viewer 31 Configuring Viewing Player From the Home Screen click on Player...

Page 128: ...View Note The appearance of Smart Player window may vary depending on version and type of Vitek device you re using This user s manual is based on general display screen Server Control BarA Allows yo...

Page 129: ...provides additional features such as backup and snapshot Time Line Control BarE Search condition calendar condition and data can be refined in this bar Display screenF This screen shows multiple numbe...

Page 130: ...129 The following window will be displayed Type in the group name and click OK A new group with the assigned name will be created as shown below To add a camera to the new group drag and drop from the...

Page 131: ...search and playback video Smart Player requires one or more groups to exist If a search is executed on the basis of a selected group a search will be performed on all the cameras in that group If a s...

Page 132: ...h Mode In this mode you can search for video on the basis of combination of 3 different conditions which are Time Motion and Sensor Initially only Time condition is available for searching and you nee...

Page 133: ...t etc First select Time checkbox and choose the desired time frame Start date and time End date and time and then click Add Condition button to add to Search Condition Now select Event checkbox and ch...

Page 134: ...ll the conditions have been configured click Search button to start searching Any video data which meets at least one of the conditions in Search Condition list will be shown as the results 33 Video P...

Page 135: ...me Playback Speed Control Player Path Control only for condition search mode 34 Extra Features 34 1 Window Control Users canopen or close control windows 34 2 Recording Period You can view the startin...

Page 136: ...wing window is displayed as below Select Camera Check the camera to backup For AVI backup only one camera is permitted For FJP IDX multiple backup is allowed Backup Period Select the time frame Start...

Page 137: ...ckup is completed the following window will appear Click OK button 34 4 Snapshot Choose the camera currently being played or paused click Snapshot button Then a snapshot file will be saved in a design...

Page 138: ...hot from the above window 34 5 Print Choose the camera currently being played or paused then click Print button Then the image of the selected camera will be sent to your default printer 34 6 Ratio Di...

Page 139: ...ENVI Series VTD 13FN VTD 13VN VTD 20VN 138...

Page 140: ...u list 35 1 1 Configuring System name To name the system click configuring system name the following window will be displayed Change the name as desired Items Descriptions System Name Setting Enter th...

Page 141: ...ord to use Confirm Password Enter the new password again to confirm OK Click this button to apply the changed password Cancel Click this button to discard the change 35 1 3 System Network Configuratio...

Page 142: ...ystem Network Configuration HTTP Port To configure HTTP port to use click System Network Configuration on the menu tree Then click Change HTTP Port Items Descriptions HTTP Port Enter a HTTP Port to us...

Page 143: ...nal Port Enter an external HTTP Port to use for IP CCTV DNS service Default is 80 Register verify Click to test the connection with IP CCTV DNS server after setting is done in IP CCTV DNS server OK Cl...

Page 144: ...D 13VN VTD 20VN 143 on the NEXT button as shown below Fill out the requested information as shown below and click on Apply The following screen will confirm that your Membership has been completed suc...

Page 145: ...ation previously created To register your first product click on Product Registrationas shown below Enter the requested information The name of your camera the Mac Address and product Key as shown bel...

Page 146: ...our product has been registered successfully click on OK You will be directed to the Product List page where you will be able to see your recent camera registration By clicking the Detail Information...

Page 147: ...me than click Apply A window will pop up asking if you really want to apply the new configurations to continue click OK A window will pop up confirming that the product information has been modified s...

Page 148: ...ENVI Series VTD 13FN VTD 13VN VTD 20VN 147 Your camera with the new DDNS Host name will be displayed Your camera is now registered and ready for use...

Page 149: ...nual To manually register an IP Device click IP Device Camera Management on the menu tree Click Register IP device manually Items Descriptions A IP Device Manual Registration Register IP Devices manua...

Page 150: ...P Device ID to register B Vendor Select the Vendor name of the IP Device to register Click the pull down list and choose a proper vendor name from the list C Model Select the total number of channels...

Page 151: ...ort to use with the IP Device Default is 80 J RTSP Port Enter the RTSP Port Default is 554 K Login ID Type in the Login ID to use Default is root L Login Password Type in the Login Password to use for...

Page 152: ...P devices found during the scan process If you need to select multiple IP devices at the same time drag your mouse over the devices or keep pressing CTRL or SHIFT key while clicking the IP devices B C...

Page 153: ...R5 R6 R7 R8 R9 R10 B PTZ Install Description Descriptions of the PTZ numbers in the IP Device list P1 P2 P3 P4 C IP Device list IP Device list to select from D Apply to All Click this button to copy...

Page 154: ...Enter 0 for non Vitek IP devices Vitek products can be set to 0 to 15 and default is 0 I HTTP Port Enter the HTTP Port to use with the IP Device Default is 80 J RTSP Port Enter the RTSP Port Default i...

Page 155: ...ment on the menu tree Then select the IP device Click Go to IP Device homepage 37 5 Camera Management In this section you will see how to manage the device information video resolutions recording conf...

Page 156: ...name Then click on camera1 or camera 2 and then click Configure Camera Name and Information A Camera Information Configure Information of the selected camera B Resolution and Quality Choose the resolu...

Page 157: ...be display adjust resolution F then click Apply to camera H then OK Items Descriptions A B C D Camera Selection Select one or more cameras for name assignment by clicking buttons E Unselect All Clear...

Page 158: ...n Items Descriptions A B C D Camera Selection Select one or more cameras by clicking buttons E Unselect All Clear the device list which shows the selected cameras F Resolution Select the video resolut...

Page 159: ...to be started G Condition to use Decide whether to use the defined condition or not H Condition Mode Select the condition mode for recording I Scheduling Set up the schedule for recording J Event set...

Page 160: ...click camera under Condition list F This enables the Configure Recording Condition G H I and J Now you can select your condition mode H Under condition mode you have four choices always schedule event...

Page 161: ...I Series VTD 13FN VTD 13VN VTD 20VN 160 37 5 4 Alarm Event Configuration To configure the Alarm and Event features select a camera to configure and then click Configure alarm map service Item Descript...

Page 162: ...ra Click this button to apply the changes to the camera I OK Click this button to confirm the change and exit the window J Cancel Click this button to cancel the Alarm Event configuration 37 6 User Ma...

Page 163: ...ce access permission Choose the level of permission for System resource access All channels access Viewing all cameras Alarm PTZ Audio Searching General access Viewing all cameras only No access An us...

Page 164: ...When you click Disk Setup on the menu tree it will show two sub menu items One is Disk Quota and the other is Disk Mode The following window shows the Disk Quota mode 37 7 2 Disk Quota Modification a...

Page 165: ...Change To modify the disk circulation style click Disk Setup and then Disk Mode on the menu tree Item Description A Use HDD Decide whether this HDD is to be used B Possible Maximum Quota Display Poss...

Page 166: ...ge Report Setup Configure email address for reporting Item Description A Use circulation Select this if disk circulation will be used B Not use circulation Select this if disk circulation will not be...

Page 167: ...configure an email accounts click Utilities on the menu tree Click Configure Item Description A Use to report HDD usage Choose whether to Enable or Disable the report service B Report HDD space When...

Page 168: ...f SMTP server for sending email C Authentication Decide whether to use Authentication D Email user id Enter the sender s id for email account E Email user password Enter the password of the sender s e...

Page 169: ...oller will be on the lower right part of the system tray Then right click the icon a sub window will display click on Open Smart NVR Controller The following window will open Items Descriptions A Abou...

Page 170: ...R is running on In case that the HTTP port for EN V R is not 80 default the port number should be entered together with the IP address the example below assumes HTTP port of 7777 Items Descriptions A...

Page 171: ...N V R s homepage B Live View Click this button to execute Live View program You can use various features such as live view audio transmission PTZ control unconditional recording etc C Player Click thi...

Page 172: ...I Series VTD 13FN VTD 13VN VTD 20VN 171 In case that the HTTP port for EN V R is not 80 default the port number should be entered together with the IP address the example below assumes HTTP port of 77...

Page 173: ...uest of the customer subject to availability with a new product that equals or exceeds the performance of the original product purchased Within the first 6 months of purchase at its sole discretion VI...

Page 174: ...ed to provide reasonable protection against harmful interference when the equipment is operated in a commercial environment This equipment generates uses and can radiate radio frequency energy and if...

Reviews: