background image

U

NIQUE

 S

CANNING

 F

EATURES


AND

 D

ESTINATIONS

83

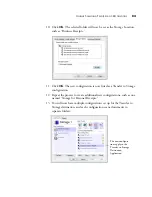
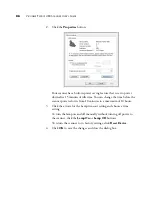
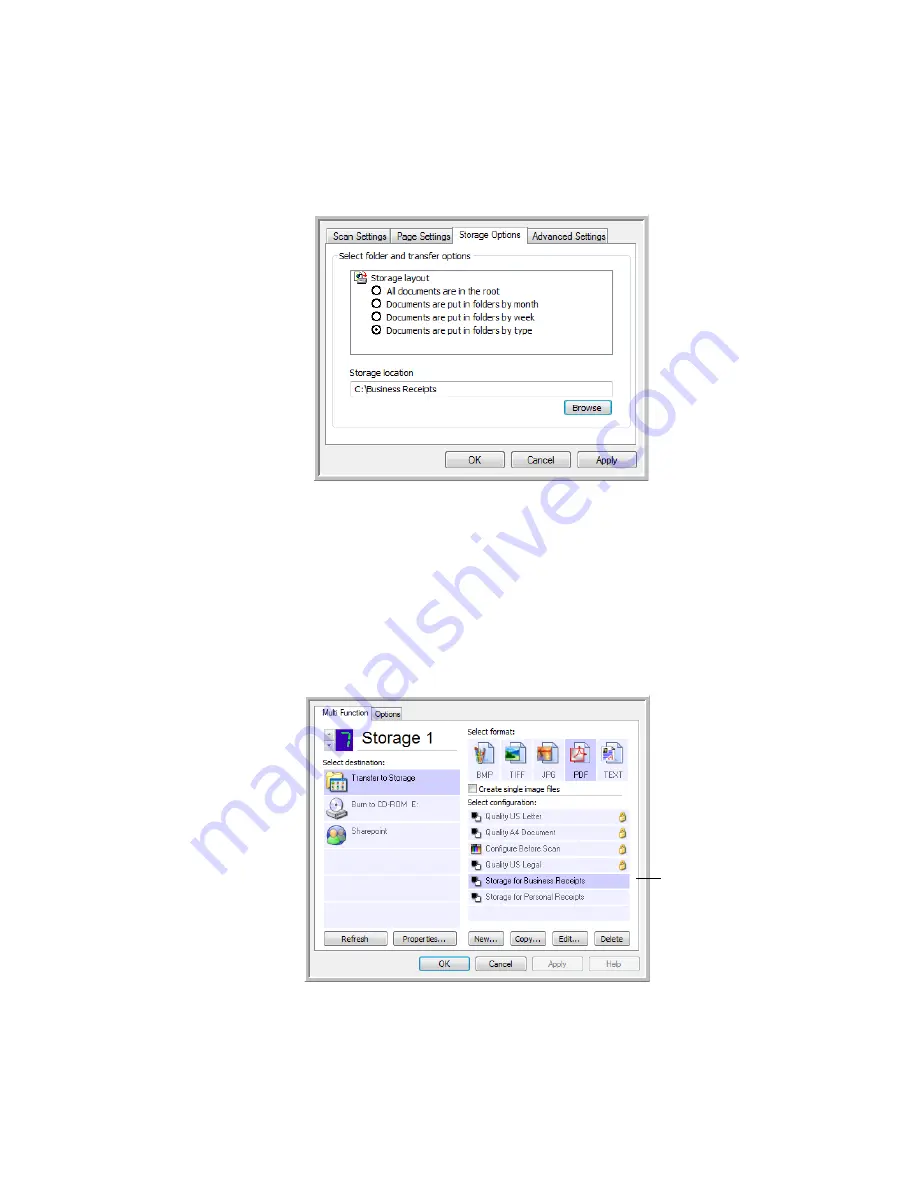
10. Click 

OK

. The selected folder will now be set as the Storage Location, 

such as “Business Receipts.”

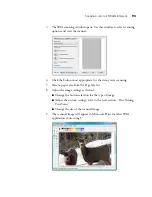
11. Click 

OK

. The new configuration is now listed as a Transfer to Storage 

configuration.

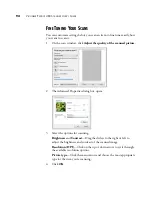
12. Repeat the process to create additional new configurations, such as one 

named “Storage for Personal Receipts.”

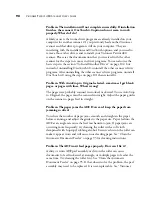
13. You will now have multiple configurations set up for the Transfer to 

Storage destination, and each configuration scans documents to 
separate folders.

The new configura-
tions apply to the 
Transfer to Storage 
Destination 
Application.

Summary of Contents for Patriot 480

Page 1: ...for Windows Visioneer Patriot 480 Scanner User s Guide...

Page 2: ...Visioneer Patriot 480 Scanner User s Guide F O R W I N D O W S...

Page 3: ...D IS EXTENDED TO THE 12 MONTH PERIOD AFTER THE DATE OF YOUR ORIGINAL PURCHASE IF A VALID REGISTRATION IS NOT RECEIVED DURING THE INITIAL 90 DAY PERIOD THE 12 MONTH WARRANTY IS NO LONGER AVAILABLE AND...

Page 4: ...es 22 Scanning Interfaces 23 Scanning from OneTouch Load and Scan Documents from the Input Tray 24 Load and Scan Items from the Front Feed Tray 27 Scan With the Front Feed Tray Up 27 Scan With the Fro...

Page 5: ...rage 80 Checking the Hardware and Lamp Settings 85 Scanning from the TWAIN Interface Basic Steps to Open The TWAIN Interface 87 Scanning with the TWAIN Interface 88 Display the Device Configuration 91...

Page 6: ...can also scan single items from the front of the scanner such as embossed plastic cards WHAT S IN THE BOX Before proceeding check the contents of the box If items are missing or damaged contact the d...

Page 7: ...Shows the scanner s status Refer to Status Light Troubleshooting Codes on page 99 for additional details Front Feed tray Place an item between the guides and press down to feed items through the front...

Page 8: ...ista Windows 2000 and XP Minimum of 512 megabytes MB of internal memory RAM Windows Vista Minimum of 1 gigabyte GB of internal memory RAM 350 MB minimum of free hard disk space A VGA or SVGA Monitor T...

Page 9: ...our scanner and software installation Nuance PaperPort User s Guide On the Installation CD contains detailed feature and configuration information for the PaperPort software Kofax VRS User s Guide On...

Page 10: ...ssages during installation asking you to allow the installation to proceed The messages will differ based on the software your computer is running but in each case allow the installation to proceed Al...

Page 11: ...the ADF cover release then press the release and open the Automatic Document Feeder cover 3 Carefully remove any foam particles that may have gotten inside the document feeder and close the cover 4 Al...

Page 12: ...STEP 1 ASSEMBLE THE SCANNER 7 6 Insert the pins on each side of the output tray into the holes on the front of the scanner...

Page 13: ...pens Note If the CD does not start check the following Make sure the CD drive s door is completely shut Make sure the CD was inserted in the drive in the proper direction label side up To launch the C...

Page 14: ...STEP 2 INSTALL THE SOFTWARE 9 3 On the Main Menu select Install Products 4 Make sure the boxes for Nuance PaperPort and Scanner Driver are checked 5 Click Install Now...

Page 15: ...rPort software will not be installed 3 In the Customer Information window accept the current values or enter new information then click Next 4 On the Setup Type window keep the default Setup Type and...

Page 16: ...License Agreement window read the license agreement If you accept the terms select I Agree and click Next If you choose not to accept the license agreement the installation will terminate and the scan...

Page 17: ...ications with a TWAIN interface You can also scan from applications that use the ISIS driver You will not be able to scan with the buttons on the scanner TWAIN only The TWAIN driver is installed witho...

Page 18: ...you will see this window asking you to select one of the images for your Color Space setting 6 STOP when you see the Complete the installation by connecting your hardware window Do NOT click OK yet L...

Page 19: ...outlet To connect your Visioneer Patriot 480 scanner 1 Plug the power supply into the power port on the scanner 2 Plug the power cord into the power supply and into a wall outlet Note Only use the po...

Page 20: ...urn on the power switch located on the back of the scanner to the left of the power port The status light comes on and flashes indicating that the scanner is receiving power If you are using Windows X...

Page 21: ...ur hardware window 5 Click OK You can also click More to see a quick overview about accessing and navigating the OneTouch Button Panel When you re finished reading the additional information click OK...

Page 22: ...plications 1 Return to the CD main menu and click on Install Products Software that is already installed will have Installed next to them 2 Select the additional applications you want to install then...

Page 23: ...and storing images It uses an ISIS certified driver for scanning and includes flexible job separation and barcode recognition The Demo version lets you try the application first You can use this soft...

Page 24: ...matically If it does not open see the note on page 8 4 Select Install OmniPage Pro 5 Follow the instructions on the screen to install OmniPage Pro 6 When installation is finished return to the OmniPag...

Page 25: ...and will open in any standard browser If you need to click Acrobat Reader to install it now Follow the instructions on the installation windows If your computer already has Adobe Acrobat Reader insta...

Page 26: ...ftware to use VRS settings when scanning This brief Mini Guide explains what the feature is and how to use the VRS settings when creating or modifying a Scan Configuration The OneTouch OmniPage Mini G...

Page 27: ...the bottom right corner of the screen 2 Choose Check for Online Updates from the pop up menu 3 Follow the instructions on the screen and register your scanner by entering your scanner s serial number...

Page 28: ...mputer screen Scanning from the on screen OneTouch Button Panel is the same as pressing a scanner button except you click an icon that represents the scanner button See Scan from the OneTouch Button P...

Page 29: ...scanned images are then sent to a software application or location known as the Destination Application on your computer 1 Adjust the paper guide for the width of the paper and make sure the output t...

Page 30: ...d into the Automatic Document Feeder 3 Check the LED number to make sure you re using the scan setting you want 4 For one sided scanning press the Simplex button For two sided scanning press the Duple...

Page 31: ...dow opens and the image s are sent to the selected location in the OneTouch properties In this example the Destination Application is the PaperPort desktop If you have the front feed tray attached all...

Page 32: ...FRONT FEED TRAY UP 1 Adjust the paper guides for the width of the item you are scanning 2 Place a single item face up with the top pointing into the scanner between the paper guides on the front feed...

Page 33: ...from the front and the front feed tray springs back up 5 Check the LED number to make sure you re using the scan setting you want 6 To scan a one sided item press the Simplex button To scan a two sid...

Page 34: ...he scanner scans the item and ejects it out underneath the front feed tray A scan progress window opens and the image s are sent to the selected application from the OneTouch utility In this example t...

Page 35: ...own so that it is always positioned at the front slot of the scanner Any items you scan are ejected over the front feed tray when scanning is complete TO LOCK THE FRONT FEED TRAY DOWN 1 Locate the arm...

Page 36: ...LOAD AND SCAN ITEMS FROM THE FRONT FEED TRAY 31 3 The front feed tray is now in the down position aligned with the front slot of the scanner...

Page 37: ...THE FRONT FEED TRAY DOWN 1 Adjust the paper guides for the width of the item you are scanning 2 Place a single item face up with the top pointing into the scanner between the paper guides on the fron...

Page 38: ...etting you want 5 To scan a one sided item press the Simplex button To scan a two sided item press the Duplex button 6 The scanner scans the item and ejects it out over the front feed tray Press the D...

Page 39: ...R PATRIOT 480 SCANNER USER S GUIDE A scan progress window opens and the image s are sent to the selected application from the OneTouch utility In this example the Destination Application is the PaperP...

Page 40: ...TRAY DOWN You can scan a maximum of 5 pages in the input tray with the scanner s front feed tray in the down position 1 Adjust the paper guide for the paper width and make sure the output tray is full...

Page 41: ...ke sure you re using the scan setting you want 4 To scan a one sided document press the Simplex button To scan a two sided document press the Duplex button Press the Destination Selector to cycle thro...

Page 42: ...7 5 A scan progress window opens and the images are sent to the selected application from the OneTouch utility In this example the Destination Application is the PaperPort desktop The pages are ejecte...

Page 43: ...matically scan an item when it is inserted into the scanner from the front TO SET THE FRONT FEED SCAN EVENT 1 Right click on the OneTouch icon located on the Windows task bar and select Show Hardware...

Page 44: ...vent to always use the settings you have specified for that function number Please see Configuring the OneTouch Buttons on page 45 for details on configuring the 9 scanning functions for your scanner...

Page 45: ...Ok to close the Hardware Properties window TO AUTO SCAN FROM THE FRONT FEED TRAY 1 Adjust the paper guides for the width of the item you are scanning 2 Place a single item face up with the top pointin...

Page 46: ...N ITEMS FROM THE FRONT FEED TRAY 41 A scan progress window opens and the image s are sent to the selected application from the OneTouch utility In this example the Destination Application is the Paper...

Page 47: ...op pointing into the scanner 2 Now click on the OneTouch icon in the Windows Notification Area at the bottom right corner of the screen 3 On the screen click the button you want to use to scan 4 The s...

Page 48: ...k to close the OneTouch panel The Button View Left click on a Destination Application icon to start scanning Right click on a Destination Application icon to open the OneTouch Properties The Detail Vi...

Page 49: ...l message in your default eMail program The eMail application will default to the eMail program specified in the internet options of Internet Explorer A folder icon for a button such as shown for Butt...

Page 50: ...the OneTouch Properties window There are two methods that you can use to open the OneTouch Properties Left click on the OneTouch icon in the Windows Notification Area then right click on one of the de...

Page 51: ...lace a page in the scanner 6 Press either the Simplex or Duplex button on the scanner or click on the destination application icon on the OneTouch Panel 7 The scanner starts scanning and sends the ima...

Page 52: ...Applications that OneTouch can send a scanned image to so that this application opens immediately after scanning is complete Select a software application as the destination to send scanned documents...

Page 53: ...gure Before Scan to set the scanning mode manually before scanning See Configure Before Scan on page 58 Select Format A set of file formats for the scanned image for the selected button The formats ar...

Page 54: ...esh button If you install new applications on your computer and they do not appear in the Select Destination list click the Refresh button New Copy Edit Delete buttons Click New or Copy to add new sca...

Page 55: ...t to create a new Scan Configuration 3 Click the New button If you want to start from the settings of another configuration select the configuration then click the Copy button There are 3 settings tab...

Page 56: ...0 dpi the minimum is 50 dpi The higher the dpi setting the sharper and clearer the scanned image However higher dpi settings take longer to scan and produce larger files for the scanned images Brightn...

Page 57: ...ppled lines that sometimes appear on the scanned images of photographs or illustrations particularly newspaper and magazine illustrations Selecting Reduce Moir Patterns will limit or eliminate moir pa...

Page 58: ...GrayScale Mode Double Feed Detection Selecting this option turns on the scanner hardware feature that detects when multiple pages feed through the scanner at one time Abort the scanner stops scanning...

Page 59: ...the Color or GrayScale scanning mode 1 Drag the sliders to the left and right to change the color settings As you do the image changes to show the effects of the new settings Color Saturation the str...

Page 60: ...ed around its edges to fit on the page Center image on page The image will be printed in the center of the page instead of at the top right corner Maintain aspect ratio The aspect ratio is the length...

Page 61: ...Location Documents are put into folders by month week or type Folders are created based on your selection month week or type and the scanned documents are saved in those folders By default the locati...

Page 62: ...k the configuration Clicking it toggles between locking and unlocking the configuration The key icon indicates the configuration is unlocked 5 Edit the settings and click OK Note Your scanner comes wi...

Page 63: ...EFORE SCAN 1 Open the OneTouch Properties window 2 Using the button selection arrows choose the button that you want to set to configure before scanning 3 Select the Scan Configuration Configure Befor...

Page 64: ...ndow TO SCAN USING CONFIGURE BEFORE SCAN 1 Load the documents face down with their tops into the scanner 2 Click the button you set up to use the Configure Before Scan option The TWAIN or WIA interfac...

Page 65: ...se Yes to delete any scanned pages then start over the correct scan Mode selected No Scanning stops and the TWAIN interface remains open You can place a new set of pages into the ADF adjust the TWAIN...

Page 66: ...able by right clicking on the text format icon The names of the formats indicate their file types CREATE SINGLE IMAGE FILES The TIFF and PDF formats support multiple page documents If you are scanning...

Page 67: ...essing or other processing The PDF format is also used to put multi page documents on web sites as pdf readable files As with the JPEG option the PDF format can be reduced in size or quality To select...

Page 68: ...age 75 To select a file type for the text format 1 Select a text editing Destination Application 2 Right click on the text format icon 3 Choose the file type that you want for the text format Your sel...

Page 69: ...t used to create web pages Searchable PDF The sPDF file format used by Adobe Acrobat and OmniPage Pro This format converts scanned text into PDF with text search and OCR capabilities Normal PDF The nP...

Page 70: ...plication then click the Properties button PaperPort Properties These properties apply to designating the PaperPort folder to receive your scanned items 1 Select the folder where you want the file to...

Page 71: ...tions 1 Click in the General OCR settings boxes for the options you want The options will apply to all the applications in the group Always send a file even when no text was found The scanned file is...

Page 72: ...on that will appear in the OneTouch Destination List 5 In step 4 of the dialog box select the file formats that the application will accept Refer to the documentation that you received with the applic...

Page 73: ...to a lower resolution bitmap images with a higher resolution may be too big to fit on the screen Converting the bitmap image to match the screen resolution ensures that the image fits on the screen C...

Page 74: ...ou want All documents are in the root The scanned documents are saved in the root of the folder specified in the Storage Location Documents are put into folders by month week or type Folders are creat...

Page 75: ...for Folder for storing attachments and choose a folder for your email attachments 2 If you are using AOL on your computer and the folder name for AOL is incorrect click the Browse button and find the...

Page 76: ...n image will fit on the computer s screen When a computer screen is set to a lower resolution bitmap images with a higher resolution may be too big to fit on the screen Converting the bitmap image to...

Page 77: ...utton menu arrow and select a button for setting new options 3 The OneTouch Destination Options are Show All Destinations Selecting this option activates all the Destination Application categories for...

Page 78: ...ending them to a CD burner to create a CD containing the scanned documents See Transferring Scanned Documents to Storage on page 80 and Scan and Burn to a CD on page 77 for details Fax and Print is fo...

Page 79: ...ption is not available if either the Document Management or Storage and CD R W options are selected because by default file copies for those types of Destination Applications are already automatically...

Page 80: ...on the CD Disc 2 that you received with your scanner The OneTouch OmniPage Module and the OmniPage software can both be installed on your computer at the same time however the features in the OneTouc...

Page 81: ...k the OneTouch icon in the Windows Notification Area 2 On the OneTouch Button Panel click on the button you have set with a text editing program as the Destination Application Your scanned pages appea...

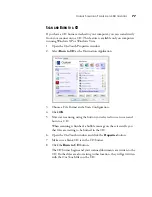
Page 82: ...le Format and a Scan Configuration 4 Click OK 5 Now start scanning using the button you selected to use to scan and burn to a CD When scanning is finished a bubble message on the screen tells you that...

Page 83: ...stination Application You cannot choose a File Format for this option as the Destination Application is not selected until after starting the scanning batch 3 Click OK 4 Start scanning using the butto...

Page 84: ...or the image on the HTML page 5 Click OK 6 Load the documents face down with their tops into the scanner 7 On the OneTouch Button Panel or on the scanner LED select the button you setup to scan using...

Page 85: ...ce down with their tops into the scanner 2 To scan using the buttons on the scanner press the Function button until the LED is at 7 then press the Simplex or Duplex button 3 To scan from the OneTouch...

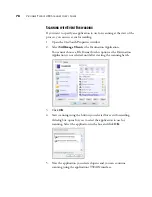
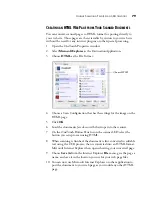
Page 86: ...h the appropriate storage location for that set Then switch to another Scan Configuration and scan the next set of documents to store them in their folder Setting up multiple folders for transfer to s...

Page 87: ...DE 7 Click the Storage Options tab 8 Click the Browse button 9 Select the folder you created for storing the scanned documents If you haven t created the folder yet you can click the Make New Folder b...

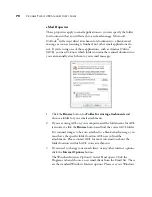
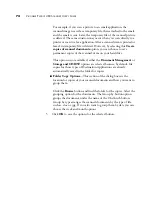
Page 88: ...sted as a Transfer to Storage configuration 12 Repeat the process to create additional new configurations such as one named Storage for Personal Receipts 13 You will now have multiple configurations s...

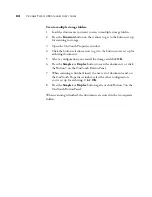
Page 89: ...set up for archiving documents 5 Select a configuration you created for storage and click OK 6 Press the Simplex or Duplex button to scan the documents or click the Button 7 on the OneTouch Button Pa...

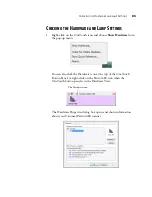
Page 90: ...Show Hardware from the pop up menu You can also click the Hardware icon at the top of the OneTouch Button Panel or right click on the Patriot 480 icon when the OneTouch button panel is in the Hardwar...

Page 91: ...e the time before the scanner powers down from 10 minutes to a maximum of 10 hours 3 Click the arrows for the Lamp timeout setting and choose a time setting To turn the lamp on and off manually withou...

Page 92: ...appropriate steps to open the TWAIN Interface for your scanner For instructions on how to use the PaperPort software press F1 on your keyboard when the PaperPort software is open or refer to the Pape...

Page 93: ...instructions in this section regardless of the application you use to open the TWAIN Interface 1 Select the options you want from the TWAIN interface then load the documents with their tops into the A...

Page 94: ...er the dpi setting the sharper and clearer the scanned image However higher dpi settings take longer to scan and produce larger files for the scanned images Brightness Increasing or decreasing the Bri...

Page 95: ...he Grayscale or Color Mode at 200 dpi or less Define page size Click this option to activate the Define button Then click the Define button to see the Define page size dialog box for selecting a speci...

Page 96: ...ure The item is scanned with the current settings on the TWAIN interface If this option is not selected the scanner waits for you to click the Scan button DISPLAY THE DEVICE CONFIGURATION 1 Click the...

Page 97: ...ners digital cameras and other digital devices This section shows how to use Microsoft Paint to scan using the WIA interface but you can use other Windows applications as well To scan using WIA from M...

Page 98: ...e for the item you re scanning 5 Select a paper size from the Page Size list 6 Adjust the image settings as desired Change the button selection for the type of image Adjust the custom settings refer t...

Page 99: ...canned picture 2 The Advanced Properties dialog box opens 3 Select the options for scanning Brightness and Contrast Drag the sliders to the right or left to adjust the brightness and contrast of the s...

Page 100: ...the jammed paper and close the cover To reduce the number of paper jams smooth and straighten the paper before scanning and adjust the guides to the paper size and insert the paper evenly into the AD...

Page 101: ...ng information 1 Press the ADF cover release on the top left of the scanner body to open the Automatic Document Feeder cover 2 The ADF pad is located behind the scanner buttons 3 Squeeze the plastic c...

Page 102: ...s light doesn t come on plug the power supply into another electrical outlet Did you restart the computer after installing the software If you didn t restart the computer it may not have loaded all of...

Page 103: ...ted sometimes I get blank pages or pages with lines What s wrong The pages were probably scanned in crooked or skewed To use AutoCrop to Original the pages must be scanned in straight Adjust the paper...

Page 104: ...he scanner 2 Restart your computer 3 After the restart is complete plug the power cable back in STATUS LIGHT TROUBLESHOOTING CODES A blue status light indicates the normal state of the scanner Normal...

Page 105: ...in If the problem persists and your scanner s power is plugged into a surge protector or UPS battery backup try plugging the scanner power directly into a wall outlet 6 The scanner is open Make sure t...

Page 106: ...ware programs 5 Follow the same steps to select and remove the Kofax VirtualReScan 4 10 and OneTouch 4 0 ScanSoft OmniPage OCR modules from the installed programs list 6 The OneTouch 4 0 software and...

Page 107: ...on c Select OneTouch 4 0 then click on the Remove button d An Add or Remove message box opens and asks if you are sure you want to remove OneTouch 4 0 from your computer Click Yes The OneTouch 4 0 sof...

Page 108: ...s 0 003 0 055 0 076 1 397 mm Light source Cold cathode fluorescent lamp Interface USB 2 0 High Speed Scanner dimensions Height 6 inches Width 6 5 inches Length 13 inches Weight 9 5 pounds Operating te...

Page 109: ...e use the following part names and numbers when ordering replacements for your scanner Part Name Part Number Input Tray 57 0104 000 Output Tray 57 0105 000 ADF Pad 57 0103 000 Front Feed Tray with Out...

Page 110: ...ormat 64 D Destination Application 23 29 45 OCR 76 Destination Selector 28 36 Device Settings Tab 55 Disc 1 8 Document Management 73 documentation 4 dpi 94 Duplex 53 Duplex button 28 36 duplex button...

Page 111: ...aperPort Properties 65 PDF 62 73 PDF file size 62 Picture type 94 power saving 86 Properties button 49 R Resolution 51 89 94 Rich Text Format 64 rtf file format 64 S saturation 54 Scan Front Feed tray...

Page 112: ...9 Straighten Image 52 system requirements 3 T Text Documents Properties 66 Text Editors 73 Text Formats 63 TIFF 62 Transfer to Storage 80 troubleshooting 97 TWAIN 58 78 TWAIN standard 87 U uninstall 1...

Page 113: ...INDEX 108...

Page 114: ...Copyright 2008 Visioneer Inc 05 0766 000 visioneer...

Reviews: