Step by Step Operation
55
© 2018 Vision Engraving & Routing Systems
5.2
Zeroing the Cutter
Zeroing Cutters
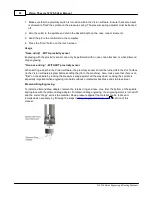
(Refer to the diagram on the following page)
Zeroing Cutters for Top-Loaded Spindles
1. Turn the micrometer to zero. This provides a starting point and reference for setting the depth
accurately. It’s important to note that the micrometer should be threaded onto the spindle housing
sufficiently to prevent excessive play in the micrometer and nosecone. If there are too few threads
holding the micrometer in place it will move during the engraving process. The best starting position is
3 or 4 complete revolutions from the top.
2. With the appropriate cutter installed in the spindle, loosen the setscrew in the brass cutter knob with
a spline wrench (commonly referred to as the cutter wrench). CAUTION: When you loosen the
setscrew in this step, the cutter may easily fall out of the spindle and can cause cutter tip damage.
Use one hand to hold the cutter before loosening.
3. Gently place a piece of metal against the bottom of the nosecone so as to push the cutter even with
the bottom of the nosecone. Now the cutter should be flush with the nosecone.
4. Tighten the cutter knob setscrew. Your cutter is now "zero'ed". Rotating the micrometer to the right
will increase the depth of the cut. Each click of the micrometer = .001”. A full revolution is .025”.
5.3
Proximity Sensor
Advantage of this Feature
The advantage of this device is that it eliminates the need to perform a surface setting procedure. It is
used when utilizing a nose cone or diamond drag cutter. It cannot be used without a nose cone, such as
when burnishing or setting multiple pass depths in the software.
Procedure
Summary of Contents for Phoenix 1212 S5
Page 1: ... 2018 Vision Engraving Routing Systems Vision Phoenix 1212 S5 User Manual Revised 12 7 2018 ...
Page 16: ...Vision Phoenix 1212 S5 User Manual 16 2018 Vision Engraving Routing Systems ...
Page 44: ...Vision Phoenix 1212 S5 User Manual 44 2018 Vision Engraving Routing Systems ...
Page 113: ...Step by Step Operation 113 2018 Vision Engraving Routing Systems ...
Page 121: ...Step by Step Operation 121 2018 Vision Engraving Routing Systems ...
Page 123: ...Step by Step Operation 123 2018 Vision Engraving Routing Systems ...
Page 147: ...Optional Accessories 147 2018 Vision Engraving Routing Systems ...
Page 148: ......

