background image

Chapter 4: Phantom Software

41

After pressing this button, the camera’s internal 
mechanical shutter will close, and a progress meter 
will be displayed (bottom of the image window). 
When completed the shutter re-opens, and the 
camera is ready for shooting.

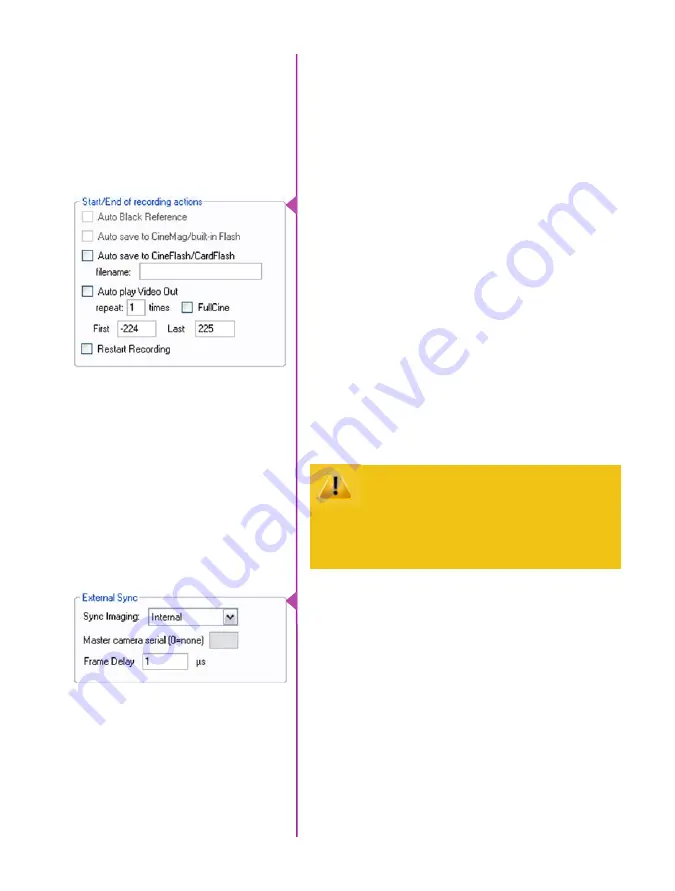
The first of these key features is the option to 
enable the ‘Start/End of recording actions’ to be 
performed automatically at the beginning or end of 
a shot. The most common ones are:


‘Auto save to CineFlash/CardFlash;’ this 
feature saves a user-specified portion of a 
clip to the Phantom CineFlash immediately 
after recording.


‘Auto play Video Out’ begins playback after 
recording. The range marked under ‘Auto 
play Video Out’ affects both playback and 
saving to the Phantom CineFlash.


‘Restart Recording,’ when enabled, 
automatically restarts the recording process 
after the auto actions have been performed.

Key Advanced Settings

When ‘Restart Recording’ is enabled PCC 
does not provide any user confirmation 
before the clip is erased from RAM and 
starts recording again.
This feature should be used with care!

‘External Sync’ instructs the camera to utilize one 
of the following three frame sync clock sources:


-

Internal - instructs the camera to utilize its’ 
internal crystal oscillator to drive the camera’s 
‘Speed’ (sample / frame rate).


-

External - should be selected when an 
externally supplied frame sync clock pulse is 
supplied to drive the camera’s sample rate. 


-

IRIG - should be selected when an IRIG-B signal 
is supplied to drive the camera’s sample rate.

Summary of Contents for Phantom Miro LC Series

Page 1: ...M LC M A N U A L PHANTOM CAMERAS ...

Page 2: ...Phantom Miro M LC Series Camera Manual w w w v i s i o n r e s e a r c h c o m PN ZDOC 64084 MA 0003 Rev 1 Last Updated Nov 2012 ...

Page 3: ...Phantom Miro M LC Series Camera Manual Phantom Miro M LC Series M A N U A L 100 Dey Road Wayne New Jersey 07470 USA ...

Page 4: ...a n d p r o d u c e d b y t h e M a r k e t i n g D e p a r t m e n t a t V i s i o n R e s e a r c h T h e c o n t e n t s o f t h i s m a n u a l m a y b e s u b j e c t t o c h a n g e w i t h o u t n o t i f i c a t i o n PN ZDOC 64084 MA 0003 Rev 1 Last Updated Nov 2012 Updated 06 10 2012 ...

Page 5: ...es Camera Manual C o n t e n t s 1 1 Introduction 2 7 3 17 4 35 5 49 Quick Start Guides Miro LC Touchscreen Interface Phantom Software CineFlash CineFlash Dock 6 55 Phantom RCU 7 57 Batteries Battery Charger 8 63 FAQ Support ...

Page 6: ... 3 5 x 4 inches 19 x 19 x 10 cm L W H 1 Megapixel and 2 Megapixel custom designed CMOS sensors Up to 3 2 Gigapixels second throughput Excellent light sensitivity Compact rugged design LC Series includes flip out LCD touch screen for on camera control and monitoring Rechargeable battery Sony BP U30 or BP U60 Phantom CineFlash storage system 60GB 120GB and 240GB CineFlash CineFlash Dock eSATA Connec...

Page 7: ...x s throughput while the Miro 310 and Miro 320S double that for 3 2 Gpx s throughput These throughputs translate to the Miro 110 yielding over 1600 frames per second fps the Miro 310 over 3200 fps 720 fps for the Miro 120 and 1380 fps for the Miro 320S all at full resolutions Maximum frame rates at reduced resolution are 400 000 fps for the Miro 110 650 000 for the Miro 310 250 000 fps for the Mir...

Page 8: ...16 partitions for Cine storage A Cine is Vision Research s raw image format that stores all image data in a compact file At the end of any shot save your Cine to the removable Phantom CineFlash storage media at about 4GB minute CineFlash allows you to save a copy of your Cine to non volatile memory for later retrieval and avoid costly downtime while you download from camera memory to a computer ha...

Page 9: ...uch screen interface The Miro LC Series cameras have a flip out LCD touchscreen for on camera control and monitoring Camera settings can be changed with a few taps on the screen which doubles as a monitor for live preview and Cine playback from internal memory The LCD user interface is available in multiple languages Advanced control signals are available including a Frame Synchronization signal F...

Page 10: ... SDI 1080psf 1080i 720p Trigger Switch closure or TTL Pulse OFF AUTO ON Switch 12 28 Volts DC Trigger Ready Strobe A Sync Video 120 110 310 only IRIG B In Modulated Unmod IRIG B Out Unmod Aux Strobe Event MemoryGate CAT5 UTP for control and data transfer A B C D E F G H I Power Switch DC Input F Sync HD SDI Miro 320S Trigger Miro 120 110 310 CineFlash Compartment Battery Compartment Battery Releas...

Page 11: ... through video tools functions Zoom 1 1 Threshold and Live mode Long press 3 seconds will perform an internal CSR current session reference Tap once to trigger the camera Long press 5 seconds will delete the last RAM Cine file and re arm the camera A B Autoset Trigger A B ...

Page 12: ... 5 seconds Double clicking the square button also resets the screen Turns on off all on screen displays Displays the main capture and setting control interface Tapping the center of the screen will also bring up menu icons B C See Chapter 3 Miro LC Touchscreens for a brief description of the various Menu screens Image shown is of the LCD screen flipped around and folded back into the side of the c...

Page 13: ...eight Choose the required Speed frame rate and Exposure Time shutter Set the Post Trigger trigger position at the begining or the end or some position within the internal memory Scroll up and down for desired setting Tap once to select parameter to change Press 3 seconds the Autoset button front of the camera to perform an internal CSR Current Session Reference Tap on AWB Automatic White Balance i...

Page 14: ...t Mark In icon Locate the last image to be saved and tap the the Mark Out icon Review the edited Cine Save marked frames to Phantom CineFlash Tap the file management icon on the LCD menu and then tap on the CF CineFlash icon to bring up the CF menu This will show the entire list of files on the CineFlash drive Ensure the last shot is there by checking the time and file size Note that the files sto...

Page 15: ...p on the RAM Cine and then tap the X to delete Tap the Record icon to start the camera in capture Alternatively a long press 5 seconds on the front camera trigger button will also delete the last RAM Cine and put the camera back in Capture mode If there is an asterisk next to the RAM file that means it has not been saved to the CineFlash ...

Page 16: ...tware from the accompanying CD or USB key Mount camera onto suitable support Attach and adjust appropriate lens If necessary connect the supplied Capture cable to the capture port on the camera If an external trigger is being used connect it to the capture cable s trigger BNC or directly to the back of the camera on the Miro 110 310 or 120 Connect the 12 28 VDC power supply to the camera s DC Inpu...

Page 17: ...ter zero 0 into the Last data entry field Click on the CSR button to perform a Current Session Reference Move the cursor over a white or neutral non saturated object in the image and right mouse click Click the White Balance command pop up window or Click anywhere other than the pop up window to cancel Click the Capture button to start recording to the camera s internal memory circular buffer Clic...

Page 18: ... of the Play panel In the Save Cine window 1 Navigate to the folder where you want to save the Cine file 2 Enter a file name for the Cine file in the File name data entry field 3 From the Save as type pull down selection list select the Cine Raw Cine file format 4 Click the Save button to begin downloading the cine file from the camera to the computer s hard drive Click the down arrow of the Save ...

Page 19: ...the cine Using the Video Control Buttons review the saved Cine file After ensuring the Cine file has been saved via Manager tab 1 Highlight the recorded Cine file under the selected Phantom camera then 2 Click the Remove From Tree button to erase the Cine stored in the camera s RAM 3 Click the OK button when the Delete all cines from camera warning message appears via Live tab 1 Click on the Captu...

Page 20: ...om CineFlash CineDock Gently depress the Setup button then the Acq Acquisition button Set the Aspect Ratio Press the down arrow right of Aspect Ratio field and select an Aspect Ratio from the pull down selection list Define the Resolution Frame Rate Exposure and Post Trigger settings using the Numerical Keypad to specify the desired setting To overwrite the present value 1 Tap the entry field once...

Page 21: ... Capture cable Click the Play button Locate the first last image to be saved by Performing a Quick Search Rotate the Jog Scroll dial until desired point in Cine is achieved or Press and hold down on Image Location Identifier arrow located just below the Cine Editor Bar and slide finger right to quickly advance Cine slide left to quickly rewind present image number is displayed above Using Video Co...

Page 22: ... P A Camera State B Cine for multi Cine setups C Time Stamp D Internal Memory E Number of Frames Available F Record Time G Trigger H Menu Button I OSD Button J Resolution K Voltage Battery Life L Exposure Time M Speed N Serial Number Name O Cine Management P Menu Q CineFlash Status R IBAT Enabled G R ...

Page 23: ...ached video monitor Triggered camera has been triggered and is filling internal memory Post Trigger frames Displays a Live image on the LCD and attached video monitor Cine Stored recording has ended and a Cine is stored in internal memory Displays a Live image on the LCD and attached video monitor Playback camera is in PLAYBACK mode RAM Cines can be selected for playback Indicates the internal mem...

Page 24: ...ns Turns on off all on screen displays Indicates the user defined resolution width x height in pixels Indicates the power status counts down Indicates the user defined Exposure Time in milliseconds or microseconds Indicates the user defined frame rate Indicates the camera serial number or user defined camera name Tap to view and select Cine files stored in RAM save and or delete to re arm the came...

Page 25: ... used to load the factory settings access 3 factory saved presets or store up to 6 of your own presets Scroll up and down for desired setting Tap once to select parameter to change Used to jump to menu categories in the camera s main menu list Factory User Settings A Capture Settings B Menu Categories C G ...

Page 26: ... object in the center square and tap once White subject must not be fully saturated Camera Info displays model serial memory size firmware level and current temperature readings Scroll up the Capture Setting menu Scroll down the Capture Setting menu Move up one level in the menu structure AWB D Camera Info E Scroll Up F Scroll Down G Return H ...

Page 27: ...Chapter 3 Miro LC Touchscreens 21 Expanded menu above is displayed when Advanced Settings is set to On Menu above is always available m e n u d e s c r i p t i o n ...

Page 28: ...e of motion blur Resolution is the number of pixels used to capture an image For example on the Miro M120 if 1920 x 1200 width x height is set the full sensor space is available Smaller resolutions allow higher recording speeds The image aspect ratio will be displayed with the defined Resolution setting Defines the number of frames past the trigger point to be stored in the camera s internal memor...

Page 29: ...include NTSC PAL HD SDI 1080psf 1080i 720p These are SMPTE Color bars generated by the camera and output over the video signal They are used for setting up a video monitor The camera will show the PA Production Area specified placing a red rectangle over the image The production area is an overlay and is not recorded in the RAW data The camera s white balance can be set with the AWB on the upper r...

Page 30: ...age at 0 0 Defines the number of frames interval between updates the auto trigger region is checked Defines the amount a pixel value must change for auto trigger purposes Defines the number of partitions 15 segments maximum the camera s internal memory buffer RAM will be evenly divided into End of recording or automatic actions can be set Play Save Play Restart Save Restart Play Save Restart Chang...

Page 31: ...saved with the Cine Sets the first frame for automatic functions like auto save to CineFlash and Auto Play to video If not selected the first frame will always be the beginning of the full recording Sets the last frame for automatic functions like auto save to CineFlash and Auto Play to video If not selected the last frame will always be the end of the full recording This field instructs the camer...

Page 32: ... activated on the Auxiliary pin of the capture connector Defines when the Ready signal is turned off Adjust the color Saturation of the images being displayed Increasing the value results in the images being displayed with more brilliant color while decreasing the value results in the images being displayed with less brilliant color The Master Black Pedestal parameter is used to change the voltage...

Page 33: ...oot Tone allows manual control over the tone curve of the image Tone curves change the shadows highlights relationship between the original values on X axis and resulting values on Y axis Tone curves can be useful to boost midtones of the image without effecting highlights or shadows for example They can also be used to push the darks lower which may result in richer images when detail in the shad...

Page 34: ...capture and setting control interface Scroll up and down for desired setting then tap once to select parameter to change On the right and symbols will appear when applicable and a keyboard symbol can also be selected for data entry The keyboard data entry menu allows you to enter any available value then tap the return key to accept Menu Access Set Parameter Select Setting s e t t i n g p a r a m ...

Page 35: ... settings access 3 factory saved presets or store up to 6 of your own presets When saving a user setup enter a name and tap the return button to save it Any of the 3 factory saved presets can be modified or overwritten When loading any of the user settings or factory defaults you must tap to confirm or cancel ...

Page 36: ...e m a n a g e m e n t A B C D E F G H I J K M A Camera State B Time Stamp C Internal Memory D Number of Frames Available E Record Time F CineFlash Status G Menu Button H OSD Button I Play Cine J Cine List K CineFlash Mangement L Erase Cine M Return L ...

Page 37: ...a Cine from the list to play or erase asterisk indicates Cine had not yet been saved Opens the CineFlash Management screen displays list of Cine files stored on CineFlash drive Erases selected Cine from camera RAM displays when a Cine is selected Delete individual takes or tap XCF to format secure erase the drive When deleting Cine files from the CineFlash you must tap to confirm or cancel CineFla...

Page 38: ... Cine C Mark In Point D Image Location E Time Stamp F Internal Memory G Mark Out Point H Number of Available Frames I Record Time J CineFlash Status K Menu Button L OSD Button M Save to CineFlash N Mark Out O Forward P Forward 1 Frame Q Stop Pause R Reverse S Mark In T Return F Q S R E G C M ...

Page 39: ... frame number being saved counts up Saves Cine file to CineFlash Sets the end point of the Cine file to save Plays the Cine file Tap multiple times to speed up playback Advances the Cine file one image Pauses playback When paused button changes to Reverse 1 Frame button Plays the Cine file in reverse Tap multiple times to speed up playback Sets the starting point of the Cine file to save A H I K L...

Page 40: ...Phantom Miro M LC Series Camera Manual 34 The latest version of Phanom PCC software can be found and downloaded from the support section of the Vision Research website www visionresearch com ...

Page 41: ...o 255 255 0 0 p c c s o f t w a r e When using multiple computers to control the same camera each computer requires a unique IP address for example 100 100 100 1 255 255 0 0 100 100 100 2 255 255 0 0 and so on The software is built around a multi layered work area that includes the following work areas Provides quick access to the most frequently used functions Position the mouse over a button and...

Page 42: ... files on the local hard drive PVP works with the camera s HD SDI NTSC and or PAL outputs as connected to a compatible monitor PVP provides the ability to view capture review edit and or save a Cine recorded into the camera s RAM to a hard drive or installed Phantom CineFlash PVP is extremely effective when used with the high resolution cameras since most computer monitors will not refresh quickly...

Page 43: ...f these settings will be covered later in this section Double click the camera to be controlled listed in the Manager tab select the camera from the Camera pull down list in the Live tab Camera Control via PCC Selecting a Camera Multiple cameras if available will be displayed in the Manager tab and the Live tab Camera pull down list Once a camera is selected a Preview panel will display to the lef...

Page 44: ... to the default which under the most typical lighting will produce a green image The Tone Reset button restores the image tone to the default values and the Color Matrix Restore button return the color matrix values to their default values The Zoom Actual Size toolbar button resizes the images being displayed in the Preview Playback panel to their actual size The Zoom Fit toolbar button resizes th...

Page 45: ...e Preview or Playbak panel then click on the White Balance pop up window It is not necessary to fill the frame with white a small target can be used Capture Setup Just below the Camera selector in the Live tab are a series of expandable headers which contain groups of related camera settings This manual will cover the most commonly used settings see the Pcc Help file for details of more rarely use...

Page 46: ...equired setting from the Resolution number of pixels used to capture an image Sample Rate frame rate speed ExposureTime shutter EDR Extreme Dynamic Range exposure time and Last Image Range and Trigger Position pull down menu If not displayed type value in the data entry field software will round value to the closest supported value A third method can be used to set the Image Range and Trgger posit...

Page 47: ...d under Auto play Video Out affects both playback and saving to the Phantom CineFlash Restart Recording when enabled automatically restarts the recording process after the auto actions have been performed Key Advanced Settings When Restart Recording is enabled PCC does not provide any user confirmation before the clip is erased from RAM and starts recording again This feature should be used with c...

Page 48: ...t trigger frames until the user specified value is met Using the camera s hardware Trigger button or an external trigger signal provides a more accurate trigger to the camera Once the camera has completed recording a Cine in the camera s RAM or saving to the Phantom CineFlash it can be reviewed by selecting it from the Cine pull down selection list in the PCC Play tab A previously saved Cine store...

Page 49: ...ing the frame number into the jump data entry field then hit the enter key Image Search The goal is to search or find an image change in the recording based on the difference between image content Image Search utilizes two methods or algorithms to discover the image change Difference Method which compares the difference between two images Correlation Method based on the Normalized Cross Correlatio...

Page 50: ...M Cine to Flash Editing a Cine Vision Resaerch recommends reviewing the save cine file before erasing it from the camera s internal memory RAM Saving a Cine The PCC software provides you with the ability to convert Cine files into a number of other formats Single Cine files can be converted by selecting the desired format from the Save as Type selection list in the Save Cine dialogue window The fi...

Page 51: ...ive to the trigger point to the file name If the first frame in the clip is 100 then the first converted frame will have the name image_ 00100 tif The annotator will add frame numbers starting from 1 Example image_ 5 tif This will cause the first converted frame to have the name image_00001 tif Ensure all image adjustments have been applied prior to initiating the conversion process All metadata g...

Page 52: ...the original file name and appends the appropriate image number and file extension to each image Once the Convert button is clicked a progress window appears Each converted Cine will be placed in it s own folder named after the original Cine file PVP PhantomVideo Player can be opened directly from the desk top or by clicking the Video Out toolbar button in the PCC software The video output paramet...

Page 53: ... Phantom CineFlash are not available for video playback To return to the live output select Live Scroll through a cine by dragging the play head back and forth on the timeline Use the playback controls to play forward and in reverse Use the speed slider to change the playback speed Use the and buttons to mark in and out points After trimming a clip press the Save to Flash button to save it to the ...

Page 54: ...Phantom Miro M LC Series Camera Manual 48 ...

Page 55: ...ad the file after each shot meaning less down time in between takes Quality Files saved to the CineFlash are always saved in the Cine raw format which maximizes image quality and workflow options Portability Whether using a Phantom RCU the LCD interface or an auto save setup when saving to the CineFlash there s no need to connect the camera to a PC during capture Once the CineFlash drive is full d...

Page 56: ...e the CineFlash compartment door Re open the CineFlash compartment door Prior to removing the Phantom CineFlash verify that it safe to remove it by ensuring the CineFlash Recording Indicator located inside the CineFlash compartment on the lower right hand side is inactive If the indicator is active red do not remove the CineFlash because a Cine is being recorded to the CineFlash Phantom CineFlash ...

Page 57: ...m This will install the driver and a program called Ext2 Volume Manager which you can use to assign a drive letter to the CineFlash For Macintosh computer running OSX http www paragon software com home extfs mac You can use a commercial driver from Paragon Software Alternatively you can install a driver that runs under the FUSE package at no cost http code google com p macfuse The specific driver ...

Page 58: ...end of the eSATA connector to the Phantom CineFlash Dock Insert the other end of the eSATA connector to the PC MAC computer s eSATA interface Insert the Phantom CineFlash into the docking station and ensure the computer recognizes the drive Install the EXT2 Driver Connecting the CineFlash Dock to a Computer Verify Setup ...

Page 59: ...cking the down arrow to the right of the Cine field and selecting the file from the pull down list Review the saved Cine using the Video Control buttons In PCC click the Manager tab then double click on the Phantom camera with the Phantom CineFlash files to be erased In the Live tab click on the Flash Memory selector and click the Erase button When the dialog box appears with thumbnails of the Cin...

Page 60: ...Phantom Miro M LC Series Camera Manual 54 ...

Page 61: ...s everything you need to connect the Phantom Miro to an RCU The kit includes a mounting bracket a cable that breaks out the remote connection from the power port and a short 6m cable Longer cables can be used for hand held control when the camera is positioned up to 5 meters away The 5 active TFT display is easy to use even outdoors The display can act as both an analog or HD SDI video monitor a f...

Page 62: ...Phantom Miro M LC Series Camera Manual 56 Sony BP U30 Lithium ion Rechargeable Battery Sony BP U60 Lithium ion Rechargeable Battery ...

Page 63: ...es battery status data to the camera The remaining capacity of the battery is displayed on the LCD monitor and viewfinder when the camera is powered on This intelligent battery management function allows operators to monitor the battery status easily and accurately The BP U30 and BP U60 also have LED displays to indicate the remaining capacity of the battery at the push of a button on the battery ...

Page 64: ...ature 4 to 113 F 20 to 45 C Remaining capacity display Four LED 20 40 60 and 80 Dimensions W x H x D 1 11 16 x 3 1 4 x 2 3 4 in 41 5 x 82 5 x 69 7 mm Mass 15 oz 350 g Maximum nominal voltage 16 4 VDC 14 4 VDC Miro Run Time 90 min Charging time using the BC U1 Approx 170 min Operating temperature 4 to 113 F 20 to 45 C Remaining capacity display Four LED 20 40 60 and 80 BP U30 Lithium ion Battery Sp...

Page 65: ...x 98 mm Weight 12 oz 330 g DC output 12V 2 0A Number of mountable batteries 1 Chargable battery BP U90 BP U60 BP U30 Supplied accesories Operating Instructions 1 DC Output Cable 1 Warrenty Booklet 1 Approximate charge time 170 min BP U60 57 Wh 130 min Bp U30 28 Wh BC U1 Battery Charger Specification BC U1 Battery Charger must be used to recharge the batteies Batteries do not recharge through the c...

Page 66: ...ly straight then press down gently to lock in place Never insert the battery at a top first angle Vision Research recommends the following procedure for safe battery installation and removal Only Sony BP U30 and BP U60 batteries are gaurenteed Larger heavier batteries should not be used Failure to follow this procedure could result in physical damage to the camera which must be repaired at a Visio...

Page 67: ...ttery should lower smoothly then snap in place Guides will ensure the battery lowers over the terminals perfiectly straight Slide the battery lock on the top of the camera forward and lift the battery up and back to remove Battery Removal ...

Page 68: ...LC Series Camera Manual 62 Be sure to check www visionresearch com for additional troubleshooting info support information FAQs software and firmware releases and the Phantom Zone an online community of Phantom users ...

Page 69: ...end always holding the back or edge of the screen while controlling it or touch any metallic surface on the camera with either hand This is not an issue when the camera is running on AC power Yes the physical button on the side of the screen marked with a square icon turns the menu display on and off When turning the menu off the screen automatically resets A good way to force the re set is to dou...

Page 70: ...ds about 12mm to the width of the camera It also adds an on camera control interface and a live preview image for framing focus and playback from RAM There are no other functional differences or differences in specifications The camera s menu system allows you to review the amount of takes on the CineFlash their size and the drive s remaining capacity however they can not be played back on the scr...

Page 71: ... The LCD screen on the side of the camera uses slightly more power therefore battery life is slightly diminished A BPU 30 battery provides about 45 minutes of battery life where the BPU 60 provides about 90 minutes Support details are available as follows For technical questions and help troubleshooting contact technical support visionresearch com or call 1 973 692 4003 For basic questions and hel...

Page 72: ...Phantom Miro M LC Series Camera Manual ...

Page 73: ...Phantom Miro M LC Series Camera Manual ...

Page 74: ...nterey Commons Suite 200 Stuart Florida 34997 USA Ph 1 772 286 7000 Fax 1 772 286 6206 Vision Research Ltd UK Suite F8 Bedford i lab Priory Business Park Stannard Way Bedford MK44 3RZ United Kingdom Ph 44 1234 834 850 Fax 44 1234 834 851 Vision Research Asia Ametek Singapore Pte Ltd No 43 Changi South Avenue 2 04 01 Singapore 486164 Ph 65 6505 9034 w w w v i s i o n r e s e a r c h c o m PN ZDOC 6...

Reviews: