Vimar ELVOX 40610.S User Manual Download Page 114

EN

   112

40610.S - SIP 7" video entryphone
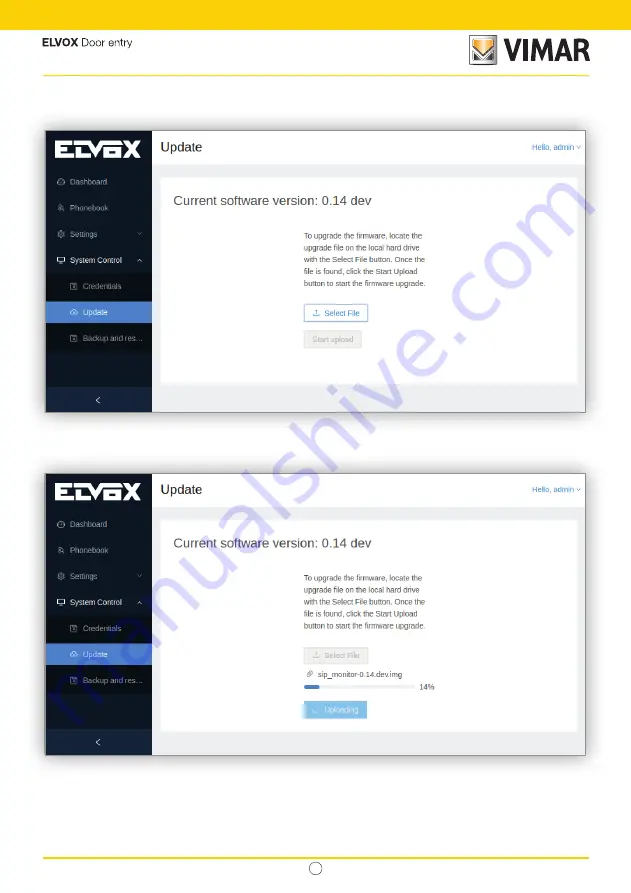
9.5.2 Update

This page allows to update the software by selecting the update file from the PC using the 

Select File

 button:

Once the file has been selected, the 

Start upload

 button becomes enabled and can be clicked. A pop-up appears 

indicating that the file is being uploaded:

After the file has been uploaded, it is validated and then the proper update procedure starts and during this process 

several standard operations are disabled:

• 

The display UI is disabled.

• 

The SIP calls are disabled.

If the update procedure finishes successfully, a pop-up window notifies the event:

Summary of Contents for ELVOX 40610.S

Page 1: ...SIP 40610 S SIP 7 video entryphone User manual...

Page 2: ...EN B 40610 S SIP 7 video entryphone...

Page 3: ...ering calls 11 4 1 1 Declining calls 12 4 1 2 Ending calls 13 4 1 3 Adjusting audio settings 13 4 1 4 Opening the door 14 4 1 5 Taking a snapshot 14 4 1 6 Activating an actuator 15 4 2 Placing calls 1...

Page 4: ...3 9 4 2 Networking 90 9 4 2 1 Wi Fi 90 9 4 2 2 Ethernet 92 9 4 3 Date Time 94 9 4 4 Display 97 9 4 5 Sound 100 9 4 6 UI language 102 9 4 7 Touch buttons 103 9 4 8 Images list 106 9 5 System control 11...

Page 5: ...r installation refer to the instruction sheet in the package 1 3 Characteristics 1 3 1 Calls Receipt of audio or audio video calls from an outdoor station Specific self start from an outdoor station C...

Page 6: ...hite back light illuminates all buttons for an improved visibility Touch buttons default functions The Handsfree button answers an incoming call terminates a call or terminates a camera streaming This...

Page 7: ...is three step guided procedure takes place the first time that the device is powered up before any other configuration It s used to set the basic device settings that will allow to correctly use and c...

Page 8: ...again to confirm the previous parameters Once this procedure is completed it will not appear anymore except after a Factory Reset since the user configuration is completely removed After these steps...

Page 9: ...ess Once it s known enter it in the browser s URL bar and follow this web based steps that are equivalent to the above procedure First step Select the device language Choose the plant name Choose the...

Page 10: ...ask to log in again with the new credentials Once this procedure is completed it will not appear anymore except after a Factory Reset since the user configuration is completely removed After these ste...

Page 11: ...ing audio is disabled during a call d Do not Disturb DnD icon When activated all the incoming calls are refused sending a busy reply to the calling party 2 Calls status At the middle left of the scree...

Page 12: ...Calls history screen where all the calls are listed Open the Monitoring screen to execute a self start to a SIP external panel Open the Camera screen to start a streaming from an IP cam Opens the Con...

Page 13: ...y It is disabled until the call is established Snapshot Take a snapshot of the current call Keyboard Show a keyboard used for entering a DTMF code It is disabled until the call is established More Sho...

Page 14: ...pen door Keyboard More Volume and Mute become enabled Notice that depending on the calling peer characteristics some controls may be disabled 4 1 1 Declining calls When an incoming call is waiting to...

Page 15: ...ished 4 1 3 Adjusting audio settings If the calling peer supports audio during a call the volume can be adjusted with the Volume bar and the Mute icon can be used to disable the audio keeping the curr...

Page 16: ...ted to that icon normally a door lock is activated Notice that the DTMF code for the actuator has to be configured when creating the contact 4 1 5 Taking a snapshot During a call if the Snapshot icon...

Page 17: ...Activating an actuator During a call an actuator can be activated in two different modes The Keyboard icon By pressing this icon a dialog with a numeric keypad appears where the DTMF code of the desi...

Page 18: ...with the list of actuators associated to the current calling peer appears and the desired actuator can be selected Notice that in order for an actuator to appear in the list of actuators it must had...

Page 19: ...ne 4 2 Placing calls The Calls icon in the Main screen allows to place calls The Calls screen that is opened allows to dial the desired number by using the dial pad in the right or by selecting direct...

Page 20: ...number is entered or the contact is selected the Place call icon is selected to actually place the call The screen that appears when placing the call is exactly the same as when an incoming call take...

Page 21: ...other peer ends it the current screen is closed and returns to the Calls screen The call can also be prematurely terminated before the other peer answers by pressing the End call icon or the Back ico...

Page 22: ...ns a list of all the previous calls that took place in the device The Calls history screen allows to visualize in chronological order all the incoming outgoing and missed calls The information is orga...

Page 23: ...shows a snapshot icon that indicates that a snapshot was taken during the call The seventh column allows to delete the selected call entry without asking for a confirmation By pressing the snapshot ic...

Page 24: ...lls section The Delete icon at the bottom of the screen erases all the calls in the history One or more entries can also be selected for removal the first one is selected by a long press while the nex...

Page 25: ...EN 23 40610 S SIP 7 video entryphone...

Page 26: ...lished automatically to the first external panel and its video is displayed to the left while a set of controls is accessible to the right and bottom of the screen The controls at the right are the fo...

Page 27: ...d The Device name string is also a icon that when selected a dialog is shown with a list of the available external panels When a device from this list is selected the video screen returns stops the pr...

Page 28: ...ring in this screen a video streaming is started automatically from the first camera and its video is displayed to the left while a set of controls is accessible to the right and bottom of the screen...

Page 29: ...top Restart a streaming When a streaming is being received the Stop icon is displayed and when the streaming is stopped the Restart icon is displayed Snapshot Take a snapshot of the current streaming...

Page 30: ...and is described later in this section The Device name string is also an icon that when selected a dialog is shown with a list of the available cameras When a camera from this list is selected the vi...

Page 31: ...tarted It s recommend to configure the streaming resolution in the IP cam to equal or less than Full HD 1920 x 1080 Higher resolutions may result in frame dropping or visualization artifacts Notice th...

Page 32: ...as taken while receiving the streaming In order to scatter a manual snapshot of a streaming the Snapshot icon in the previous screen must be pressed By pressing this icon the snapshot is visualized in...

Page 33: ...f the screen erases all the snapshots in the history One or more entries also can be selected the first one is selected by a long press while the next ones can be selected just by a normal press In bo...

Page 34: ...EN 32 40610 S SIP 7 video entryphone...

Page 35: ...in alphabetical order the list of current contacts registered in the device and is composed of three parts the top bar the bottom bar and the main area The top bar includes The Back icon at the left t...

Page 36: ...der the contacts alphabetically by Name By default they are ordered from A to Z The Delete all icon erases the selected contacts One or more entries can be selected the first one is selected by a long...

Page 37: ...0 S SIP 7 video entryphone Before removing them a dialog appears asking for a confirmation since this operation cannot be undone The main area shows the contacts in an organized list with the followin...

Page 38: ...t s a camera its streaming URL appears When the first or second columns are selected the contact s icon and name respectively the Contact info screen is opened and it s described later in this section...

Page 39: ...EN 37 40610 S SIP 7 video entryphone The bottom bar of the Contacts list screen contains only the Add icon at the right that allows to create a new contact...

Page 40: ...to the contact s type The indoor monitor contact provides two fields Contact name SIP ID The external panel contact provides three fields Contact name SIP ID Optional DTMF code for opening its associa...

Page 41: ...a contacts provides four fields Contact name URL from where to get the streaming The protocol type such as rtsp is optional The required parts of the URL are the IP address port and path Es if the com...

Page 42: ...video entryphone The actuator contact provides two fields Contact name DTMF code for activating an actuator such as the lights For entering the optional DTMF code a numerical keypad appears where the...

Page 43: ...hone After the contact s fields have been entered independently of the contact s type the flag at the top right saves the contact but before it shows a dialog that asks for a confirmation and then ret...

Page 44: ...n adding a contact in the Create contact screen but the difference resides in that the fields are already filled with the contact s info After editing one or more fields the flag at the top right edit...

Page 45: ...ludes The Back icon at the left that returns to the Main screen The contact name at the center The Edit icon at the right that opens the Edit contact screen The Delete icon at the far right The left a...

Page 46: ...one 7 4 Delete a contact There are several ways to delete a contact From the main Contacts list the fourth column deletes only the contact of the selected row From the View contact screen the Delete i...

Page 47: ...icon in the Main screen opens the Settings screen where all the device configuration takes place The Settings are a couple of standard Android screens with several options organized by functionality...

Page 48: ...EN 46 40610 S SIP 7 video entryphone Some of these screens for security reasons are protected by the password that has been set during the device start up procedure...

Page 49: ...s a mandatory parameter SIP protocol Transport protocol used for encapsulating the SIP data It s a radio button that with the following values UDP TCP TLS When this option is selected an encrypted cha...

Page 50: ...and the network interface are also correct the SIP status in the Main screen should become green If this is a first start up this is the last step of the configuration before being able to place recei...

Page 51: ...oIP Networking Date Time Touch buttons and Factory reset screens as well as for accessing the Web UI and are needed to avoid accidental changes that could affect the device behavior It will ask for th...

Page 52: ...t Only one of the two interfaces can be enabled at any given time The default interface during the first start up is the Wi Fi The Interface option allows to select the desired network interface Crede...

Page 53: ...ready executed when entering the screen but it can be pressed at any time and a new scan will take place Add network Some Wi Fi networks do not show in the automatic scan If this is the case through t...

Page 54: ...e If the password is correct it automatically connects to the network The DHCP server in the network automatically assigns an IP address If the password is invalid or the network is not available at t...

Page 55: ...Static IP address The IP address Netmask The network mask Gateway The network gateway DNS 1 The IP address of a DNS server DNS 2 The IP address of a secondary DNS server All the parameters are mandat...

Page 56: ...ress IPv4 IP address Netmask Network mask Gateway Network gateway DNS 1 IP address of a DNS server DNS 2 IP address of a secondary DNS server All the parameters are mandatory If the password is correc...

Page 57: ...EN 55 40610 S SIP 7 video entryphone Then before disconnecting from it a dialog appears asking for a confirmation...

Page 58: ...an be manually configured Alternatively if a dynamic IP address is required the DHCP option can be selected from the Ethernet IP mode dialog The device automatically connects to the network since the...

Page 59: ...te and time By default is set as automatic but if it s disabled user defined NTP servers can be added manually This option is useful if the device is inside a network that cannot reach the default NTP...

Page 60: ...ock and a 24 hour clock In order to keep the date and time updated also between reboots the device needs to contact an NTP server otherwise it cannot provide the correct date and time since it does no...

Page 61: ...ng the background image of the Main screen The following parameters can be configured Brightness level A bar that changes the luminosity of the display Sleep The elapsed time before the display enters...

Page 62: ...ain screen There are four possible sizes Small Normal default Large Huge Background It allows to choose the background image for the Main screen By default there are six provided images By pressing th...

Page 63: ...S SIP 7 video entryphone When the desired image has been found it can be selected and a dialog appears asking for a confirmation Then the selected image is highlighted and it will be displayed in the...

Page 64: ...e The user background images can only be uploaded through the Display settings in the Web UI Up to 20 images can be uploaded and their size cannot exceed 8MB each The six default images that cannot be...

Page 65: ...ia volume Audio level when a call arrives Ring volume Audio level when typing in the keyboard or pressing a button Phone ringtone Select the sound played when a call arrives There are several ringtone...

Page 66: ...isplay Currently it supports English default Italian French German Greek Portuguese Polish Swedish Dutch Russian When selecting the language a pop window with the above languages appear where the desi...

Page 67: ...call can be finished by pressing again the same touch button In the image below there is only one item that is selected therefore a call is started automatically when pressing the touch button The fo...

Page 68: ...ouch button the Door A will be opened if and only if there is an on going call to the external panel to which that actuator is connected If None is chosen and there is an ongoing call pressing the tou...

Page 69: ...he device This option is seldomly used but when it s selected all the system functionality will be halted and after the reboot it will return to the normal operation Before proceeding a dialog appears...

Page 70: ...ake place during this procedure are described in the Factory Reset section Before proceeding a dialog appears asking for a confirmation This procedure may take several minutes during which the device...

Page 71: ...his device in Vimar s website Android version The base Android version Firmware version It is the latest installed software that has the form x y dev where x and y are the major and minor version numb...

Page 72: ...to connect to the device through a browser Follow the device discovery procedure and once the IP address is known return to this section When connecting to the browser it will warn about a security ri...

Page 73: ...SIP 7 video entryphone Enter the credentials in the browser s pop up window and press the Sign in button During the first device start up or a factory reset the default credentials are Username admin...

Page 74: ...EN 72 40610 S SIP 7 video entryphone 9 1 Interface organization The Web UI is organized in three areas that are described and illustrated in the image below Top bar...

Page 75: ...the language in the display UI These operations are accessible through a cascade menu and the supported languages are the same as the ones supported for the UI English Italian French German Spanish G...

Page 76: ...ed as a menu to easily reach any configuration parameter It allows to move efficiently from one of sections to another Its contents are the following Dashboard Phonebook Settings VoIP Networking Date...

Page 77: ...nt in the display UI Backup restore and factory reset Backup and restore are not present in the display UI Some menu items are not present in the display UI since they require to upload and or downloa...

Page 78: ...main page that provides an at a glance overview of the most relevant parameters and is organized in four sections Device info Product code Device name Language Timezone Firmware version Network parame...

Page 79: ...610 S SIP 7 video entryphone Network parameters WiFi MAC address IP address SSID It is displayed in the table header next to the string Network parameters WiFi Plant info Plant name SIP domain SIP con...

Page 80: ...External panel Switchboard Camera Actuator SIP ID ID number used to call the contact Useful only for indoor monitors external panels and switchboards URL The URL for receiving the streaming Useful onl...

Page 81: ...the device type Indoor monitor Name SIP ID External panel Name SIP ID DTMF sequence Switchboard Name SIP ID Camera Name URL Login optional Password optional Actuators Name DTMF sequence The SIP ID is...

Page 82: ...ange the info of the contact of the selected row A pop up window appears whose parameters depend on the type of contact exactly as when a contact is created the difference is that the fields are alrea...

Page 83: ...book page contains a checkbox that allows to select the contact for removal When it s selected the Delete selected users button appears at the top right of the page If this button is pressed a pop up...

Page 84: ...cally selected Then the above Delete selected users button can be used for deleting all the contacts at the same time A more direct method for deleting all the contacts is to select the Delete all con...

Page 85: ...on that with the following values UDP TCP TLS When this option is selected an encrypted channel is established between the device and the SIP server Notice that when this option is selected the next f...

Page 86: ...tryphone If this configuration and the network interface are also correct after clicking the Save button the SIP status in the Main screen should become green And the SIP connection in the Dashboard s...

Page 87: ...EN 85 40610 S SIP 7 video entryphone If this is a first start up this is the last step of the configuration before being able to place receive calls...

Page 88: ...on Notice that this operation can only take place from this page and not from the display UI since it requires to upload the certificate At the top right of this area the Add certificates button can b...

Page 89: ...irst column allows to select the certificate for removal If the checkbox in the table header is selected all the certificates are automatically selected Issued by The authority that issued the certifi...

Page 90: ...same time there is a couple of methods If the checkbox in the table header of the trusted certificates table is selected all the certificates are automatically selected Then the above Delete selected...

Page 91: ...EN 89 40610 S SIP 7 video entryphone...

Page 92: ...e Wi Fi When entering the Network page the list of the currently accessible Wi Fi networks is displayed in the SSID list Once the SSID is selected and its password is entered by clicking the Connect b...

Page 93: ...terface If for any reason the device cannot obtain a dynamic IP address the device will auto assign a local link IP address that can be known after executing a device discovery In the case that a stat...

Page 94: ...t uses a statically assigned configuration IP address 192 168 1 142 Netmask 255 255 255 0 Gateway 192 168 1 1 DNS 1 192 168 1 1 DNS 2 8 8 8 8 This static configuration can be changed as desired by set...

Page 95: ...and all the below fields for the static IP address become disabled By clicking the Save button a pop up appears with the result of the operation and a warning that the device will be unreachable throu...

Page 96: ...e and their format The following options can be selected NTP configuration Use the default NTP servers This servers are used by the device to synchronize the date and time By default is set to automat...

Page 97: ...reach the default NTP servers Automatic timezone Use the timezone provided by the NTP servers If disabled the next option appears at the bottom of the page Timezone By default it s hidden but if the A...

Page 98: ...etween a 12 hour AM PM clock and a 24 hour clock In order to keep the date and time updated also between reboots the device needs to contact an NTP server otherwise it cannot provide the correct date...

Page 99: ...IP 7 video entryphone 9 4 4 Display This page allows to configure all the display parameters in the system The following parameters can be configured Brightness level A bar that changes the luminosity...

Page 100: ...0610 S SIP 7 video entryphone Sleep The elapsed time before the display enters in the Stand by mode The different options are 15 seconds 30 seconds 1 minute default 2 minutes 5 minutes 10 minutes 30 m...

Page 101: ...video entryphone Font size The size of the fonts in all the screens including the Main screen This option does not change the font size in this web interface There are four possible sizes Small Normal...

Page 102: ...ng the volume for the different types of actions The following parameters can be configured Media volume Audio level when a call arrives Ring volume Audio level when typing in the keyboard or pressing...

Page 103: ...40610 S SIP 7 video entryphone Touch sounds Enable Disable the sound when typing in the keyboard or pressing a button Screen locking sounds Enable Disable the sound when the display enters in Stand b...

Page 104: ...610 S SIP 7 video entryphone 9 4 6 UI language This screen allows to change the language of the display Currently it supports English default Italian French German Greek Portuguese Polish Swedish Dutc...

Page 105: ...a radio button so only one can be chosen None Indoor monitor A Indoor monitor B If Indoor monitor A is chosen when pressing the touch button a call is established to the this indoor monitor If None is...

Page 106: ...o activate an actuator For example assume that there are three external panels in the building complex and each one of them opens a different door when this button is selected the main area shows the...

Page 107: ...EN 105 40610 S SIP 7 video entryphone...

Page 108: ...ist This page shows the list of thumbnails of the images that can be used as a background for the Main screen There are six default images to choose from When passing the mouse over the default images...

Page 109: ...EN 107 40610 S SIP 7 video entryphone This action will zoom the image in a pop up window that allows to select the image as a background for the Main screen by clicking in the Set as background icon...

Page 110: ...arrows From this moment the selected image is visible as background in the Main screen This page also allows to upload custom images by clicking the Add images button Once the image has been selected...

Page 111: ...mages Up to 20 images can be uploaded and their size cannot exceed 8MB each As with the default images the custom ones can be set as background When passing the mouse over the custom images besides th...

Page 112: ...EN 110 40610 S SIP 7 video entryphone Notice that for uploading and removing images only this page can be used the display UI does not have this functionality...

Page 113: ...tion and the software update 9 5 1 Credentials This password is used for accessing the VoIP Networking Date Time Touch buttons and Factory reset screens as well as for accessing this web interface and...

Page 114: ...upload button becomes enabled and can be clicked A pop up appears indicating that the file is being uploaded After the file has been uploaded it is validated and then the proper update procedure star...

Page 115: ...up window and the device reboots Independently of the update results the device always reboots at the end of the process During the update procedure the display UI also shows a screen with the follow...

Page 116: ...ar and an OK icon with the text Update successful The system will reboot appears for 5 seconds in the screen before a reboot is performed If the update fails The spinner and previous text disappears a...

Page 117: ...EN 115 40610 S SIP 7 video entryphone After the device reboots the new software version can be seen in the Dashboard or in the About screen in the display UI...

Page 118: ...or for a multi device installation in which several devices with the same configuration have to be installed The Backup and restore page has four buttons The first three Backup Restore and Restart ar...

Page 119: ...ultiple devices date is the date when the backup is created in the format YYYYMMDD For example a backup file for a device with MAC address bc f8 11 06 54 created on March 17 2022 will have the name bc...

Page 120: ...rts and during this process several standard operations are disabled The display UI is disabled The SIP calls are disabled If the restore procedure finishes successfully a pop up window notifies the e...

Page 121: ...the configuration restore A moving spinner and the text Restoring configuration Please do not power off the device is displayed If the configuration restore is successful The spinner and previous text...

Page 122: ...r and previous text disappear and a Fail icon with the text Configuration restore failed appears for 5 seconds before restoring the normal operation Notice that for downloading and uploading the backu...

Page 123: ...121 40610 S SIP 7 video entryphone 9 5 4 Restart From this page the device can also be restarted After this button is pressed the device halts cleanly all its current operations and executes a restar...

Page 124: ...0610 S SIP 7 video entryphone 9 5 5 Factory reset The Factory Reset button can be found at the bottom of the Backup and restore page If this button is pressed a pop up window appears asking for a conf...

Page 125: ...erations that take place during this procedure are described in the Factory Reset section This procedure may take several minutes during which the device will be rebooted Afterwards the device first s...

Page 126: ...if the MAC address is 00 c0 08 99 ef 07 the hostname will be SM99ef07 10 2 Factory Reset This procedure can be executed from the display from the Web UI or from a touch button that is described later...

Page 127: ...EN 125 40610 S SIP 7 video entryphone...

Page 128: ...Viale Vicenza 14 36063 Marostica VI Italy www vimar com MU_EN_40610 S 00 2206...

Reviews: