background image

56

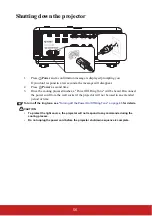
Shutting down the projector

1.

Press 

Power

 and a confirmation message is displayed prompting you. 

If you don't respond in a few seconds, the message will disappear.

2.

Press 

Power

 a second time.

3.

Once the cooling process finishes, a "Power Off Ring Tone" will be heard. Disconnect 
the power cord from the wall socket if the projector will not be used in an extended 
period of time.

To turn off the ring tone, see 

"Turning off the Power On/Off Ring Tone" on page 45

 for details.

CAUTION

To protect the light source, the projector will not respond to any commands during the 
cooling process.

Do not unplug the power cord before the projector shutdown sequence is complete.

Summary of Contents for LS800HD

Page 1: ...egistering your product for future service Warranty information contained in this User Guide will describe your limited coverage from ViewSonic Corporation which is also found on our web site at http ZZZ YLHZVRQLF FRP LQ QJOLVK RU LQ VSHFL F ODQJXDJHV XVLQJ WKH 5HJLRQDO VHOHFWLRQ box in the upper right corner of our website Antes de operar su equipo lea cu idadosamente las instrucciones en este ma...

Page 2: ...r more of the following measures y Reorient or relocate the receiving antenna y Increase the separation between the equipment and receiver y Connect the equipment into an outlet on a circuit different from that to which the receiver is connected y Consult the dealer or an experienced radio TV technician for help Warning RX DUH FDXWLRQHG WKDW FKDQJHV RU PRGL FDWLRQV QRW H SUHVVO DSSURYHG by the par...

Page 3: ...t consult an electrician for replacement of the obsolete outlet 10 Protect the power cord from being walked on or pinched particularly at plugs Convenience receptacles and the point where they exit from the unit Be sure that the power outlet is located near the unit so that it is easily accessible 2QO XVH DWWDFKPHQWV DFFHVVRULHV VSHFL HG E WKH PDQXIDFWXUHU 8VH RQO ZLWK WKH FDUW VWDQG WULSRG EUDFNH...

Page 4: ...d under the Annex III of the RoHS2 Directives as noted below Examples of exempted components are 1 0HUFXU LQ FROG FDWKRGH ÀXRUHVFHQW ODPSV DQG H WHUQDO HOHFWURGH ÀXRUHVFHQW lamps CCFL and EEFL for special purposes not exceeding per lamp 1 Short length 500 mm maximum 3 5 mg per lamp 2 Medium length 500 mm and 1 500 mm maximum 5 mg per lamp 3 Long length 1 500 mm maximum 13 mg per lamp 2 Lead in gla...

Page 5: ...ose without prior written permission from ViewSonic Corporation Product Registration To fulfill possible future product needs and to receive additional product information as it becomes available please visit your region section on ViewSonic s website to register your product online Registering your product will best prepare you for future customer service needs Please print this user guide and fi...

Page 6: ...osition using lens shift 33 Magnifying and searching for details 35 Selecting the aspect ratio 36 Optimizing the image 37 Setting the presentation timer 41 Hiding the image 42 Locking control keys 42 Operating in a high altitude environment 42 Using the CEC function 43 Using the 3D functions 43 Using the projector in standby mode 44 Adjusting the sound 44 RJ45 45 Preparing Email Alerts 50 RS232 by...

Page 7: ...t source press BLANK on the remote control 7 Do not place this product on an unstable cart stand or table The product may fall sustaining serious damage 8 Do not attempt to disassemble this projector There are dangerous high voltages inside which may cause death if you should come into contact with live parts Under no circumstances should you ever undo or remove any other covers Refer servicing on...

Page 8: ...on cable Safety instructions for ceiling mounting of the projector We want you to have a pleasant experience using your projector so we need to bring this safety matter to your attention to prevent damage to person and property If you intend to mount your projector on the ceiling we strongly recommend that you use a proper fitting projector ceiling mount kit and that you ensure it is securely and ...

Page 9: ...unless the instructions are closely followed This Laser Product is designated as Class 3R during all procedures of operation LASER LIGHT AVOID DIRECT EYE EXPOSURE Do not point laser or allow laser light to be directed or reflected toward other people or reflective objects Direct or scattered light can be hazardous to eyes and skin There is a potential hazard of eye exposure to laser radiation if t...

Page 10: ... 698 dur de impulsion 4 ms ée 1 3 GB 7247 1 2012 IEC EN 60825 1 2007 CLASS 1 LASER PRODUCT IEC EN 60825 1 2014 PRODUIT LASER DE CLASSE 1 IEC EN 60825 1 2014 1 1 1 2 Complies with FDA performance standards for laser products except for deviations pursuant to Laser Notice No 50 dated June 24 2007 LASER RADIATION AVOID DIRECT EYE EXPOSURE CLASS 3R LASER PRODUCT Emitted wavelength 450 460 nm Max Pulse...

Page 11: ... aperture location Be careful not to let the eye see the light directly Interlock switches This machine has 1 Top cover Interlock switches to protect the laser light Leakage Will power off the system individually when the top cover is removed DVHU DSHUWXUH ...

Page 12: ...ent projection purposes Selectable Smart Energy function One key auto adjustment to display the best picture quality Digital keystone correction to correct distorted images Adjustable color management control for data video display Ability to display 1 07 billion colors Multi language On Screen Display OSD menus Switchable normal and economic modes to reduce the power consumption Component HDTV co...

Page 13: ...0 USA 909 468 1240 ViewSonic Europe Ltd www viewsoniceurope com 1st Floor Salamanca Place 9 Albert Embankment London SE1 7SP United Kingdom 44 0 207 382 8251 United States 1 800 688 6688 service us viewsonic com Canada 1 866 463 4775 service ca viewsonic com Europe http www viewsoniceurope com eu support call desk ViewSonic China Limited www viewsonic com cn fservice_register Puerto Rico Virgin Is...

Page 14: ...socket 20 3D Sync port 21 Mini USB port 22 USB port 5V 1 5A out 23 Adjuster foot 24 Audio signal output socket 25 Mic input socket 26 Audio signal input socket 27 Audio signal input L R socket 28 Kensington lock Warning THIS APPARATUS MUST BE EARTHED When installing the unit incorporate a readily accessible disconnect device in the fixed wiring or connect the power plug to an easily accessible soc...

Page 15: ...om an angled projection 8 Enter Enacts the selected On Screen Display OSD menu item 9 Menu up Selects the desired menu items and makes adjustments Keystone key Manually corrects distorted images resulting from an angled projection 10 Menu down Selects the desired menu items and makes adjustments Keystone key Manually corrects distorted images resulting from an angled projection 11 Right Selects th...

Page 16: ...high 14 Light source indicator light Indicates the status of the light source Lights up or flashes when the light source has developed a problem 15 Power indicator light Lights up or flashes when the projector is under operation 16 Power Toggles the projector between standby mode and Power ON ...

Page 17: ... determines the best picture timings for the displayed image 7 Keystone keys Manually corrects distorted images resulting from an angled projection Left Right Up Down Selects the desired menu items and makes adjustments 8 Menu Turns on the On Screen Display OSD menu 9 Laser Emits a visible laser pointer beam which can be used during presentations 10 Aspect ratio Displays the aspect ratio selection...

Page 18: ...ngs up the Presentation Timer settings menu 17 Eco Mode ID Set Selects a light source mode 18 Pattern 0 Displays embedded test pattern 19 Power Off Turns the projector off 20 HDMI 2 Selects HDMI 2 source for display 21 Source Displays the source selection bar 22 Blank Hides the screen picture 23 Enter Enacts the selected On Screen Display OSD menu item 24 Exit Goes back to previous OSD menu exits ...

Page 19: ...to remind you to switch the code for the remote control Using the remote PgUp PgDn function The capability of operating your computer with the remote control gives you more flexibility when delivering presentations 1 Set the input signal to a PC signal 2 Connect the projector to your PC or notebook with a USB cable prior to using the remote control in place of your computer s mouse See Connecting ...

Page 20: ...equivalent type recommended by the battery manufacturer Dispose of the used batteries according to the manufacturer s instructions and local environment regulations for your region Never throw the batteries into a fire There may be danger of an explosion If the batteries are drained or if you will not be using the remote control for an extended period of time remove the batteries to avoid damage t...

Page 21: ...ct this location with the projector suspended upside down from the ceiling in front of the screen Purchase the projector ceiling mount kit from your dealer to mount your projector on the ceiling Set Front Ceiling in the SYSTEM Projector Position menu after you turn the projector on 3 Rear Ceiling Select this location with the projector suspended upside down from the ceiling behind the screen Note ...

Page 22: ...3 5 5 140 5 5 140 60 1524 60 1528 99 2524 29 747 6 6 168 6 6 168 70 1778 70 1782 116 2944 34 872 7 7 196 7 7 196 80 2032 80 2037 132 3365 39 996 8 8 224 8 8 224 90 2286 90 2291 149 3786 44 1121 9 9 252 9 9 252 100 2540 100 2546 166 4206 49 1245 11 0 280 11 0 280 110 2794 110 2800 182 4627 54 1370 12 1 308 12 1 308 120 3048 120 3055 199 5047 59 1494 13 2 336 13 2 336 130 3302 130 3310 215 5468 64 1...

Page 23: ... 80 2033 132 3359 39 994 8 8 224 8 8 224 98 2489 90 2290 149 3784 44 1120 9 9 252 9 9 252 109 2769 100 2547 166 4208 49 1246 11 0 280 11 0 280 120 3048 110 2804 182 4633 54 1372 12 2 309 12 2 309 131 3327 121 3061 199 5058 59 1497 13 3 337 13 3 337 142 3607 131 3318 216 5482 64 1623 14 4 365 14 4 365 153 3886 141 3575 233 5907 69 1749 15 5 393 15 5 393 163 4140 150 3809 248 6293 73 1863 16 5 419 1...

Page 24: ...6 673 4 0 101 4 0 101 60 1524 59 1486 97 2455 32 808 4 8 121 4 8 121 70 1778 68 1734 113 2865 37 942 5 6 141 5 6 141 80 2032 78 1982 129 3274 42 1077 6 4 162 6 4 162 90 2286 88 2229 145 3683 48 1212 7 2 182 7 2 182 100 2540 98 2477 161 4092 53 1346 7 9 202 7 9 202 110 2794 107 2725 177 4502 58 1481 8 7 222 8 7 222 120 3048 117 2972 193 4911 64 1615 9 5 242 9 5 242 130 3302 127 3220 209 5320 69 175...

Page 25: ... Vertical offset min max min max inch mm inch mm inch mm inch mm inch mm inch mm 54 1372 50 1262 82 2085 27 686 4 1 103 4 1 103 65 1651 60 1519 99 2510 33 826 4 9 124 4 9 124 76 1930 70 1776 116 2934 38 965 5 7 145 5 7 145 87 2210 80 2033 132 3359 44 1105 6 5 166 6 5 166 98 2489 90 2290 149 3784 49 1245 7 4 187 7 4 187 109 2769 100 2547 166 4208 55 1384 8 2 208 8 2 208 120 3048 110 2804 182 4633 6...

Page 26: ...nce only The rear connecting jacks available on the projector vary with each projector model For detailed connection methods see pages 22 25 1 VGA to DVI A cable 2 VGA cable 3 HDMI cable 4 RS232 cable 5 Audio cable 6 Video cable 7 Mini USB cable 8 USB power supply 5V 1 5A 9 Audio L R cable 10 Component Video to VGA D Sub adapter cable 11 3D IR glasses transmitter unit 12 Microphone 3 5 mini jack c...

Page 27: ...to DVI A cable and connect the DVI end of the cable to the DVI input socket of the video monitor 3 Connect the other end of the cable to the MONITOR OUT socket on the projector The MONITOR OUT output only works when COMPUTER IN connection is made to the projector To use this connection method when the projector is in standby mode turn on the Active VGA Out function under the SOURCE Standby Setting...

Page 28: ...o the stereo audio projector Connecting an HDMI device You should use an HDMI cable when making connection between the projector and HDMI devices 1 Take an HDMI cable and connect one end to the HDMI output port of the video device 2 Connect the other end of the cable to the HDMI input port on the projector In the unlikely event that you connect the projector to a DVD player via the projector s HDM...

Page 29: ... Take a VGA D Sub Component adaptor cable and connect the end with 3 RCA type connectors to the Component Video output sockets of the Video source device Match the color of the plugs to the color of the sockets green to green blue to blue and red to red 2 Connect the other end of the VGA D Sub Component adaptor cable with a D Sub type connector to the COMPUTER IN socket on the projector If the sel...

Page 30: ...connect separate amplified speakers to the AUDIO OUT socket of the projector If you have a separate sound system you will most likely want to connect the audio output of your Video source device to that sound system instead of to the audio projector Once connected the audio can be controlled by the projector On Screen Display OSD menus See Adjusting the sound on page 44 for details About the micro...

Page 31: ...4 If the projector is activated for the first time select your OSD language following the on screen instructions 5 Switch all of the connected equipment on 6 The projector will start to search for input signals The current input signal being scanned appears in the bottom right corner of the screen If the projector doesn t detect a valid signal the message No Signal will continue to be displayed un...

Page 32: ...time turned on after out of box language selection will pop out automatically 1 Press Menu to turn the OSD menu on 3 Press to highlight Language and press Enter Then press to select a preferred language 2 Use to highlight the SYSTEM menu 4 Press Exit twice to leave and save the settings The first press leads you back to the main menu and the second press closes the OSD menu Current input signal Ma...

Page 33: ...essing 4 As pictured to the right the four arrow keys respectively represent 4 digits 1 2 3 4 According to the password you desire to set press the arrow keys to enter six digits for the password 5 Confirm the new password by re entering the new password Once the password is set the OSD menu returns to the Security Settings page 6 To leave the OSD menu press Exit If you forget the password If the ...

Page 34: ...assword 4 Enter a new password 5 Confirm the new password by re entering the new password 6 You have successfully assigned a new password to the projector Remember to enter the new password next time the projector is started 7 To leave the OSD menu press Exit The digits being input will be displayed as asterisks on screen Do make a note of your password and then keep the note in a safe place for l...

Page 35: ...e distortion or loss of picture clarity See Selecting the aspect ratio on page 36 for details Changing HDMI input settings In the unlikely event that you connect the projector to a device like a DVD or Blu ray player via the projector s HDMI input and the projected picture displays wrong colors please change the color space to an appropriate one that fits the color space setting of the output devi...

Page 36: ... situation see Correcting keystone on page 34 for details Do not look into the lens while the light source is on The strong light from the light source may cause damage to your eyes Adjusting the vertical image position The vertical image height can be adjusted around 14 7 for 1080P and 12 for WUXGA of offset position Note that the maximum vertical image height adjustment can be limited by the hor...

Page 37: ...mum horizontal image height adjustment can be limited by the vertical image position For example it is not possible to achieve the maximum horizontal image position if the vertical image position is at maximum Please consult the Shift Range diagram below for further clarification Signal Offset A Lens Shift V B Lens Shift H C 1080P 45 14 7 5 WUXGA 30 12 5 Lens Shift Range Diagram ...

Page 38: ...ound and lightly press the knob to rotate back Auto adjusting the image In some cases you may need to optimize the picture quality To do this press Auto Sync on the remote control Within 5 seconds the built in Intelligent Auto Adjustment function will re adjust the values of Frequency and Clock to provide the best picture quality The current source information will be displayed in the upper left c...

Page 39: ...t the bottom of the image 3 Press to correct keystoning at the right of the image Press to correct keystoning at the left of the image Using the OSD menu 1 Open the OSD menu and go to the DISPLAY Keystone menu 2 Press Enter The Keystone correction page is displayed 3 Press to correct keystoning at the top of the image or press to correct keystoning at the bottom of the image 4 Press to correct key...

Page 40: ...ind the details on the projected picture magnify the picture Use the direction arrow keys for navigating the picture Using the remote control Press remote control and for screen zoom in or zoom out Using the OSD menu 1 Open the OSD menu and go to the DISPLAY Zoom menu 2 Press Enter The Zoom bar is displayed 3 To navigate the picture press Enter to switch to the paning mode and press the directiona...

Page 41: ...e displayed on those unused black areas 1 Auto Scales an image proportionally to fit the projector s native resolution in its horizontal width This is suitable for the incoming image which is neither in 4 3 nor 16 9 and you want to make most use of the screen without altering the image s aspect ratio 2 4 3 Scales an image so that it is displayed in the center of the screen with a 4 3 aspect ratio ...

Page 42: ...operation mode that suits your need you can follow one of the following steps Press Color Mode on the remote control until your desired mode is selected Go to the IMAGE Color Mode menu and press to select a desired mode Picture modes for different types of signals The picture modes available for different types of signals are listed below 1 Brightest mode Maximizes the brightness of the projected ...

Page 43: ...ker the image Adjust this control so the black areas of the image appear just as black and that detail in the dark areas is visible Adjusting Contrast Go to the IMAGE Contrast menu and press The higher the value the greater the contrast Use this to set the peak white level after you have previously adjusted the Brightness setting to suit your selected input and viewing environment Adjusting Color ...

Page 44: ...al is selected Selecting a gamma setting Go to the IMAGE ADVANCED Gamma menu and select a preferred setting by pressing Gamma refers to the relationship between input source and picture brightness Selecting a Color Temperature Go to the IMAGE Color Temp menu and press The options available for color temperature settings vary according to the signal type selected 1 Cool With the highest color tempe...

Page 45: ...ent colors Please refer to the illustration to the right for how the colors relate to each other For example if you select Red and set its range at 0 only pure red in the projected picture will be selected Increasing its range will include red close to yellow and red close to magenta 5 Press to highlight Saturation and adjust its values to your preference by pressing Every adjustment made will ref...

Page 46: ...ant to activate sound reminder by pressing If you select On a double beep sound will be heard at the last 30 seconds of counting down up and a triple beep sound will be produced when the timer is up 8 To activate the presentation timer press and press to highlight Start Counting and press Enter 9 A confirmation message displays Highlight Yes and press Enter to confirm You will see the message Time...

Page 47: ...still functional when panel key lock is enabled If you press Power to turn off the projector without disabling panel key lock the projector will still be in locked status the next time it is turned on Operating in a high altitude environment We recommend you use the High Altitude Mode when your environment is between 1500 m 3000 m above sea level and temperature is between 5 C 25 C CAUTION Do not ...

Page 48: ...on may not work Using the 3D functions This projector features 3D function which enables you to enjoy 3D movies videos and sporting events in a more realistic way by presenting the depth of the images You need to wear a pair of 3D glasses to view 3D images If the 3D signal is input from an HDMI 1 4a compatible device the projector detects the signal for 3D Sync information and once detected it pro...

Page 49: ...ugh function When switch On Standby Settings mode will change to Normal Audio Pass Through Select Audio Pass Through from Audio in Audio L R or Disable this function When switch On Standby Settings mode will change to Normal Adjusting the sound The sound adjustments made as below will have an effect on the projector speaker Be sure you have made a correct connection to the projector audio input ou...

Page 50: ...ity with Crestron AMX Device Discovery Extron control boxes enables not only collective projector management on a network but also management from a control panel on a PC or Laptop browser screen Crestron is a registered trademark of Crestron Electronics Inc of the United States Extron is a registered trademark of Extron Electronics Inc of the United States AMX is a registered trademark of AMX LLC...

Page 51: ...n about the diverse types of external devices which can be connected to the LAN RJ45 port and remote control the projector as well as the related control commands supporting for each external device kindly please get contact with the Support Service team directly LAN_RJ45 1 Connect an RJ45 cable to RJ45 ports on the projector and the PC Laptop 2 On the PC Laptop select Start Control Panel Network ...

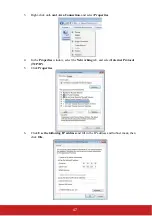
Page 52: ...onnection and select Properties 4 In the Properties window select the Networking tab and select Internet Protocol TCP IP 5 Click Properties 6 Click Use the following IP address and fill in the IP address and Subnet mask then click OK ...

Page 53: ...10 10 10 10 Subnet Mask 255 255 255 0 Gateway 0 0 0 0 DNS Server 0 0 0 0 10 Press ENTER to confirm settings Open a web browser for example Microsoft Internet Explorer with Adobe Flash Player 9 0 or higher 11 In the Address bar input the IP address 10 10 10 10 12 Press ENTER The projector is setup for remote management The LAN RJ45 function displays as follows ...

Page 54: ...trol IP Address 15 IP ID 3 Port 5 Projector Projector Name 10 Location 10 Assigned To 10 Network Configuration DHCP Enabled N A IP Address 15 Subnet Mask 15 Default Gateway 15 DNS Server 15 User Password Enabled N A New Password 10 Confirm 10 Admin Password Enabled N A New Password 10 Confirm 10 ...

Page 55: ...re that user can access the homepage of LAN RJ45 function by web browser for ex ample Microsoft Internet Explorer v6 01 v8 0 2 From the Homepage of LAN RJ45 click Alert Settings 3 By default these input boxes in Alert Settings are blank ...

Page 56: ...f the alert to the specified email address This is an optional field for example the projector administrator s assistant The From field is the sender s email address for example the projector administrator This is a required field Select the alert conditions by checking the desired boxes Fill in all fields as specified User can click Send Test Mail to test what setting is correct For successful se...

Page 57: ...AN RJ45 interface Quick Start Guide for RS232 by TELNET 1 Check and get the IP Address on OSD of the projector 2 Make sure that laptop PC can access the web page of the projector 3 Make sure that Windows Firewall setting to be disabled in case of TELNET function filtering out by laptop PC 4 Start All Programs Accessories Command Prompt 5 Input the command format like the below telnet ttt xxx yyy z...

Page 58: ...53 ttt xxx yyy zzz IP Address of the projector If Telnet Connection ready and user can have RS232 command input then Enter key pressed the RS232 command will be workable ...

Page 59: ...lt installation for Windows VISTA 7 8 10 TELNET function is not included But end user can have it by way of Turn Windows features On or Off to be enabled 1 Open Control Panel in Windows VISTA 7 8 10 2 Open Programs 3 Select Turn Windows features on or off to open ...

Page 60: ...y Close Windows Telnet utility directly after TELNET connection ready Limitation 1 for Telnet Control there is less than 50 bytes for successive network payload for Telnet Control application Limitation 2 for Telnet Control there is less than 26 bytes for one complete RS232 command for Telnet Control Limitation 3 for Telnet Control Minimum delay for next RS232 command must be more than 200 ms In W...

Page 61: ... a Power Off Ring Tone will be heard Disconnect the power cord from the wall socket if the projector will not be used in an extended period of time To turn off the ring tone see Turning off the Power On Off Ring Tone on page 45 for details CAUTION To protect the light source the projector will not respond to any commands during the cooling process Do not unplug the power cord before the projector ...

Page 62: ...oard Aspect Ratio Auto 4 3 16 9 16 10 Native 2 35 1 Keystone Vertical Horizontal Corner Adj Top Right Top Left Bottom Right Bottom Left Position Phase H Size Zoom OverScan Off 1 2 3 4 5 3X Fast Input Inactive Active 2 IMAGE Color Mode Brightest Presentation Standard Photo Movie Brightness Contrast Color Temp Warm Normal Cool Red Gain Green Gain Blue Gain Red Offset Green Offset Blue Offset ADVANCE...

Page 63: ...gh Off Audio in Audio L R 4 BASIC Audio Settings Mute On Off Audio Volume 0 20 Microphone On Off Microphone Volume 0 10 Power On Off Ring Tone On Off Presentation Timer Timer Period 1 240 min 1 2 3 4 5 10 15 20 60 240 Timer Display Always 1 min 2 min 3 min Never Timer Position Top Left Bottom Left Top Right Bottom Right Timer Counting Direction Count Down Count Up Sound Reminder On Off Start Count...

Page 64: ...Control Apply AMX Device Discovery On Off Control 4 On Off HDBaseT On Off RS232 Settings Baud Rate 2400 4800 9600 14400 19200 38400 57600 115200 Channel Local HDBaseT Remote Sensor All Front Top Off Light Source Settings Light Source Mode Normal Eco Custom Light Source Power 20 100 Reset Light Source Hours Reset Cancel Light Source Hours Normal Eco Custom Closed Caption Closed caption Enable On Of...

Page 65: ...nu Position Center Top Left Top Right Bottom Left Bottom Right High Altitude Mode Off On Quick Auto Search Off On Security Settings Change Password Power on Lock Off On Panel Key Lock Off On Remote Control Code 1 2 3 4 5 6 7 8 7 INFORMAT ION Current System Status Source Color Mode Resolution Color System IP Address MAC Address Light Source Usage Firmware Version S N Main menu Sub menu Options ...

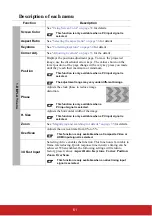
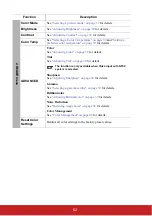
Page 66: ...is selected The adjustment range may vary under different timings Phase Adjusts the clock phase to reduce image distortion This function is only available when a PC input signal is selected H Size Adjusts the horizontal width of the image This function is only available when a PC input signal is selected Zoom See Magnifying and searching for details on page 35 for details OverScan Adjusts the over...

Page 67: ...n page 38 for details Tint See Adjusting Tint on page 38 for details The function is only available when Video input with NTSC system is selected Sharpness See Adjusting Sharpness on page 38 for details Gamma See Selecting a gamma setting on page 39 for details Brilliantcolor See Adjusting Brilliantcolor on page 39 for details Noise Reduction See Reducing image noise on page 39 for details Color M...

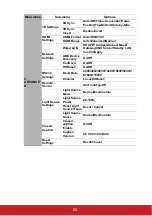
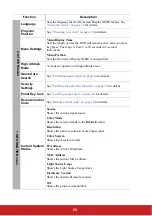
Page 68: ...n page 68 for details Power Saving See Setting Power Saving on page 69 for details Standby Settings See Using the projector in standby mode on page 44 for details 4 BASIC menu Audio Settings See Adjusting the sound on page 44 for details Presentation Timer See Setting the presentation timer on page 41 for details Blank Timer See Hiding the image on page 42 for details Message Selecting On displays...

Page 69: ...the function is on The Gateway address will auto display here or you need to enter it value by yourself DNS Server If has DHCP server and the function is on The DNS Server address will auto display here or you need to enter it value by yourself Standby LAN Control When switch on standby mode change to Network Standby or Normal Apply Press ENTER to confirm settings AMX Device Discovery When AMX Dev...

Page 70: ...s of the projected picture Light Source Power Only available when light source mode is under Custom Reset Light Source Hours Service center shall reset light source hour after change light source parts Light Source Hours Display light source usage hours Closed Caption Caption Version Selects a preferred closed captioning mode To view captions select CC1 CC2 CC3 or CC4 CC1 displays captions in the ...

Page 71: ...t signal on page 30 for details Security Settings See Utilizing the password function on page 28 for details Panel Key Lock See Locking control keys on page 42 for details Remote Control Code See Remote control code on page 14 for details 7 INFORMATION menu Current System Status Source Shows the current signal source Color Mode Shows the selected mode in the IMAGE menu Resolution Shows the native ...

Page 72: ...wn the projector on page 56 and unplug the power cord To remove dirt or dust wipe the case with a soft lint free cloth To remove stubborn dirt or stains moisten a soft cloth with water and a neutral pH detergent Then wipe the case CAUTION Never use wax alcohol benzene thinner or other chemical detergents These can damage the case Storing the projector If you need to store the projector for an exte...

Page 73: ...riod of time once no input source is detected to prevent unnecessary waste of light source life 1 Open the OSD menu and go to the POWER MANAGEMENT Smart Energy menu 2 Press Enter and the Smart Energy page is displayed 3 Highlight Auto Power Off and press 4 If the preset time lengths are not suitable for your need select Disable The projector will not automatically shut down in a certain time perio...

Page 74: ...ther decide if you would like the projector to turn off automatically after a set period of time 1 Open the OSD menu and go to the POWER MANAGEMENT Smart Energy menu 2 Press Enter and the Smart Energy page is displayed 3 Highlight Power Saving and press 4 When Enable is selected the projector light source will be changed to Eco mode after no signal is detected for 5 minutes ...

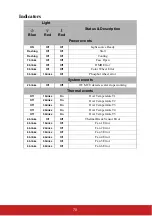
Page 75: ...blinks Off Off 1W MCU detects scaler stops working Thermal events Off 1 blinks On Over Temperature T1 Off 2 blinks On Over Temperature T2 Off 3 blinks On Over Temperature T3 Off 4 blinks On Over Temperature T4 Off 5 blinks On Over Temperature T5 4 blinks Off Off Thermal Break Sensor Error 6 blinks 1 blinks Off Fan 1 Error 6 blinks 2 blinks Off Fan 2 Error 6 blinks 3 blinks Off Fan 3 Error 6 blinks...

Page 76: ... connected to the input signal device Check the connection The input signal has not been correctly selected Select the correct input signal with the Source key on the projector or remote control Cause Remedy The projection lens is not correctly focused Adjust the focus of the lens using the focus ring The projector and the screen are not aligned properly Adjust the projection angle and direction a...

Page 77: ...nical Weight 11 Kg 24 25 lbs Input terminal Computer input RGB input D Sub 15 pin female x 1 Video signal input VIDEO RCA jack x 1 SD HDTV signal input Analog D Sub Component RCA jack x 3 through RGB input Digital HDMI V1 4a x 3 Audio signal input Audio in jack x 1 Audio in jack L R in x 1 Mic In Audio jack x 1 3D Sync x 1 HDbaseT RJ45 x 1 HDMI input x 3 Output terminal Audio signal output Audio j...

Page 78: ...ating altitude 0 1499 m at 5 C 35 C 1500 3000 m at 5 C 25 C with High Altitude Mode on Storage temperature 10 C to 60 C Storage humidity 10 to 85 Non Condensing Storage altitude 30 C 0 to 12200m above sea level 169 0mm 6 7 146 1mm 5 8 161 1mm 6 3 360 00mm 14 2 442 50mm 17 4 452 00mm 17 8 440 00mm 17 3 135 00mm 5 3 135 00mm 5 3 130 00mm 5 1 160 00mm 6 3 Ceiling mount screws M4 x 12 Max L 12 mm Unit...

Page 79: ...4 4 3 75 WXGA 1280 x 768 15 9 60 1280 x 800 16 10 60 75 85 1360 x 768 16 9 60 Quad VGA 1280 x 960 4 3 60 85 SXGA 1280 x 1024 5 4 60 SXGA 1400 x 1050 4 3 60 WXGA 1440 x 900 16 10 60 UXGA 1600 x 1200 4 3 60 WSXGA 1680 x 1050 16 10 60 HD 1280 x 720 16 9 60 MAC 13 640 x 480 4 3 67 MAC 16 832 x 624 4 3 75 MAC 19 1024 x 768 4 3 75 MAC 21 1152 x 870 4 3 75 HDTV 1080p 1920 x 1080 16 9 60 ...

Page 80: ...360 x 768 16 9 60 Quad VGA 1280 x 960 4 3 60 SXGA 1280 x 1024 5 4 60 SXGA 1400 x 1050 4 3 60 WXGA 1440 x 900 16 10 60 WSXGA 1680 x 1050 16 10 60 HDTV 1080p 1920 x 1080 16 9 50 60 HDTV 1080i 1920 x 1080 16 9 50 60 HDTV 720p 1280 x 720 16 9 50 60 SDTV 480p 720 x 480 4 3 16 9 60 SDTV 576p 720 x 576 4 3 16 9 50 SDTV 480i 720 x 480 4 3 16 9 60 SDTV 576i 720 x 576 4 3 16 9 50 ...

Page 81: ...Bottom and Frame Sequential formats 120 Hz signals are supported for Frame Sequential format only Video signal SDTV 480i is supported for Frame Sequential format only HDMI 3D In Frame packing format Signal Resolution dots Aspect Ratio Refresh Rate Hz 1080p 1920 x 1080 16 9 23 98 24 720p 1280 x 720 16 9 50 59 94 60 In Side by side format Signal Resolution dots Aspect Ratio Refresh Rate Hz 1080i 192...

Page 82: ...50 60 HDTV 1080i 1920 x 1080 16 9 50 60 HDTV 720p 1280 x 720 16 9 50 60 SDTV 480p 720 x 480 4 3 16 9 60 SDTV 576p 720 x 576 4 3 16 9 50 SDTV 480i 720 x 480 4 3 16 9 60 SDTV 576i 720 x 576 4 3 16 9 50 Composite video Signal Aspect Ratio Refresh Rate Hz NTSC 4 3 60 PAL 4 3 50 PAL60 4 3 60 SECAM 4 3 50 ...

Page 83: ... Disclaimer ViewSonic Corporation makes no representations or warranties either expressed or implied with respect to the contents hereof and specifically disclaims any warranties merchantability or fitness for any particular purpose Further ViewSonic Corporation reserves the right to revise this publication and to make changes from time to time in the contents hereof without obligation to notify a...

Page 84: ...3 F4 0E F1 Enter NEC X3 F4 15 EA Right H keystone NEC X3 F4 0F F0 Menu NEC X3 F4 30 CF Down V keystone NEC X3 F4 0C F3 Exit NEC X3 F4 28 D7 Information NEC X3 F4 97 68 Aspect ratio NEC X3 F4 13 EC Help NEC X3 F4 21 DE PgUp ID 1 NEC X3 F4 06 F9 Volume ID 2 NEC X3 F4 82 7D Zoom ID 3 NEC X3 F4 67 98 PgDn ID 4 NEC X3 F4 05 FA Volume ID5 NEC X3 F4 83 7C Zoom ID 6 NEC X3 F4 68 97 Presentation Timer ID 7...

Page 85: ...When select HDBaseT for RS232 control channel change Baud rate to 9600 Pin Description Pin Description 1 NC 2 RX 3 TX 4 NC 5 GND 6 NC 7 RTSZ 8 CTSZ 9 NC RS 232 protocol Baud Rate 115200 bps default Data Length 8 bit Parity Check None Stop Bit 1 bit Flow Control None ...

Page 86: ... 0x05 0x00 0x34 0x00 0x00 0x11 0x0A 0x68 Quick Power Off Write OFF 0x06 0x14 0x00 0x04 0x00 0x34 0x11 0x0B 0x00 0x68 ON 0x06 0x14 0x00 0x04 0x00 0x34 0x11 0x0B 0x01 0x69 Read Status 0x07 0x14 0x00 0x05 0x00 0x34 0x00 0x00 0x11 0x0B 0x69 High Altitude Mode Write OFF 0x06 0x14 0x00 0x04 0x00 0x34 0x11 0x0C 0x00 0x69 ON 0x06 0x14 0x00 0x04 0x00 0x34 0x11 0x0C 0x01 0x6A Read Status 0x07 0x14 0x00 0x05...

Page 87: ...0x06 0x14 0x00 0x04 0x00 0x34 0x12 0x20 0x04 0x82 Side by Side 0x06 0x14 0x00 0x04 0x00 0x34 0x12 0x20 0x05 0x83 Read Status 0x07 0x14 0x00 0x05 0x00 0x34 0x00 0x00 0x12 0x20 0x7F 3D Sync Invert Write OFF 0x06 0x14 0x00 0x04 0x00 0x34 0x12 0x21 0x00 0x7F ON 0x06 0x14 0x00 0x04 0x00 0x34 0x12 0x21 0x01 0x80 Read Status 0x07 0x14 0x00 0x05 0x00 0x34 0x00 0x00 0x12 0x21 0x80 Contrast Write Decrease 0...

Page 88: ... 0x14 0x00 0x04 0x00 0x34 0x12 0x06 0x00 0x64 Read Get Value 0x07 0x14 0x00 0x05 0x00 0x34 0x00 0x00 0x12 0x06 0x65 Vertical position Write Shift Up 0x06 0x14 0x00 0x04 0x00 0x34 0x12 0x07 0x00 0x65 Shift Down 0x06 0x14 0x00 0x04 0x00 0x34 0x12 0x07 0x01 0x66 Read Get Value 0x07 0x14 0x00 0x05 0x00 0x34 0x00 0x00 0x12 0x07 0x66 Color temperature Write Warm 0x06 0x14 0x00 0x04 0x00 0x34 0x12 0x08 0...

Page 89: ... 0x14 0x00 0x04 0x00 0x34 0x12 0x0B 0x14 0x7D Read Status 0x07 0x14 0x00 0x05 0x00 0x34 0x00 0x00 0x12 0x0B 0x6A Primary Color Write R 0x06 0x14 0x00 0x04 0x00 0x34 0x12 0x10 0x00 0x6E G 0x06 0x14 0x00 0x04 0x00 0x34 0x12 0x10 0x01 0x6F B 0x06 0x14 0x00 0x04 0x00 0x34 0x12 0x10 0x02 0x70 C 0x06 0x14 0x00 0x04 0x00 0x34 0x12 0x10 0x03 0x71 M 0x06 0x14 0x00 0x04 0x00 0x34 0x12 0x10 0x04 0x72 Y 0x06 ...

Page 90: ...0x14 0x00 0x04 0x00 0x34 0x13 0x00 0x01 0x60 OFF 0x06 0x14 0x00 0x04 0x00 0x34 0x13 0x00 0x00 0x5F Read Status 0x07 0x14 0x00 0x05 0x00 0x34 0x00 0x00 0x13 0x00 0x60 Source input Write D Sub Comp 0x06 0x14 0x00 0x04 0x00 0x34 0x13 0x01 0x00 0x60 HDMI 1 0x06 0x14 0x00 0x04 0x00 0x34 0x13 0x01 0x03 0x63 HDMI 2 0x06 0x14 0x00 0x04 0x00 0x34 0x13 0x01 0x07 0x67 HDMI 3 0x06 0x14 0x00 0x04 0x00 0x34 0x1...

Page 91: ...x14 0x00 0x04 0x00 0x34 0x15 0x00 0x00 0x61 0x06 0x14 0x00 0x04 0x00 0x34 0x15 0x00 0x01 0x62 0x06 0x14 0x00 0x04 0x00 0x34 0x15 0x00 0x02 0x63 0x06 0x14 0x00 0x04 0x00 0x34 0x15 0x00 0x03 0x64 0x06 0x14 0x00 0x04 0x00 0x34 0x15 0x00 0x04 0x65 0x06 0x14 0x00 0x04 0x00 0x34 0x15 0x00 0x05 0x66 0x06 0x14 0x00 0x04 0x00 0x34 0x15 0x00 0x06 0x67 0x06 0x14 0x00 0x04 0x00 0x34 0x15 0x00 0x07 0x68 0x06 0...

Page 92: ...0x00 0x15 0x00 0x62 Light Source Hours Reset Write Reset to ZERO 0x06 0x14 0x00 0x04 0x00 0x34 0x15 0x01 0x00 0x62 Read Get Usage Time 0x07 0x14 0x00 0x05 0x00 0x34 0x00 0x00 0x15 0x01 0x63 HDMI Format Write RGB 0x06 0x14 0x00 0x04 0x00 0x34 0x11 0x28 0x00 0x85 YUV 0x06 0x14 0x00 0x04 0x00 0x34 0x11 0x28 0x01 0x86 Auto 0x06 0x14 0x00 0x04 0x00 0x34 0x11 0x28 0x02 0x87 Read Status 0x07 0x14 0x00 0x...

Page 93: ...0x00 0x04 0x00 0x34 0x12 0x0F 0x05 0x72 Color 6 0x06 0x14 0x00 0x04 0x00 0x34 0x12 0x0F 0x06 0x73 Color 7 0x06 0x14 0x00 0x04 0x00 0x34 0x12 0x0F 0x07 0x74 Color 8 0x06 0x14 0x00 0x04 0x00 0x34 0x12 0x0F 0x08 0x75 Color 9 0x06 0x14 0x00 0x04 0x00 0x34 0x12 0x0F 0x09 0x76 Color 10 0x06 0x14 0x00 0x04 0x00 0x34 0x12 0x0F 0x0A 0x77 Read Status 0x07 0x14 0x00 0x05 0x00 0x34 0x00 0x00 0x12 0x0F 0x6E Re...

Page 94: ...0x02 0x91 Whiteboard 0x06 0x14 0x00 0x04 0x00 0x34 0x11 0x32 0x03 0x92 Read Status 0x07 0x14 0x00 0x05 0x00 0x34 0x00 0x00 0x11 0x32 0x90 Over Scan Write OFF 0x06 0x14 0x00 0x04 0x00 0x34 0x11 0x33 0x00 0x90 Value 1 0x06 0x14 0x00 0x04 0x00 0x34 0x11 0x33 0x01 0x91 Value 2 0x06 0x14 0x00 0x04 0x00 0x34 0x11 0x33 0x02 0x92 Value 3 0x06 0x14 0x00 0x04 0x00 0x34 0x11 0x33 0x03 0x93 Value 4 0x06 0x14 ...

Page 95: ...tom 0x02 0x14 0x00 0x04 0x00 0x34 0x02 0x04 0x0C 0x5E Left 0x02 0x14 0x00 0x04 0x00 0x34 0x02 0x04 0x0D 0x5F Right 0x02 0x14 0x00 0x04 0x00 0x34 0x02 0x04 0x0E 0x60 Source 0x02 0x14 0x00 0x04 0x00 0x34 0x02 0x04 0x04 0x56 Enter 0x02 0x14 0x00 0x04 0x00 0x34 0x02 0x04 0x15 0x67 Auto 0x02 0x14 0x00 0x04 0x00 0x34 0x02 0x04 0x08 0x5A AMX Write AMX response AMX Function Type Action Command ...

Page 96: ...59 service in viewsonic com Korea ap viewsonic com kr T 080 333 2131 service kr viewsonic com Latin America www viewsonic com la C http www viewsonic com la soporte servicio tecnico soporte viewsonic com Macau www hk viewsonic com T 853 2840 3687 service hk viewsonic com Middle East ap viewsonic com me Contact your reseller service ap viewsonic com Puerto Rico Virgin Islands www viewsonic com T 1 ...

Page 97: ...ding the lamp one 1 year for labor and ninety 90 days IRU WKH RULJLQDO ODPS IURP WKH GDWH RI WKH UVW FRQVXPHU SXUFKDVH Other regions or countries Please check with your local dealer or local ViewSonic RI FH IRU WKH ZDUUDQW LQIRUPDWLRQ DPS ZDUUDQW VXEMHFW WR WHUPV DQG FRQGLWLRQV YHUL FDWLRQ DQG DSSURYDO SSOLHV WR manufacturer s installed lamp only All accessory lamps purchased separately are warran...

Page 98: ...ages based XSRQ LQFRQYHQLHQFH ORVV RI XVH RI WKH SURGXFW ORVV RI WLPH ORVV RI SUR WV ORVV RI business opportunity loss of goodwill interference with business relationships or other commercial loss even if advised of the possibility of such damages 2 Any other damages whether incidental consequential or otherwise 3 Any claim against the customer by any other party Effect of local law 7KLV ZDUUDQW J...

Page 99: ...ges How to get service For information about receiving service under warranty contact ViewSonic Customer Support Please refer to the attached Customer Support page You will need to provide your product s serial number so please record the product information in the space provided below on your purchase for your future use Please retain your receipt of proof of purchase to support your warranty cla...

Page 100: ...6954 E Mail Cefeo soluglobales com Cuernavaca Compusupport de Cuernavaca SA de CV Francisco Leyva 178 Col Miguel Hidalgo C P 62040 Cuernavaca Morelos Tel 01 777 3180579 01 777 3124014 E Mail aquevedo compusupportcva com Distrito Federal QPLUS S A de C V Av Coyoacán 931 Col Del Valle 03100 México D F Tel 01 52 55 50 00 27 35 E Mail gacosta qplus com mx Guadalajara Jal SERVICRECE S A de C V Av Niños...

Page 101: ......

Reviews: