94
Osprey-300 User’s Guide
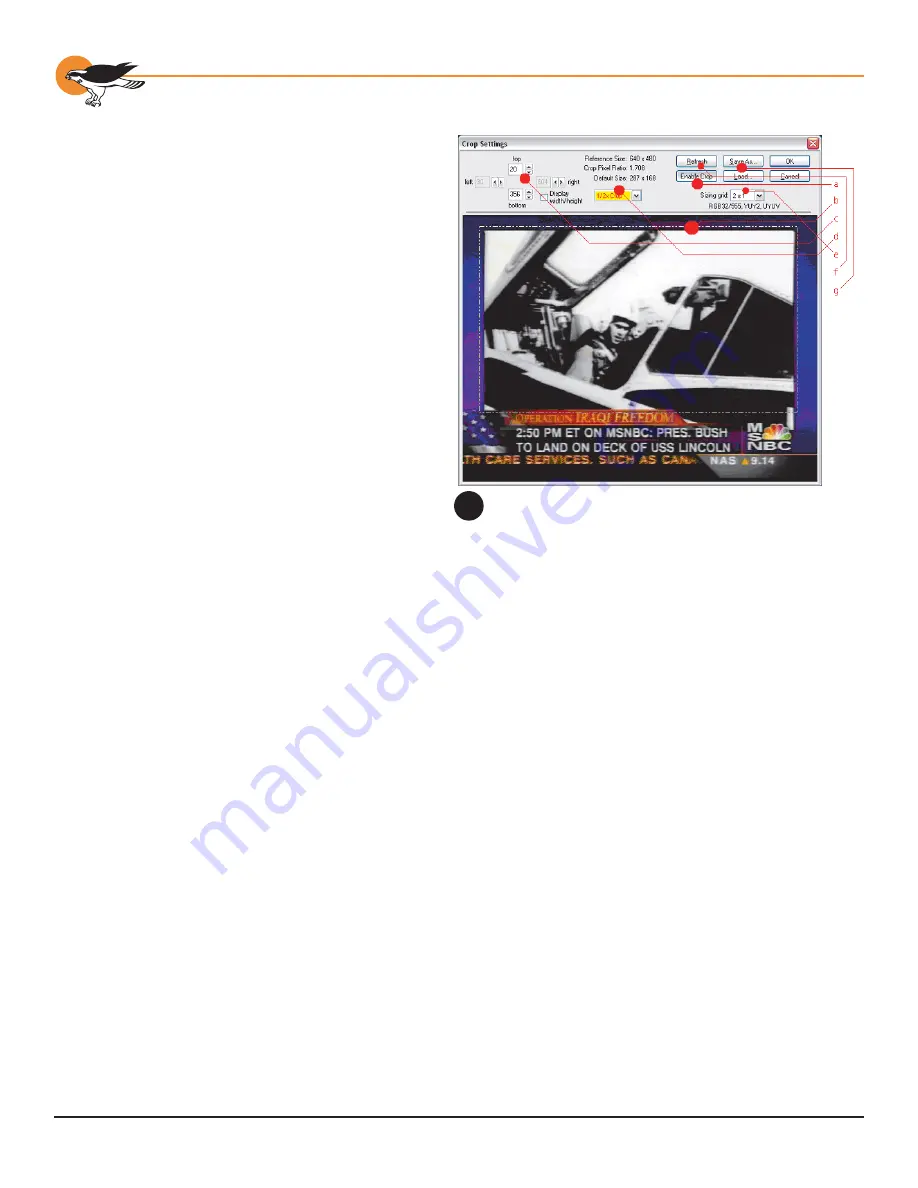
4. The output size, which is the fi nal size
of the captured video, can be 1X, 1/2X,
or 1/4X the crop size (6d). There
is also an entry in this drop box by
which you can set a custom size.
5. The sizing grid sets the granularity of your
crop width settings (6e). For example, if
you are capturing in YVU9 format, crop
width must divide evenly by 16 and crop
height must divide evenly by 4. Setting
the sizing grid to 16x4 ensures that
your crop settings will be correct for
the capture format. The text line below
the drop list shows which color formats
your selected granularity applies to.
6. Click Refresh to update the image
from the video source (6f).
7. Save As… and Load… allow you to save
multiple crop specifi cations for future
reference (6g). Note that there are
minimum values for crop size and output
size; SwiftCap will reject smaller values.
Also, you cannot specify an output size
that is larger than the crop size.
Other Features
Logo setup: SwiftCap has the menu item
Settings -> Logo Settings… . This selection
directly accesses the driver’s logo property
page; for details, refer to the driver properties
description. There is also a Settings -> Logo
Enable control to directly turn the logo on or off.
Accessing driver properties: Click the circuit
board icon on the toolbar.
NOTE: If you use the driver’s “Size and Crop”
or “Logo” property pages, you will not have the
option of saving different settings for capture
and preview. The Pin Select radio buttons will be
greyed out and forced to the “Both” position.
Cpu meter: Turn on via the menu item View ->
CPU Meter.
Load and save configuration: These two buttons
enable you to save SwiftCap settings for future
use.
Limitations and Peculiarities of SwiftCap
• The current version of SwiftCap does not
capture or display closed captions.
The Crop Settings dialog
6
Summary of Contents for Osprey-300
Page 1: ...Osprey 300 User s Guide...