background image


17 

Distance Testing 

 
The ‘Distance’ selection will test the performance of your vehicle to any distance that 
you desire (feet or meters).  
 
To begin testing: 
 
If you haven’t selected your test criteria, then do Step 1) and Step 2). If you have 
previously selected your criteria, then proceed to Step 2). 
 
Step 1) 
 
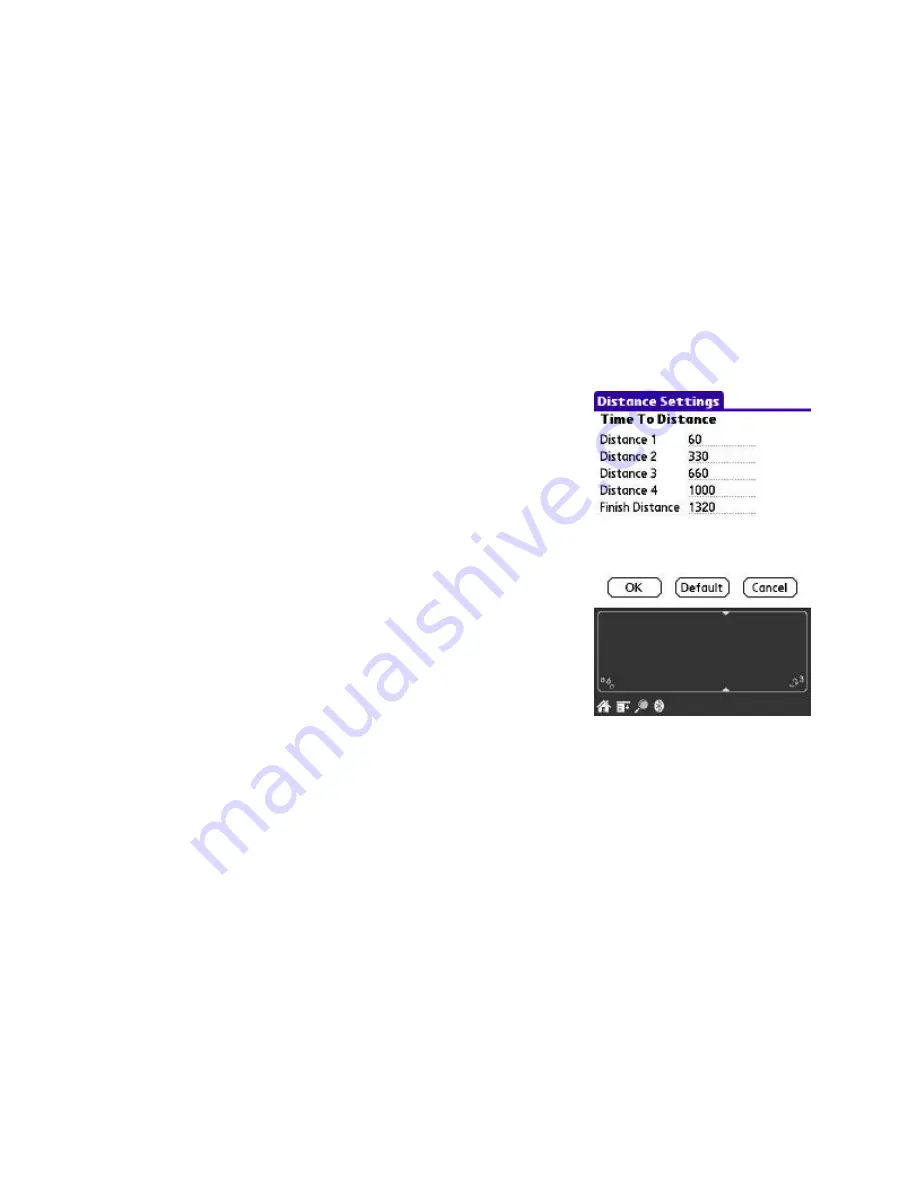
From the 'Home' menu, select the Palm menu icon, the ‘Settings’, and then ‘Time To 
Distance.’ See Figure 6 . 
 
You may change any of the selections in Figure 10.  
 
Note: This test uses the Start_G, Start_Speed, 
Start_Distance, and Time_out values shown in Figure 10. It 
is recommended that you not enter a Start_G value of less 
than 0.30g unless you are having trouble getting the test to 
start on initial acceleration. See Appendix 1 for a Trouble 
Shooting guide. See Appendix 3 for a Distance Testing 
flow chart. 
 

Figure 10 

Summary of Contents for G-Analyst

Page 1: ...g Analyst Owner s Manual Version 1 0 11 27 2006 Copyright 2006 Valentine Research...

Page 2: ...ool to measure performance and safety characteristics of a given vehicle Use it for that purpose only Please wear your seat belt at all times Valentine Research reserves the right to make changes to t...

Page 3: ...damages of how long an implied warranty lasts so the above limitations or exclusions may not apply to you This warranty gives you specific rights You may have other legal rights which may vary from st...

Page 4: ...ided to you by Hamilton Performance Electronics C Meaning of You If the person installing or using this software is an individual using it for his or her own purposes you means the person installing o...

Page 5: ...icable copyright or other intellectual property laws and treaties This EULA grants no rights to use such content All rights not expressly granted are reserved by Hamilton Performance Electronics and o...

Page 6: ...formance Electronics with a copy of your receipt This limited warranty is void if failure of the Software Product has resulted from accident abuse or misapplication Any replacement Software Product wi...

Page 7: ...Further you will indemnify defend and hold harmless Hamilton Performance Electronics and its equityholders managers officers employees and agents from and against any and all third party damages loss...

Page 8: ...on 3 The PalmOS Bluetooth connection wizard will launch select nearby devices then g Analyst Once connected the g Analyst should indicate a solid green LED and a flickering red LED 4 If this is your f...

Page 9: ...Finish Speed third test time calculated Finish speed should be greater than Speed 2 defined in TIME TO SPEED TIME TO DISTANCE Parameters for DISTANCE tests Distance 1 first test time calculated Dista...

Page 10: ...on once you see GO and or hear a beep 5 Begin braking once you hear a second beep 6 Review your test data on the screen or hit OK to review later g LINK MAX G 1 You must be at zero vehicle speed to st...

Page 11: ...rowse Data Files Files Select test file to review Test Notes Review test notes attached to test file Open Open test file Graph Graph data Exit Return to previous screen Results Delete Delete test file...

Page 12: ...1 The unit should be placed on a relatively flat and level surface and firmly anchored The battery door should be down and the power switch should point to the rear of the vehicle Some mounting locat...

Page 13: ...Calibrate 2 You will need to enter calibration information for the 1 5G 2 0G 4 0G 6 0G ranges See Figure 3 The calibration information was provided with you g Analyst 3 Hit Next to move to the next p...

Page 14: ...line testing West bound Note An accurate weight is essential to obtain good results from the estimated Mile calculations and the horsepower calculations Have your vehicle weighed at a public scale if...

Page 15: ...If you haven t selected your test criteria then do Step 1 and Step 2 If you have previously selected your criteria then proceed to Step 2 Step 1 From the Home menu select the Palm menu icon the Setti...

Page 16: ...librating you will hear a beep make sure your system sound is turned on and GO will be displayed on the screen If you receive a Tilt error then you need to reposition the unit and try again Start acce...

Page 17: ...m the Home menu select the Palm menu icon the Settings and then Time To Distance See Figure 6 You may change any of the selections in Figure 10 Note This test uses the Start_G Start_Speed Start_Distan...

Page 18: ...calibrating you will hear a beep make sure your system sound is turned on and GO will be displayed on the screen If you receive a Tilt error then you need to reposition the unit and try again Start ac...

Page 19: ...gs and then Braking See Figure 6 You may change any of the selections in Figure 12 The Brake_Speed is the speed that you must reach before you are prompted to begin braking The Stop_Speed allows you t...

Page 20: ...e sure your system sound is turned on and GO will be displayed on the screen If you receive a Tilt error then you need to reposition the unit and try again Start accelerating the G Analyst will not st...

Page 21: ...m a Speed test from 0 60 MPH You may zoom in and out of the time scale by pressing the arrow buttons below the Zoom label You may also playback the test in real time by using the VCR control buttons b...

Page 22: ...See Figure 15 The Max g screen will be displayed See Figure 16 Select Start The G Analyst will perform a brief calibration and then the Max g values will be displayed As you test your vehicle the disp...

Page 23: ...the logger readings will be referenced from the g Analyst s current orientation Log Raw Values will log without zeroing the x y z axis Once you make your selection of how you would like the values sav...

Page 24: ...Analyst s current orientation Raw Readings will display readings without zeroing the x y z axis Log Data allows you to log data to a file while viewing the data in Real Time on the screen Make your s...

Page 25: ...s equipped with a selectable range accelerometer This allows the user flexibility in selecting the range for any vehicle From the Home menu select the Palm menu icon the Settings and then g Range See...

Page 26: ...ee more information on a file select the file and press the Test Notes button The test notes screen will open see Figure 3 Once you have a file that you want to review select the file name and press t...

Page 27: ...there are options to graph by speed distance or g s For data logging files you may only display the data in g s Data may also be reviewed in real time Use the VCR buttons at the bottom of the graph to...

Page 28: ...PC for either Capture pdb or Summary pdb You may want to try the following path C Program Files palmOne name of your Palm Backup 3 Make a note of where your files are located You can copy them to ano...

Page 29: ...Analyst test sessions The second is the Summary file type Files that start with Summary store a summary of the g Analyst test session along with any results and test notes If you are not sure which fi...

Page 30: ...title Exporting Your Test to a PC Do I need to use a Palm with the g analyst Yes Check the http www pdyno com website for a list of compatible Palm models What s new How do I find out Check http www p...

Page 31: ...31 Appendix 1 Trouble Shooting Guide...

Page 32: ...p and GO displayed Start_G exceeded Calculate speed and distance Start Distance and Start Speed already exceeded A Yes Timeout Yes Yes No A Finish Speed exceeded End Test B Yes No Zero timer No B No B...

Page 33: ...ep and GO displayed Start_G exceeded Calculate speed and distance Start Distance and Start Speed already exceeded A Yes Timeout Yes Yes No A Finish_ Distance exceeded End Test B Yes No Zero timer No B...

Page 34: ...alculate speed and distance Start Speed already exceeded A Yes Timeout Yes Yes No A Accel to Brake Speed End Test Zero timer No B No record 0 speed time Yes Decel to Brake Speed start brake timer Dece...

Page 35: ...nput voltage operating range 0 5V to 4 5V Battery Life 7 hours with standard AA Accelerometer Freescale MMA7260Q Acceleration Range 1 5g 2 0g 4 0g 6 0g Selectable Bluetooth Class 1 BlueRadio SPP Bandw...

Page 36: ...ith your computer The instructions below are for Windows XP with built in Bluetooth If you have a Bluetooth dongle you will need to follow the manufacture s instructions for pairing Turn on you g Anal...

Page 37: ...37 The Bluetooth Device Wizard screen will open Check the box My device is set up and ready to be found Then click Next Select the g Analyst from the pick list and then click Next...

Page 38: ...Use the passkey found in the documentation and then enter 1234 Click the Next button Note the Outgoing COM port assigned You will need to use this COM port with Hyper Terminal Click Finish to complete...

Page 39: ...39 Start Hyper Terminal You will be prompted for a new connection Type in g Analyst for the name and then click OK Select the Bluetooth COM port from the pairing...

Page 40: ...or n to make you selection Calibrate It is not recommended that you use the g Analyst in gravity mode at this time Therefore calibration is un necessary However the following procedure may be followed...

Page 41: ...top menu to set the display mode You will be prompted to select either gravity values press 1 raw ADC values press 2 or binary values press 3 You can also hit x to exit without changing the setting Ra...

Page 42: ...to respond with the Ready string R once it has completed all current measurements 2 Abort sending a capital A character 0x41 will cause the g Analyst to stop any data output and respond with the Ready...

Page 43: ...only accelerations greater than 0 5g will be displayed By returning the threshold to 0 0g all acceleration values will be reported From the top menu press 6 to get into the threshold setting mode You...

Page 44: ...lease follow these steps when not using the g Analyst Palm software 1 Set the sensor range in g s 2 Calibrate the sensor 3 Set the threshold if desired 4 Set the display mode 5 Set the output frequenc...

Reviews: