22
Installation and maintenance instructions ecoTEC exclusive 0020193968_05
7.9
Flue installation
7.9.1
Installing and connecting the air/flue pipe
1.
You can find out which air/flue pipes may be used
by consulting the enclosed set-up instructions for the
air/flue system.
2.
Observe the information on positioning the air/flue ter-
minal.
Condition
: Installation in damp rooms
▶
You must connect the product to a room-sealed air/flue
system. The combustion air must not be taken from the
installation room.
Caution.
Risk of poisoning due to escaping flue
gas.
Mineral-oil-based greases can damage the
seals.
▶
Instead of grease, use only water or com-
mercially available soft soap to aid install-
ation.
3.
Install the air/flue pipe using the set-up instructions.
7.9.2
Removing the connection piece for the
air/flue pipe
A
B
C
1.
Insert a screwdriver into the slot between the measur-
ing stub pipes.
2.
Press the screwdriver carefully down.
3.
Turn the connection piece anticlockwise as far as it will
go and then remove it by pulling it upwards.
7.10
Electrical installation
Only qualified electricians may carry out the electrical install-
ation.
Danger!
Risk of death from electric shock!
Mains connection terminals L and N remain
live even if the on/off switch is turned off.
▶
Switch off the power supply.
▶
Secure the power supply against being
switched on again.
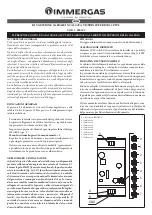
7.10.1 Opening the electronics box
A
B
▶
Open the electronics box as shown in the illustration.
7.10.2 Carrying out the wiring
Caution.
Risk of material damage caused by incor-
rect installation.
Mains voltage at incorrect terminals and plug
terminals may destroy the electronics.
▶
Do not connect any mains voltage to the
eBUS terminals (+/-).
▶
Only connect the mains connection cable
to the terminals marked for the purpose.
1.
Route the connection cables of the components to
be connected through the grommet provided on the
underside of the product on the left.
2.
Use strain reliefs.
3.
If required, shorten the connection cables.
30 mm
≤
4.
Strip the flexible line as shown in the figure. In doing
so, ensure that the insulation on the individual conduct-
ors is not damaged.
5.
Only strip inner conductors just enough to establish
good, sound connections.
6.
To avoid short circuits resulting from loose individual
wires, fit conductor end sleeves on the stripped ends of
the conductors.
7.
Screw the respective plug to the connection cable.
8.
Check whether all conductors are sitting mechanically
securely in the terminals of the plug. Remedy this if
necessary.
9.
Plug the plug into the associated PCB slot; see the
wiring diagram in the appendix.
7.10.3 Establishing the power supply
Caution.
Risk of material damage due to high con-
nected voltage.
At mains voltages greater than 253 V, elec-
tronic components may be damaged.