background image

0020193968_05 ecoTEC exclusive Installation and maintenance instructions

67

J

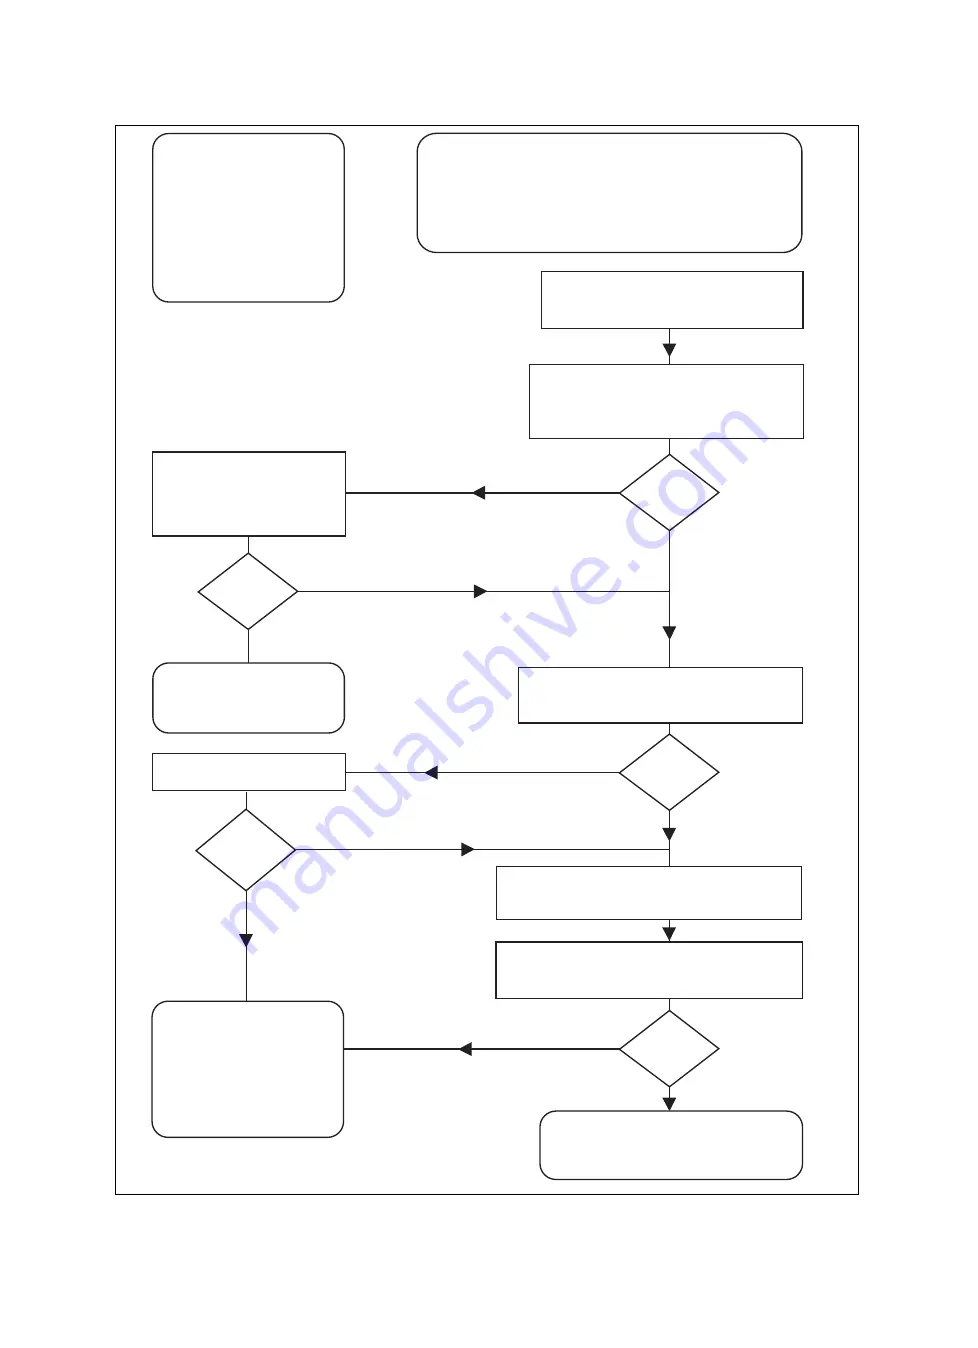
Commissioning Flow Chart

PRIOR TO CO AND COMBUSTION RATIO CHECK

The boiler manufacturer’s installation instructions should have been followed, gas type verified and gas 

supply pressure/rate checked as required prior to commissioning.

As part of the installation process, 

especially where a flue has been fitted by persons other than the 

boiler installer

, visually check the integrity of the whole flue system to confirm that all components are 

correctly assembled, fixed and supported. Check that manufacturer’s max. flue lengths have not been 

exceeded and all guidance has been followed (e.g. Gas Safe Technical Bulletin TB008).

The flue gas analyser should be of the correct type, as specified by BS 7967

Prior to its use, the flue gas analyser should have been maintained and calibrated as specified by the 

manufacturer. The installer must have the relevant competence for use of the analyser.

Check and zero the analyser IN FRESH AIR as per analyser manufacturer’s instructions.

NOTE

THE AIR GAS RATIO VALVE IS FACTORY 

SET AND MUST NOT BE ADJUSTED 

DURING COMMISSIONING UNLESS THIS 

ACTION IS RECOMMENDED FOLLOWING 

CONTACT WITH THE MANUFACTURER.

If any such adjustment is recommended and 

further checking of the boiler is required the 

installer/service engineer must be competent 

to carry out this work and to use the flue gas 

analyser accordingly.

If the boiler requires conversion to operate with 

a different gas family (e.g. conversion from 

natural gas to LPG) separate guidance will be 

provided by the boiler manufacturer

 CARRY OUT FLUE INTEGRITY CHECK USING ANALYSER

Insert analyser probe into air inlet test point and allow readings to stabilise.

NOTE

 - where no air inlet test point is provided then a flue integrity check 

with the analyser is not possible. The installer should verify that flue 

integrity has been visually checked in accordance with the  

“Prior to 

CO and combustion ratio check”

 box above before proceeding to the 

“Check CO and combustion ratio at maximum rate” 

stage below.


SET BOILER TO MINIMUM RATE

In accordance with boiler instructions, set boiler to operate at minimum rate (to 

minimum load condition). Allow sufficient time for combustion to stabilise.

NOTE 

- If manufacturer’s instructions do not specify how to set boiler to minimum 

rate contact Technical Helpline for advice.

CHECK CO AND COMBUSTION RATIO AT MINIMUM RATE

With boiler still set at minimum rate, insert analyser probe into flue gas sampling 

point. Allow readings to stabilise before recording.

NOTE 

- If no flue gas sampling point is present and the correct procedure is not 

specified in the manual, consult boiler manufacturer for guidance.

CHECK CO AND COMBUSTION RATIO AT MAX. RATE

With boiler still set at maximum rate, insert analyser probe into flue gas 

sampling point. Allow readings to stabilise before recording.

NOTE 

- If no flue gas sampling point is present and the correct procedure is 

not specified in the manual, consult boiler manufacturer for guidance.

SET BOILER TO MAXIMUM RATE

In accordance with boiler instructions, set boiler to operate at max. rate 

(full load condition). Allow sufficient time for combustion to stabilise.

NOTE - Do not insert analyser probe during this period to avoid 

possible “flooding” of sensor.

Is

CO less than 

350ppm and

CO/CO

2

 ratio

less than 0.004

Is

O

2


•

 20.6%

and

CO

2

 < 0.2%

Is

CO less than 

350ppm and

CO/CO

2

 ratio

less than 0.004

BOILER IS OPERATING SATISFACTORILY

no further actions required.

Ensure test points are capped, boiler case is correctly replaced and 

all other commissioning procedures are completed.

Complete Benchmark Checklist, recording CO and combustion ratio 

readings as required.

TURN OFF APPLIANCE AND CALL 

MANUFACTURER’S TECHNICAL HELPLINE 

FOR ADVICE.

THE APPLIANCE MUST NOT BE 

COMMISSIONED UNTIL PROBLEMS ARE 

IDENTIFIED AND RESOLVED.

 VERIFY FLUE INTEGRITY

Analyser readings indicate that combustion products 

and inlet air must be mixing. Further investigation of 

the flue is therefore required.

Check that flue components are assembled, fixed 

and supported as per boiler/flue manufacturer’s 

instructions.

Check that flue and flue terminal are not obstructed.

Is

CO


less than 

335ppm

and

CO/CO

2

 ratio less 

than 0.004

Is

O

2


•

 20.6%

and

CO

2

 < 0.2%

Check all seals around the appliance burner, 

internal flue seals, door and case seals. 

Rectify where necessary.

TURN OFF APPLIANCE AND CALL 

MANUFACTURER’S TECHNICAL HELPLINE 

FOR ADVICE.

THE APPLIANCE MUST NOT BE 

COMMISSIONED UNTIL PROBLEMS ARE 

IDENTIFIED AND RESOLVED. IF 

COMMISSIONING CANNOT BE FULLY 

COMPLETED, THE APPLIANCE MUST BE 

DISCONNECTED FROM THE GAS SUPPLY IN 

ACCORDANCE WITH THE GSIUR.

NOTE: 

Check and record CO and combustion ratio 

at both max. and min. rate before contacting the 

manufacturer.


NO

NO

NO

NO

NO

YES

YES

YES

YES

YES

Summary of Contents for ecoTEC exclusive 835

Page 1: ...en Installation and maintenance instructions ecoTEC exclusive VUW 356 5 7 H GB ecoTEC exclusive 835 VUW 436 5 7 H GB ecoTEC exclusive 843 0020193968_05 22 02 2021...

Page 2: ...6 Using check programmes 27 9 7 Checking and treating the heating water filling and supplementary water 27 9 8 Filling the condensate siphon 28 9 9 Filling the condensate siphon 28 9 10 Preventing lo...

Page 3: ...t 43 14 2 Permanently decommissioning the product 43 15 Recycling and disposal 43 Appendix 44 A Inspection and maintenance work 44 B Installer level Overview 45 C Overview of diagnostics codes 47 D St...

Page 4: ...ny direct use in industrial or commercial processes Any use other than those described in these instructions and any use that goes beyond what is described here 1 2 Qualification The person carrying o...

Page 5: ...upply Unsuitable or insufficient combustion and room air may lead to material damage but also to life threatening situations To ensure that the combustion air supply is sufficient during open flued op...

Page 6: ...one to frost 1 3 11 Safety devices Install the necessary safety devices in the installation 1 3 12 Risk of death from leaks if the product is installed below ground level Liquid gas accumulates at flo...

Page 7: ...vaillant group com Spares Enquiries Telephone 01773 596 615 To register your Vaillant appliance visit https self service vaillant co uk warranty registration Vaillant is a licensed member of the Bench...

Page 8: ...unting weight 47 5 kg 55 0 kg Operating weight with water 48 7 kg 57 0 kg Technical data G20 power loading G20 The lowest nominal heat output may be higher than the value in the technical data dependi...

Page 9: ...nstallation components Store these instructions and all other applicable docu ments for further use These instructions apply only to Product article number Article num ber Gas Council Number VUW 356 5...

Page 10: ...al Supply Failure The boiler will not work without an electrical supply Normal operation of the boiler should resume when the electrical supply is restored Reset any external controls to resume normal...

Page 11: ...0020193968_05 ecoTEC exclusive Installation and maintenance instructions 11 of warm cloths on the pipe After pressing reset the boiler should restart...

Page 12: ...small parts 1 Gas family coding resistor 1 Double Check Valve 1 Mounting template 1 Enclosed documentation 6 2 Dimensions 620 20 720 A B 125 180 130 440 188 160 100 100 35 35 12 1 3 4 5 3 5 6 7 11 4...

Page 13: ...tion is very low Compartment ventilation is not required if the product is fitted with a concentric flue system 6 6 Air flue pipe 6 6 1 Regulation Different flue outlet configurations can be carried o...

Page 14: ...ilding material Vertical flue clearance to combustible building material 500 mm 1 500 mm J Above below and either side of an opening door air vent or opening window 300 mm K Diagonally to an opening d...

Page 15: ...nditions Terminals must be positioned so to avoid combustion products entering the building Support the flue at approximately one metre intervals and at a change of direction use suitable brackets and...

Page 16: ...e into con tact with the terminal or the terminal could be subject to dam age If a terminal guard is required it must be positioned to provide minimum of 50 mm clearance from any part of the terminal...

Page 17: ...ration 6 9 2 Installing the front casing Refit the components in the reverse order 6 10 Removing installing the side section 6 10 1 Removing the side section A C D 2x B Caution Risk of material damage...

Page 18: ...ssing the rate of gas supply required 2 Consider the maximum heat output given in DHW mode 3 Install a system separator to be provided on site dir ectly on the cold water connection for the combi boil...

Page 19: ...o that it does not interfere with the removal and fitting of the lower section of the condensate trap 1 2 Install the discharge pipe as shown do not shorten 3 Make sure that the end of the pipe is vis...

Page 20: ...which may trap small pockets of water close to the pipe wall which can freeze and build into a larger ice plug As with other pipe work insulate the condensate dis charge pipe to minimise any risk of...

Page 21: ...eferred option must not terminate in rain water drain 7 8 1 6 Internal termination downstream of sink waste 100mm 32mm 22mm 3 m Open end of pipe direct into gulley below ground level but above water l...

Page 22: ...the power supply Secure the power supply against being switched on again 7 10 1 Opening the electronics box A B Open the electronics box as shown in the illustration 7 10 2 Carrying out the wiring Ca...

Page 23: ...ough the cable duct into the product 1 Open the electronics box Page 22 2 Detach the ProE plug from the PCB slot for the mains connection X1 3 Unscrew the ProE plug for the factory installed power sup...

Page 24: ...wiring 3 Activate the component via D 026 see section Adapt ing to the heating installation 7 10 7 2 Using the VR 40 2 in 7 multi functional module 1 Install the components in accordance with the res...

Page 25: ...l Overview Page 45 8 2 Calling up the installer level 1 Only call up the installer level if you are a competent person 2 Press and at the same time 3 Navigate to Menu Installer level and confirm by pr...

Page 26: ...elect the required language Confirm twice by pressing 9 3 2 Filling mode Filling mode check programme P 06 is activated automatic ally in the installation assistant for as long as the filling mode app...

Page 27: ...s all of the CH cor rection values that have been saved from previous calibration processes The products then starts by fully calibrating the combustion regulation status S 09 P 06 Filling mode check...

Page 28: ...uired Adey MC3 Adey MC5 Fernox F3 Sentinel X 300 Sentinel X 400 Additives intended to remain permanently in the installation Adey MC1 Fernox F1 Fernox F2 Sentinel X 100 Sentinel X 200 Additives for fr...

Page 29: ...ating mode Note The cap on the automatic air vent 1 has already been opened at the factory 3 Observe the information on treating heating water Page 27 A B 1 4 3 2 4 Open all radiator valves thermostat...

Page 30: ...gas installation is intact in accordance with the latest gas safe technical bulletin and informa tion supplied in the installation instructions 2 For extended flue gas installations check for flue gas...

Page 31: ...oduct If you cannot correct the failure notify the gas supply company and proceed as follows End the check programme P 01 Allow the boiler to cool down by allowing pump overrun to operate for a minimu...

Page 32: ...e the CO CO content and the gas flow at minimum load Use to end check programme P 02 Calibration and measurement in heating mode are complete Log the CO content air ratio and CO CO ratio in the Benchm...

Page 33: ...pliance config menu point Menu Installer level Appliance config Or manually relaunch the installation assistant Menu Installer level Start inst assistant 10 1 Calling up diagnostics codes The setting...

Page 34: ...3000 h 10 4 Setting the pump output 1 Navigate to Menu Installer level Diagnostics menu D 014 Pump speed target value and confirm by pressing 2 Set the required pump output Condition Low loss header...

Page 35: ...er reads the instructions to the front of the product in the end user s language Draw attention to the current issue of the Gas Safety Installation and Use Regulations Section 35 which imposes a duty...

Page 36: ...he fan runs at maximum rotational speed T 04 Check cylinder charge pump Switch the cylinder charging pump on and off T 05 Check circula tion pump Switch the circulation pump on and off T 06 Check exte...

Page 37: ...and on the back wall of the heat exchanger If you notice any signs of damage replace the relevant insulating mat 12 8 2 Cleaning the heat exchanger 1 Protect the folded down electronics box against sp...

Page 38: ...r edge VUW 436 5 7 With water until two thirds full 4 Secure the lower section to the condensate siphon 5 Check that the condensate discharge pipe is in good condition check it for tightness and that...

Page 39: ...O CO content and the gas flow in heating mode Page 31 If required reset the maintenance interval Page 36 Check the product for tightness Page 32 Install the front casing Fill out the relevant Service...

Page 40: ...ows the number of faults that have occurred the fault numbers and the corresponding plain text display Press or to call up individual fault messages Press twice to delete the fault list 13 5 Resetting...

Page 41: ...lacing the fan 1 Remove the air intake pipe 2 Remove the gas valve assembly Page 41 4 2 3 1 3 Remove all plugs from the fan 1 4 Unscrew the three screws between the mixture pipe and the fan flange 5 R...

Page 42: ...cant is included with the Vaillant spare part use only water or commercially available soft soap 22 Ensure that the clamps on the heat exchanger s con nections are seated correctly 23 Install the comp...

Page 43: ...crews 3 just enough so that you can pull out the all gas sensor by the cable 2 3 Remove the plug 1 by pushing in the latching lug 4 Reinstall the new all gas sensor in the reverse order 13 8 Completin...

Page 44: ...of the product and if required eliminate any faults that are found Annually 11 Calibrating the heat generator and measuring the CO CO content and gas flow in heating mode Annually 31 12 Logging the CO...

Page 45: ...er level Fault list F XX F XX Current value Installer level Test programs Check programs P 00 Purging Yes No P 01 Maximum load Yes No P 02 Minimum load Yes No P 04 Reset eGas CH Yes No P 06 Filling mo...

Page 46: ...4 Extractor hood 5 External solenoid valve 6 External fault message 7 Solar pump not active 8 eBUS remote control not active 9 Legionella protection pump not active 10 Solar valve not active 2 Heating...

Page 47: ...l not active 9 Legionella protection pump not active 10 Solar valve not active 2 Set the type of gas 0 2 0 Natural gas 1 Propane 50 mbar 2 Propane 30 37 mbar Contact details Phone number 0 9 End the i...

Page 48: ...equire ment Not ad justable D 009 eBUS controller target value Current value Target value from external eBUS controller Not ad justable D 010 Internal pump Current value 0 Off 1 On Not ad justable D 0...

Page 49: ...023 Heating mode status Current value Summer winter mode heating off on 0 Blocked 1 Released Not ad justable D 024 Air pressure sensor actual value Current value Pa Not ad justable D 025 Ext eBUS sign...

Page 50: ...ctual value Current value C Not ad justable D 041 Return temperature actual value Current value C Not ad justable D 044 Ionisation value actual value Current value 800 No flame 400 Good flame Not ad j...

Page 51: ...justable D 077 DHW partial load Output range specific kW Adjustable cylinder charging output 100 D 078 DHW max flow temperat ure 55 80 C Limit on cylinder charging temper ature 1 Note The chosen value...

Page 52: ...fault history 0 1 0 No 1 Yes D 095 Software version PeBUS participant Current value 0 BMU 1 AI 2 APC 3 SMU 0 D 096 Reset to factory settings 0 1 0 No 1 Yes D 118 CO sensor fault number Current value 1...

Page 53: ...c hot water mode with actoSTOR S 20 DHW demand Domestic hot water requirement S 21 DHW mode Fan start up DHW mode Fan start up S 22 DHW mode Pump pre run DHW mode Pump prerun S 23 DHW mode Ignition DH...

Page 54: ...sensor self test Return sensor test running heating demands are blocked S 97 Water pressure sensor self test Water pressure sensor test running heating demands are blocked S 98 Flow return temperature...

Page 55: ...CB incorrectly plugged in break in cable harness ignition system ignition transformer ignition cable ignition plug ignition electrode defective ionisation flow interrupted cable electrode incorrect ea...

Page 56: ...68 Fault Flame signal unstable Air in gas gas flow pressure too low incorrect air ratio condensate route blocked ionisation flow interruption cable electrode flue gas recirculation condensate route F...

Page 57: ...If the product is to be operated without an actoSTOR module set D 092 0 F 94 Fault Vortex and differential pressure Check Pump function cable harness plug sensors LED actoSTOR module actoSTOR electro...

Page 58: ...to the heating or domestic hot water position T 03 Fan The fan is switched on and off The fan runs at maximum rotational speed T 04 Cylinder charging pump The cylinder charging pump is switched on an...

Page 59: ...1 3 6 3 2 3 2 4 1 2 3 L N L N X16 L N 1 2 3 1 2 3 19 1 20 8 17 7 18 6 4 3 1 M 16 4 3 17 5 7 8 5 4 2 1 Masse PWM Hallsignal 24V 11 15 Burner Off BUS RT 24V X100 4 2 10 11 2 3 1 5 8 1 6 8 3 5 1 2 4 1 2...

Page 60: ...urn temperature sensor 8 Flow temperature sensor 9 Fan 10 Surface mounted thermostat burner off 11 24 V DC room thermostat 12 Bus connection digital room thermostat control 13 Prioritising diverter va...

Page 61: ...7 18 6 4 3 1 M 16 4 3 17 5 7 8 5 4 2 1 Masse PWM Hallsignal 24V 15 2 Burner Off BUS RT 24V X100 4 2 10 11 2 3 1 5 8 1 6 8 3 5 1 2 4 1 2 3 5 6 7 8 X30 X40 X51 X35 X31 X22 X90 2 1 T2 Fuse X12 X25 X21 X...

Page 62: ...ow temperature sensor 10 Fan 11 Surface mounted thermostat burner off 12 24 V DC room thermostat 13 Bus connection digital room thermostat control 14 Prioritising diverter valve 15 Water pressure sens...

Page 63: ...umer and they should be made aware it is ultimately their responsibility to register with the manufacturer within the allotted time period It is essential that the boiler is serviced in line with the...

Page 64: ...ut left at factory settings Yes No If no what is the maximum central heating output selected kW Dynamic gas inlet pressure mbar C Central heating return temperature C System correctly balanced rebalan...

Page 65: ...ILER delete as appropriate Date Engineer name Company name Telephone No Gas Safe registration No Max rate CO ppm CO CO CO Min rate CO ppm CO CO CO undertaken in accordance with manufacturers instructi...

Page 66: ...ILER delete as appropriate Date Engineer name Company name Telephone No Gas Safe registration No Max rate CO ppm CO CO CO Min rate CO ppm CO CO CO undertaken in accordance with manufacturers instructi...

Page 67: ...t specify how to set boiler to minimum rate contact Technical Helpline for advice CHECK CO AND COMBUSTION RATIO AT MINIMUM RATE With boiler still set at minimum rate insert analyser probe into flue ga...

Page 68: ...nection dimensions 12 Contact details 27 Control connecting 23 Corrugated gas pipe 6 D Decommissioning 43 Decommissioning temporarily 43 Diagnostics codes calling up 33 Disposal packaging 43 Disposing...

Page 69: ...pleting 43 Repair work preparing 36 40 Replacing the burner 40 Replacing all gas sensor 43 Replacing expansion vessel 42 Replacing fan 41 Replacing gas family coding resistor 23 Replacing gas valve as...

Page 70: ......

Page 71: ......

Page 72: ...lisher manufacturer Vaillant GmbH Berghauser Str 40 D 42859 Remscheid Tel 492191 18 0 Fax 492191 18 2810 info vaillant de www vaillant de These instructions or parts thereof are protected by copyright...

Reviews: