24
DS4091-002
25
DS4091-002
3.2 KEYS SETTING PROCEDURE
This procedure is used to directly program the programmable buttons (F1 ÷ F16) on the left of the
telephone.
•
Select Keys setting in the USER MENU Customization and press OK.
•
Use buttons
/
to select the button to be programmed TEL F1 ÷ TEL F16 and press OK.
Hold
/
pressed to scroll the menu faster.
•
Select the function to be assigned to the button using the
/
arrows:
Direct number: the number to be dialled
Trunk Line: the number of the dial line (1 ÷ 6).
Extension (Port): the number of the terminal socket (physical port) to which the extension is connected
(1 for extension 41, 2 for extension 42, ...32 for extension 72)
Recall phonebook: number of the memory position in the telephone directory (1 ÷ 250).
•
Press OK.
•
Enter the number corresponding to the required position.
•
Press OK.
Internal programming example: to program dialling (and consequently assembly) of extension 42 (related
to port 2) on the fi rst telephone LED (button F1), select “TEL F1” in the guided menu, OK, “Extension (Port)”,
OK, 2, OK.
Central memory recall programming example: to program the second function button F2 to recall the fi fth
central memory position (39005 where 39 is the service code for recalling the PABX memory and 005 is the
memory position), select “TEL F2” in the guided menu, then OK, “Direct number”, OK, 39005, OK.
Remember that the following data will need to be entered according to the selected function and the PABX
selection (switchboard socket):
3.2.1 DIRECT NUMBER ASSOCIATION
Any programmable button may be associated to a number for speed dialling.
•
Select and access the Direct number function.
•
Enter the direct number to be associated to the button.
•
Press OK to confi rm or
to quit.
The LED corresponding to the button will remain off when the Speed Dial option is on.
3.2.2 TRUNK LINE ASSOCIATION
This function allows to associate any programmable button to pick up and monitor a dial line of the system.
•
Select and access the Trunk Line function.
•
Enter the external line number to be associated to the button.
•
Press OK to confi rm or
to quit.
The Trunk line number associated to the button may be from 1 to 6 for 1362/624 PABX.
TYPE OF DATA
ADMISSIBLE DATA
PABX 1362/624
PABX 1372/Mod2
PABX 1372/Mod1
PABX 1332/5xx
DIRECT NUMBER
maximum 21 digits maximum 21 digits
TRUNK LINE
1 .. 0
1 .. 3
EXTENSION
1 .. 40
1 .. 12
RECALL PHONE BOOK
1 .. 250
1 .. 250
3.2.3 EXTENSION ASSOCIATION
This function allows to associate any programmable button to call/divert and monitor an extension of the
system.
•
Select and access the Extension (port) function.
•
Enter the extension number to be associated to the button.
•
Press OK to confi rm or
to quit.
The Extension (port) options relates to the number of the extension socket and not its fl exible number,
which may be from 1 to 40 for PABX 1362/624.
3.2.4 PHONE BOOK NUMBER ASSOCIATION
This function allows to associate any programmable button to a telephone directory position for quick
dialling.
•
Select and access the Recall phonebook function.
•
Enter the telephone directory position to be recalled when the button is pressed (1 … 250).
To identify the position associated to the number, access the directory/search function: three digits
corresponding to the position will appear after the stored number.
•
Press OK to confi rm or
to quit.
The LED corresponding to the button will remain off when the Recall phonebook option is on.
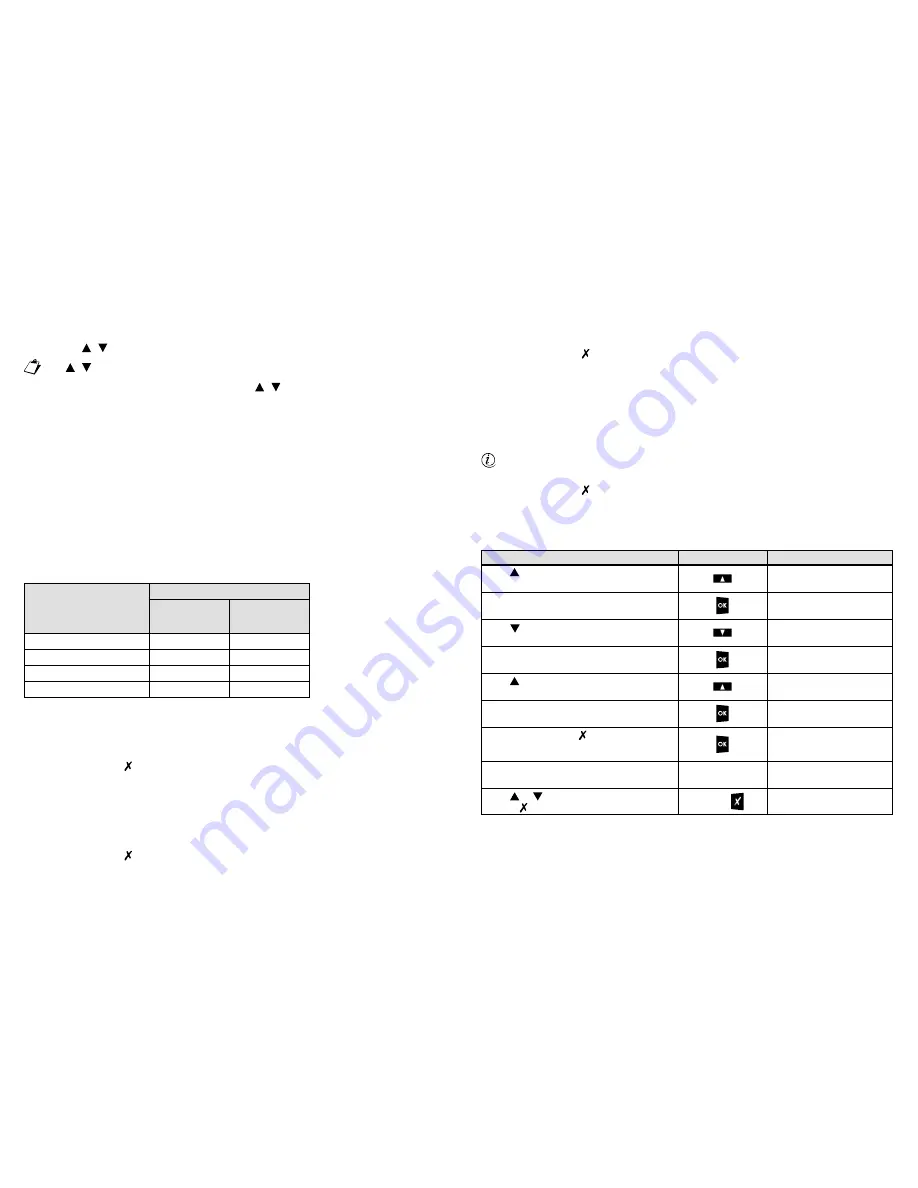
3.2.5 RESTORE PARAMETERS (PROGRAMMABLE KEYS)
The procedure for restoring the default settings of the programmable keys is described below.
3.3 CALL LIST
3.3.1 OUTGOING CALLS
This is the list of the last 20 dialled numbers, the name associated to the number in the phone book (where
applicable) and the time and date of the call:
•
Select the Outgoing Calls function in the USER MENU Call List.
DESCRIPTION OF THE OPERATION
BUTTON
DISPLAY
Press to select Customization.
user menu
Customization
Press OK to access the Customization menu.
Customization
Language
Press to select Restore parameters.
Customization
Restore parameters
Restore parameters
Volume
Press OK to confirm (or to cancel).
The restored parameters confirmation message
will appear for a few instants.
Restore done
Press or to select the other menu items
or press three times to quit.
DD/MM/YYYY HH:MM
Press OK to access the Restore parameters
menu.
Press to select Programmable Keys.
Restore parameters
Programmable Keys
The Restore parameters Programmable Keys
menu will appear again immediately after.
Restore parameters
Programmable Keys
three times
Restore?
0K=Yes X=No
Press OK to access Programmable Keys.


