background image


TruVision DVR 12 User Manual 

95 

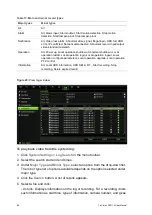
a description on the types of events recorded and when record time was 
stopped. 

Play

: Click to start playback of the selected recording.  

Export

: Click to archive the selected file to a USB device. The export 

window appears. 

Back

: Click to return to the previous window. 

Motion search 

You can quickly and easily search playback recording for incidents of motion 
detection. Motion can be searched over the whole playback window or just for 
specific areas on it. This allows you to search, for example, whether any motion 
was detected a few days ago near a particular door. 

The option is not available in instant playback. 

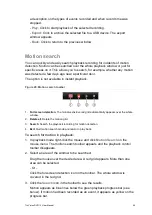
Figure 29: Motion search toolbar 


1. 

Full screen detection

: The motion-sensitive red grid automatically appears over the whole 

window. 

2. 

Delete all

: Delete the motion grid. 

3. 

Search

: Search the playback recording for motion detection. 

4. 

Exit

: Quit motion search mode and return to play back. 

To search for motion in playback: 

1.  In playback mode right-click the mouse and click 

Motion Search

 on the 

mouse menu. The motion search toolbar appears and the playback control 
toolbar disappears. 

2.  Select an area of the window to be searched: 

Drag the mouse over the desired area. A red grid appears. More than one 
area can be selected. 

- Or - 

Click the full-screen detection icon in the toolbar. The whole window is 
covered in the red grid. 

3.  Click the 

Search

 icon in the toolbar to see the results.  

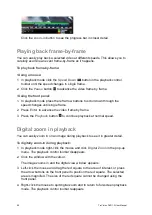
Motion appears as blue lines below the green playback progress bar (see 
below). If motion had been recorded as an event, it appears as yellow on the 
progress bar. 

Summary of Contents for TruVision DVR 12

Page 1: ...TruVision DVR 12 User Manual P N 1072798C EN REV 1 0 ISS 21AUG14...

Page 2: ...l apparatus complies with Canadian ICES 003 Cet appareil num rique de la classe A est conforme la norme NMB 003 du Canada ACMA compliance Notice This is a Class A product In a domestic environment thi...

Page 3: ...e recorder 17 Using the setup wizard 18 Chapter 4 Recording 22 Initializing the recording settings 22 Defining a recording schedule 25 Daily schedules 26 Holiday schedules 27 Motion detection schedule...

Page 4: ...alarms 51 Checking the S M A R T information 51 Searching video using disk analysis 52 Configuring redundant recording 54 Setting up HDD groups 54 Chapter 8 Operating instructions 56 Controlling the...

Page 5: ...eo clips 100 Archiving snapshots 100 Managing backup devices 101 Playing back archived files on a PC 101 Chapter 13 Recorder management 102 Configuring the RS 232 port 102 Updating system firmware 103...

Page 6: ...rlay 125 Capturing text insertions 126 Appendix A Specifications 128 Appendix B PTZ protocols 130 Appendix C Port forwarding information 131 Appendix D KTD 405 keypad 133 Supported firmware 133 Wiring...

Page 7: ...nt settings for recording and streaming video in live view mode The recorder can fully integrate with the license free TruVision Navigator software which is ideal for the most commercial applications...

Page 8: ...2222 Guest The default user name is guest The default password is 3333 Note The default passwords should be changed for security reasons Default network settings The default values for TVR 12 network...

Page 9: ...n location Extremes of heat or cold beyond the specified operating temperature limits may reduce the life expectancy of the recorder Do not install the unit on top of other hot equipment Leave 44 mm 1...

Page 10: ...ick Start Guide TruVision DVR 12 User Manual on CD TruVision Recorder Operator Guide on CD Back panel The figures on the next page show the back panel connections and describe each connector on typica...

Page 11: ...rear USB ports 8 Connect one CCTV monitor BNC type connector 9 Connect to a HDTV The HDMI connection supports both digital audio and video 10 Connect to a VGA monitor 11 Connect to speakers for audio...

Page 12: ...Connect to the RS 485 B connection on the dome camera or keypad RS 232 port Use the RS 232 port to connect CBR PB3 POS point of sale and ATM devices to the recorder such as the UTC ProBridge accessor...

Page 13: ...he list of approved PTZ protocols Figure 3 Connecting a PTZ dome camera to the recorder for control over the network Dome camera Recorder back panel RS 485 port Configuring the PTZ protocols for Inter...

Page 14: ...000 RS 485 communication DIP switches 110000 Camera ID DIP switches Select the camera ID DIP switch address as required RS 422 RS 485 data connector TruVision Mini PTZ 12X Outdoor Dome Protocol DIP sw...

Page 15: ...s switches 2 Baud switches 3 Protocol switches RS 422 on I O box 1111 Address switches Select the camera ID DIP switch address as required Baud rate 0000 9600 bps 0011 4800 bps RS 422 RS 485 data conn...

Page 16: ...otocol switches 2 Address switches RS 422 on I O box 10000 Address switches Select the address switch address as required RS 422 RS 485 data connector Legend Protocol switches RS 485 on recorder 1 RS...

Page 17: ...ces are required it is recommended that you use the keypad s RS 422 connection to connect the dome camera and the keypad s RS 485 connection to connect the recorder See Figure 5 as well as Table 4 and...

Page 18: ...bus address Recorder video inputs PTZ address range 1 1 32 00 31 2 1 32 32 63 3 1 32 64 95 4 1 32 96 127 5 1 32 128 159 6 1 32 160 191 7 1 32 192 223 8 1 32 224 255 Brackets The recorder is easily rac...

Page 19: ...PS is used in conjunction with the device To turn on the recorder Turn on the recorder using the power switch on the back panel Once it is powered up the status LEDs on the front panel will light up A...

Page 20: ...nguage for the system from the dropdown list and then click Next 4 Enable or disable the option to start the wizard automatically when the recorder is turned on Click Next 5 Administrator configuratio...

Page 21: ...subnet mask UPnP and default gateway Enter the preferred DNS server address as well as the alternate one to use Click the UPnP button and enter the required values to set up UPnP Universal Plug and P...

Page 22: ...Hi check box and select its image resolution and frame rate Check the TL Lo check box and select its image resolution and frame rate To record motion detection events check Event Motion and select the...

Page 23: ...TruVision DVR 12 User Manual 21 For a description of the recorder main menu see Menu overview on page 62...

Page 24: ...Controlling live view on page 66 for further information See Menu overview on page 62 for a list of the menu icons Initializing the recording settings Before you can set up your recorder to begin reco...

Page 25: ...before the event Select the time in seconds to start pre recording before the event The maximum pre recording times available depend on the constant bit rate See Maximum pre recording times on page 14...

Page 26: ...ar click Video Schedule More Settings 2 Under Event priority select Text In Motion or Text In Motion default Calculating the maximum permitted frame rates and bit rates You can easily calculate the co...

Page 27: ...Wednesday Wed Thursday Thu Friday Fri Saturday Sat and Holiday if Holiday has been enabled 4 Recording type There are five recording types to select which are color coded TL Time lapse Green squares R...

Page 28: ...umn time You can schedule up to eight time periods Click All Day to record all day Note Time periods defined cannot overlap 7 Select a recording type This setting instructs the recorder to begin recor...

Page 29: ...ndow appears 3 Enter the name of the holiday period and click Enable 4 Select whether the holiday period will be categorized by date week or month and then enter the start and end dates 5 Click Apply...

Page 30: ...corded file 1 In live view enter the video search window by pressing the Search button on the front panel or remote control and then enter Advanced Search Or In live view right click the mouse to disp...

Page 31: ...ings on that particular HDD again you must set the HDD status back to R W Read Write Manual recording The recorder lets you manually record video during live view This can be useful if you know that t...

Page 32: ...amera image and left click the mouse to display the quick access toolbar Click the manual record icon to start or stop manual recording The icon is red when recording Use the configuration menu This o...

Page 33: ...ion types are Full Screen Monitoring Triggers the camera image in alarm to appear as full screen view Audible Warning Triggers an audible beep when a notification or alarm is detected Notify Alarm Rec...

Page 34: ...s your recorder can record You can mask out any areas of motion on an analog camera display that you do not want to trigger a recording such as a flag on a pole or a moving tree Select the level of se...

Page 35: ...is triggered Click Apply to save the settings 8 Select the recording schedules for motion detection In the Rule window click the Arming schedule tab and select the day of the week and the time period...

Page 36: ...d their alarm schedules method of alarm notification and PTZ function 5 Select the cameras to be triggered when an external alarm is detected In the Rule window click Trigger channel and select the ca...

Page 37: ...eout setting lets you define how long a signal remains active after the alarm has ended If you select Manually Clear the signal remains active until it is manually acknowledged by pressing the alarm b...

Page 38: ...outputs at once 4 Click Back to return to live view The alarm is silenced Or 1 Press the Alarm button on the front panel or remote control The alarm is silenced Setting up system notifications Setting...

Page 39: ...to detect video loss and trigger a system notification To setup video loss detection 1 From the menu toolbar click Camera Management Video Loss 2 Select a camera to configure for video loss detection...

Page 40: ...d Click and drag the mouse across an area to mark that area for video tampering You can only set one tampering area with the full screen being the maximum area Click Clear to clear the window 5 Select...

Page 41: ...Network Administrator or ISP to see if your recorder requires specific IP addresses or port numbers Configuring general network settings To configure general network settings 1 Click the Network Setti...

Page 42: ...6 default gateway Enter the IPv6 address of your network gateway so the recorder will be recognized within the network This is typically the IP address of your router MAC address Enter the MC address...

Page 43: ...cellular network some cellular providers block port 554 so you may need to change it to another value See Appendix C Port forwarding information on page 131 for more information There are two ways to...

Page 44: ...clude tvn ddns net An example of a host name could be max64chars tvr ddns net 4 Ask your ISP service provider for your DNS server address Go to Network Settings General and enter the preferred and alt...

Page 45: ...ver Authentication Check the box if your mail server requires authentication and enter the login user name and password SMTP Server Enter the SMTP server s IP address SMTP Port Enter the SMTP port The...

Page 46: ...c mapped type The recorder automatically uses the free ports available that were set up in the Network Settings menu Manual mapped type You enter the particular external port settings and IP addresses...

Page 47: ...menu toolbar click Network Settings SNMP 2 Enter the required settings 3 Click Apply to save the settings Configuring an FTP server to store snapshots You can upload your snapshots to an FTP server fo...

Page 48: ...s 2 Enter a Multicast IP address Note When adding a device to the Network Video Surveillance software the multicast address must be the same as the recorder s multicast IP 3 Click Apply to save the se...

Page 49: ...eiving rate MAC address and NIC type You can save then this information to a storage device You can also check the network connection status by testing its delay and packet loss To check network traff...

Page 50: ...statistics 1 From the menu toolbar click System Settings Net Detect 2 The latest information is displayed on the bandwidth used by remote live and playback as well by Net Receive Idle and Net Send Idl...

Page 51: ...To initialize an HDD 1 From the menu toolbar click System Settings Hard Disk 2 Under the HDD Information tab select the HDD to be initialized 3 Click the Initialize button to begin initialization Aft...

Page 52: ...HDD can be set to read only to avoid important recorded files from being overwritten when the HDD becomes full Note Ensure that the HDD storage mode is Group before setting the HDD to read only To cha...

Page 53: ...ger when an HDD is uninitialized or in an abnormal state To set HDD alarms 1 From the menu toolbar click Alarm Settings Notification 2 Select the notification event to configure under Notification Typ...

Page 54: ...ng video using disk analysis The recorder can run a disk analysis to get a broader sense of the video data stored on the HDD This video data can include alarms events video Loss and more The disk anal...

Page 55: ...vels The levels are Level 1 Year view Level 2 Month view Level 3 Day view Level 4 Six hour view Level 5 One hour view 5 Type of recording Up to five types of event recordings can be displayed Constant...

Page 56: ...rd Disk 2 Click the HDD Information tab and select the HDD to be used for redundancy and click Edit 3 In the Local HDD Settings screen select Redundancy Verify at least one other HDD is set to R W rea...

Page 57: ...click System Settings Hard Disk 2 Select the Storage Mode tab 3 Under Mode select Group 4 Under Record on HDD Group select the HDD group number 5 Check the channels to be added to this group Note By...

Page 58: ...ol method for any procedure but in most cases we describe procedures using mouse terminology Optional control methods are given only when they differ substantially from mouse control methods Using the...

Page 59: ...r 4 Archive button Press once to enter quick archive mode Press twice to start archiving 5 Display and Seq buttons Live view mode Press Display to toggle through the various views full quad 1 5 1 7 9...

Page 60: ...tween the cameras Menu mode To enter the menu toolbar keep pressing the left arrow button until the first menu icon is selected Then press the left right arrow buttons to select a menu icon To select...

Page 61: ...Select a camera to display the quick access toolbar see Accessing frequently used commands on page 69 Menu Select a component of a menu such as a button or an input field This is similar to pressing t...

Page 62: ...and not when using a keypad You can purchase a remote control by ordering part number TVR REMOTE 1 Figure 11 IR remote control Item Description 1 Alarm Acknowledge an alarm 2 Device Enable disable th...

Page 63: ...he remote control at the IR receiver located at the front of the unit to test operation To connect the remote control to the recorder 1 Press the Menu button on the front panel or right click the mous...

Page 64: ...ided into three sections The currently selected command icon and submenu item are highlighted in green See Figure 12 below You must be in live view mode to access the main menu Figure 12 Menu structur...

Page 65: ...work settings on page 39 Alarm Settings Configures alarm settings including alarm input relay output video loss remote alert pre alarm post alarm seconds and buzzer time See Chapter 5 Alarm settings o...

Page 66: ...Using the soft keyboard A keyboard will appear on screen when you need to enter characters in a window option Click a key to input that character Figure 13 The soft keyboard Description of the keys in...

Page 67: ...tors The camera status icons are shown for each camera Each icon represents information on a specific item These icons include Table 7 Description of the on screen status icons Icon Description Indica...

Page 68: ...e main monitors they will both show the same view However you will not be able to control each individually See Controlling live view on page 66 for more information on setting up the monitors Control...

Page 69: ...elected by default See All day playback on page 89 for more information 8 Monitor B Switch between monitors A main and B event 9 Advanced Search Enter the advanced video search menu See Searching reco...

Page 70: ...ell in a multiview display A camera image can only be shown in one video tile at a time The number of multiview display formats available depends on the recorder model See Figure 15 below To change th...

Page 71: ...ncing to function Sequencing live view mode using the front panel 1 Select the camera where you want to start sequencing 2 Press the Seq button on the front panel to start sequencing 3 Press the Seq b...

Page 72: ...f snapshots on page 93 for more information PTZ control Enter PTZ control mode See Configuring PTZ settings on page 79 for more information Digital zoom Enter digital zoom See Digital zoom on page 71...

Page 73: ...nd drag the red square to the area of interest or press the arrow buttons on the front panel to position the red square The selected area is magnified 4 To exit digital zoom right click the mouse Conf...

Page 74: ...e However in order to be able to hear audio in playback you must enable the audio output setting Check the box to enable disable audio output Event Output Select which monitor will be the event monito...

Page 75: ...he camera in the sequence and the camera number Figure 19 Camera layout and sequence window Multiview layout selection bar Camera order in the sequence Camera number selection To set the camera sequen...

Page 76: ...Time Zone Select the time zone of the recorder from the drop down list 2 Date Format Select the date format from the drop down list Default format is MM DD YYYY 3 Time Format Select the time format f...

Page 77: ...button to immediately implement the changes General settings Use the Display settings menu to configure general recorder options on how information is displayed and accessed such as Change GUI langua...

Page 78: ...a daisy chain must have a unique zone ID so that it can be controlled by a KTD 405 keypad The default value is 1 5 Resolution Define the resolution of the selected monitor Select one of the options f...

Page 79: ...e box to enable disable and click Apply 5 Timebar Transparent Define the transparency of the monitor output time bar on screen relative to the background to make the time bar easier to read Check the...

Page 80: ...rowser or CMS Client Management System such as TruVision navigator using the V stream encoding option V stands for virtual When enabled you can see the output from the cameras on a remote client monit...

Page 81: ...hat the PTZ dome cameras are correctly connected to the RS 485 port on the back panel Note If a camera does not work correctly after configuring the recorder check the parameters entered To configure...

Page 82: ...OK button The PTZ control panel appears Keypad Press the Enter button on the keypad For further information see KTD 405 keypad on page 133 If the display was in multiview format it changes to full scr...

Page 83: ...ts Presets are previously defined locations of a PTZ dome camera It allows you to quickly move the PTZ dome camera to a desired position They are configured and modified from the PTZ configuration win...

Page 84: ...click The Preset window appears Select a preset number from the dropdown list and click the OK button to save changes Note Presets can be overwritten 4 Click Back to return to live view To call up a...

Page 85: ...ving to the next one The speed is the rate at which the camera will move from one key point to the next Note The PTZ dome camera used must be able to support a preset tour command See Appendix F on pa...

Page 86: ...desired preset tour from the list The camera immediately carries out the preset tour movement Menu toolbar 1 From the menu toolbar click PTZ Settings More Settings 2 Select the desired preset tour fr...

Page 87: ...a from the toolbar Or On the front panel select the desired camera and press Enter to call up the quick access toolbar The PTZ control panel appears 2 Scroll the toolbar to Shadow Tour and double clic...

Page 88: ...eo on that camera display You must have the access privilege to play back recordings see Customizing a user s access privileges on page 112 for more information Cameras in multiview mode play back sim...

Page 89: ...tual playback This is only displayed in all day playback 6 All day playback progress bar This bar displays how much of the all day period has been recorded The playback control toolbar It is easy to m...

Page 90: ...ick it to return to the Search window and reselect the search criteria 5 Hide toolbar Hide the playback control toolbar 6 Quit playback For all day playback mode quit playback and return to live view...

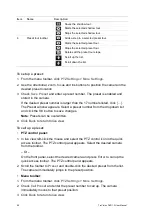
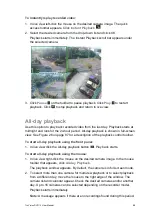
Page 91: ...full screen view See Figure 26 on page 87 for a description of the playback control toolbar To start all day playback using the front panel 1 In live view click the All day playback button Play back...

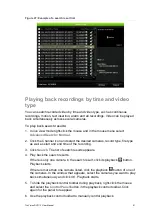
Page 92: ...arm inputs motion detection or POS ATM text insertion Note Only motion detection and POS ATM text insertion that have been recorded as events will be listed in this search Motion and text insertion th...

Page 93: ...s record type file type as well as start and end time of the recording 3 Click Search The list of search results appears 4 Play back the search results If there is only one camera in the search result...

Page 94: ...ed Motion as the event type select the required cameras If you selected Text insertion select the required cameras and enter the desired keywords 4 Click Search The list of search results appears 5 Pl...

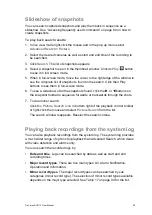
Page 95: ...he snapshots found click the or buttons on the snapshot toolbar to sequence forwards or backwards through the shots 7 To do another search Click the Picture Search icon in bottom right of the playback...

Page 96: ...ration configure parameters Local operation upgrade Local operation PTZ control Information All Local HDD information HDD S M A R T Start recording Stop recording Delete expired record Figure 28 View...

Page 97: ...n detection The motion sensitive red grid automatically appears over the whole window 2 Delete all Delete the motion grid 3 Search Search the playback recording for motion detection 4 Exit Quit motion...

Page 98: ...er to advance the video frame by frame 3 Press the Playback button to continue playback at normal speed Digital zoom in playback You can easily zoom in on an image during playback to see it in greater...

Page 99: ...ckly by using the Archive button on the front panel The recorder then downloads all the recorded files on the unit to fill the available memory space on the media This option is not available via the...

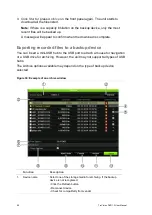
Page 100: ...recorded files to a backup device You can insert a mini USB hub to the USB port to attach a mouse for navigation or a USB drive for archiving However the unit may not support all types of USB hubs Th...

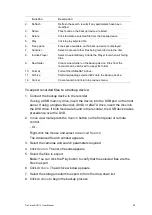
Page 101: ...ancel Cancel search and return to previous menu To export recorded files to a backup device 1 Connect the backup device to the recorder If using a USB memory drive insert the device into the USB port...

Page 102: ...want the video clip to start and click the Start Clipping button 5 Click the playback timeline where you want the video clip to stop and click the End Clipping button 6 Repeat for additional clips 7 E...

Page 103: ...gure 30 on page 98 The Archive window allows you to Create New Folder Create a new folder on the backup device Delete Delete a file or folder from the backup device Play Play the selected video file f...

Page 104: ...e System Settings menu to configure the RS 232 parameters such as baud rate data bit stop bit parity flow control and usage Figure 31 RS 232 setup window There are three ways the RS 232 port can be us...

Page 105: ...enu toolbar 4 Select Upgrade Local Upgrade The list of files on the USB is displayed 5 Select the file and click Upgrade Click Yes to begin the upgrade process 6 When the upgrade process is completed...

Page 106: ...e Network information such as IP address subnet mask gateway MTU NIC working mode server port and default route is not restored to factory default settings if Restore is selected Viewing system inform...

Page 107: ...12 User Manual 105 4 To view record information click the Record tab 5 To view alarm information click the Alarm tab 6 To view network information click the Network tab 7 To view HDD information clic...

Page 108: ...txt Note Connect the backup device such as a USB flash drive to the recorder before commencing the log search To search and export log files 1 From the menu toolbar click System Settings Log search 2...

Page 109: ...in live view mode and include the camera name time and date They also are included in recordings You can also adjust the transparency of the OSD relative to the background so that it is easier to read...

Page 110: ...n area on screen to remain hidden from view For example you can choose to block the view of a camera when overlooking residential premises This hidden area is referred to as privacy masking Privacy ma...

Page 111: ...play settings 1 From the menu toolbar click Camera Management Image 2 Select the camera for which to adjust the video image settings 3 Select the desired mode value Changes are seen immediately on scr...

Page 112: ...n when no user is logged in Instead a person walking by sees a black screen with the Interlogix logo See Figure 32 below Figure 32 Example of a restricted access camera image To set up a camera for re...

Page 113: ...dministrator The user name is admin The name cannot be modified The default password is 1234 Operator The operator account includes reduced menu access to Video settings inaccessible features are not...

Page 114: ...n to the previous window 7 Click Back to return to live view Customizing a user s access privileges Only an administrator can allocate access privileges to Operator and Guest users The access privileg...

Page 115: ...y configure v stream Camera configuration settings By default all analog cameras are enabled for operators for each of these settings and none for guests Camera Permission Select the cameras that can...

Page 116: ...u toolbar to display its window 2 Click the Delete button for the user to be deleted 3 Click Yes in the pop up window to confirm deletion The user is immediately deleted 4 Click Back to return to live...

Page 117: ...TruVision DVR 12 User Manual 115 administrator s MAC address can be changed here too Once completed click Apply to save the settings...

Page 118: ...e recorder web browser interface you can install ActiveX controls to connect and view video using Internet Explorer To have complete functionality of the web browser interface and the recorder player...

Page 119: ...order network settings are IP address 192 168 1 82 Subnet mask 255 255 255 0 Gateway address 192 168 1 1 Server port 8000 Ports When using the browser RTSP port 554 HTTP port 80 When using TruNav RTSP...

Page 120: ...earch for event logs Configure settings Log out of the interface 3 Viewer View live or playback video 4 Display format Define how you want video to be displayed in the viewer Multiview or full screen...

Page 121: ...y the configuration window There are two ways to configure the recorder Local and Remote Local configuration Local configuration lets you define communication and network parameters such as protocol t...

Page 122: ...his setting causes recorded files to be overwritten once the HDD is full See for Configuring overwrite on page 24 more information Event priority Define the priority between text insertion event and m...

Page 123: ...apture Settings Define the resolution and image quality of snapshots Manual Record Define which cameras can manually record See Manual recording on page 29 for more information Network Settings Genera...

Page 124: ...ement Basic Settings Define the HDD basic settings and Initialize the HDD See Initializing HDDs on page 49 for more information S M A R T Settings List the S M A R T information on the HDD See Checkin...

Page 125: ...o black Speed down Click to scroll through the different speeds available single frame 1 8 speed 1 4 speed 1 2 speed normal X2 speed X4 speed X8 speed maximum speed Current speed is displayed under th...

Page 126: ...download the Player application required to play back recordings on your computer Select a camera and a day to search from on the calendar displayed and then click Search The timeline below the page i...

Page 127: ...le on the camera 5 Lens initialization Initialize the lens of a camera with a motorized lens such as PTZ or IP cameras This function helps to maintain lens focus accuracy over prolong periods of time...

Page 128: ...n the video display of the recorder The text is saved and time stamped together with the video You can then search the text for specific video clips The text is displayed during playback The recorder...

Page 129: ...toolbar and then select 232 Serial Port 2 Under Usage select ProBridge 3 Select Text Insertion 4 Check Enable Text Insertion 5 Select the access device from the drop down list 6 Under Start String en...

Page 130: ...ith audio input 1 RCA 2 0 Vp p 1 k Video audio output HDMI output 1 ch Resolution 1920 1080P 60 Hz 1600 1200 60 Hz 1280 1024 60 Hz 1280 720 60 Hz 1024 768 60 Hz VGA output 1 ch Resolution 1920 1080P 6...

Page 131: ...thernet interface Serial interface 1 RS 232 interface for ProBridge Challenger Technical Support 1 RS 485 interface for PTZ control or KTD405 keyboard control USB interface 2 USB 2 0 Alarm in 4 Alarm...

Page 132: ...ocols Interlogix 485 PELCO P Interlogix 422 PHILIPS GE RS485 ASCII PHILIPS 3 Kalatel SAE DSCP Samsung HIKVISION Siemens Honeywell SONY EVI D30 31 INFINOVA SONY EVI D70 KTD 348 SONY EVI D100 P LG MULTI...

Page 133: ...hnician for further information Port 80 HTTP protocol Used to connect via IE browser Port 8000 Client Software Port Used to connect to video streams Port 554 RTSP Port Real time streaming protocol Use...

Page 134: ...fer guides on their websites as well as including documentation with the product On most routers the brand and model number is located on or near the serial number sticker on the bottom of the device...

Page 135: ...firmware 1 4 00 Note XXX represents the number of video channels YYY represents the recorder storage configuration such as 1T 1 TB etc Wiring the keypad Connect the RS 485 bus of the KTD 405 I O box...

Page 136: ...the recorder on page 15for information on how to connect both a keypad and dome camera to the recorder Setting the keypad to work with the recorder The keypad must be in zone mode to connect correctl...

Page 137: ...value must be identical for the recorder and keypad The recorder is now connected to the KTD 405 keypad Recorder and keypad functions The KTD 405U acts as a recorder control keypad when connected to...

Page 138: ...nnected to the recorder Example 1 To enter your password in the login window using the keypad 1 In live view mode press esc to activate the Login window 2 Press and hold esc and then press the arrow b...

Page 139: ...ess and hold esc and then press the up down arrow buttons to navigate to Apply Press to select it Then navigate to Back to return to live view Instead of the arrow buttons you can also use the joystic...

Page 140: ...Manually acknowledge an alarm Press Alarm PTZ functions Enter PTZ mode In live view mode press Enter It is possible that you first need to loin before you can access the PTZ mode PTZ functions Up Dow...

Page 141: ...4 66 98 130 162 194 226 258 290 322 354 386 418 450 482 4 3 35 67 99 131 163 195 227 259 291 323 355 387 419 451 483 5 4 36 68 100 132 164 196 228 260 292 324 356 388 420 452 484 6 5 37 69 101 133 165...

Page 142: ...343 375 407 439 471 503 25 24 56 88 120 152 184 216 248 280 312 344 376 408 440 472 504 26 25 57 89 121 153 185 217 249 281 313 345 377 409 441 473 505 27 26 58 90 122 154 186 218 250 282 314 346 378...

Page 143: ...nd image quality do not impact time Note This information only applies when the bit rate is set to Constant see Initializing the recording settings on page 22 for more information Constant bit rate Ma...

Page 144: ...142 TruVision DVR 12 User Manual Constant bit rate Maximum pre recording time seconds 1792 15 2048 15 3072 10...

Page 145: ...N N N N Y Y Y Y HIKVISION Y Y Y Y Y Y Y Y Y Y Y Y Y Honeywell Y Y Y Y N N N N N Y Y Y Y INFINOVA Y Y Y Y N N N N N Y Y Y Y KTD 348 Y Y Y Y N N N N N Y Y Y Y LG MULTIX Y Y Y Y N N N N N Y Y Y Y LILIN Y...

Page 146: ...Y N N N N N Y N Y KALATEL Y Y N N N N N Y N Y DSCP Y Y N N N N N Y N Y HIKVISION Y Y N N Y Y Y Y Y Y Honeywell Y Y N N N N N N N N INFINOVA Y Y N N N N N Y N Y KTD 348 Y Y N N N N N Y N Y LG MULTIX Y...

Page 147: ...TruVision DVR 12 User Manual 145...

Page 148: ...able Wizard Yes Display Status Icons Yes More Settings Monitor Standard NTSC PAL Auto detect at booting Output Mode Standard Monitor Brightness 5 Event Hint Yes Timebar Transparent Yes Enable Timebar...

Page 149: ...ime Time Settings Time Zone GMT 08 00 Pacific Time U S Canada Date Format MM DD YYYY Time Format 12 hour Display Week No System time Current system time System Date Current system date Auto DST Adjust...

Page 150: ...ull Sensitivity 3 Target size 1 Zone Full screen Privacy Mask Privacy Mask Settings Camera Analog 1 Enable Privacy Mask No Zone Null Tamper proof Tamper proof Settings Camera Analog 1 Enable Tamper pr...

Page 151: ...dium Frame Rate 6 fps Max Bit Rate Mode General Max Bit Rate Kbps 1792 Pre record 5 s Post record 5 s Auto Delete 0 Record Audio Yes Capture Camera Analog 1 Resolution 960 480 960H Image Quality Mediu...

Page 152: ...ptive Enable DHCP Disable IPv4 Address 192 168 1 82 IPv4 Subnet Mask 255 255 255 0 IPv4 Default Gateway 192 168 1 1 IPv6 Address1 It depends IPv6 Address2 Null IPv6 Address Gateday Null MAC Address It...

Page 153: ...rver Null SMTP Port 25 Enable SSL No Sender Null Sender s Address Null Select Receiver Receiver 1 Receiver Name Null Receiver s Address Null Enable Attached Snapshot No Interval 2 s FTP FTP Enable FTP...

Page 154: ...Alarm Name Null Type NO Setting Enable Alarm Input Setting Rule Trigger channel No Alarm schedule All day for whole week Rule Null PTZ link Null Alarm Output Alarm Output Alarm Output No All Alarm Na...

Page 155: ...aud Rate 9600 Date Bit 8 Stop Bit 1 Parity None Flow Ctrl None PTZ Protocol Interlogix 485 Address 0 to 15 for camera 1 to 16 More Settings Camera Analog 1 Save Preset Null Call Preset Null Shadow Tou...

Page 156: ...guration Import Export Config File Default Log search Log search Current whole day all types System Information Device Information Device name Model Serial No Firmware Version Encoding Version Panel V...

Page 157: ...74 DDNS settings 41 Default menu settings 146 Default settings restore 103 Digital zoom description 71 web browser 123 Digital zoom in playback 96 Disk analysis searching recorded video 52 DST 74 Dwe...

Page 158: ...search playback 95 Mouse pointer speed change 75 Mouse pop up menu 66 Multicast settings 46 Multiview format 68 default setting 71 N Network disconnection alarm notification 78 Network packet data ex...

Page 159: ...alarms 27 Remote alarm host settings 45 Remote control connect to the recorder 61 description 59 Resolution change monitor resolution setup 75 Restricted access cameras 109 RS 232 port 10 configuring...

Page 160: ...View system log 106 V stream encoding 78 W Warning buzzer modifying 32 Watermaking 109 Web browser accessing 117 controlling PTZ dome camera 125 digital zoom 123 installing Active X 116 local configu...

Reviews: