GENISYS II System Hardware Installation
UNION SWITCH & SIGNAL
SM-6900B Rev. 0.0
August 1999
2-25
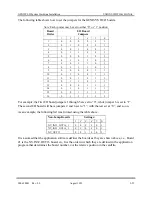
The following table shows how to set the jumpers for the GENISYS II I/O boards.
Note: Each jumper may be set to either “0” or “1” position.
Board
Order
I/O Board
Jumpers
1
2
3
4
5
6
1
0
0
0
0
0
1
2
0
1
0
0
0
1
3
0
0
1
0
0
1
4
0
1
1
0
0
1
5
0
0
0
1
0
1
6
0
1
0
1
0
1
7
0
0
1
1
0
1
8
0
1
1
1
0
1
9
0
0
0
0
1
1
10
0
1
0
0
1
1
11
0
0
1
0
1
1
12
0
1
1
0
1
1
13
0
0
0
1
1
1
14
0
1
0
1
1
1
15
0
0
1
1
1
1
16
0
1
1
1
1
1
For example, the first I/O board jumpers 1 through 5 are set to “0”, while jumper 6 is set to “1”.
The second I/O board will have jumpers 2 and 6 set to “1”, with the rest set at “0”, and so on.
As an example, the following list was formed using the table above:
Non-Lamp Boards
Settings:
1
2
3
4
5
6
NV_IN32_OUT16_1
0
0
0
0
0
1
NV_IN32_OUT16_2
0
1
0
0
0
1
NV_OUT32
0
0
1
0
0
1
It is assumed that the application software defines the boards as they are shown above, i.e., Board
#1 is the NV.IN32.OUT16 board, etc. It is the order in which they are defined in the application
program that determines the board number, not the relative position in the cardfile.
Summary of Contents for GENISYS II
Page 4: ......
Page 6: ...GENISYS II System Hardware Installation UNION SWITCH SIGNAL 1 2 August 1999 SM 6900B Rev 0 0 ...
Page 12: ...UNION SWITCH SIGNAL GENISYS II System Hardware Installation 2 ii August 1999 SM 6900B Rev 0 0 ...
Page 38: ...UNION SWITCH SIGNAL GENISYS II System Hardware Installation 2 26 August 1999 SM 6900B Rev 0 0 ...
Page 40: ...UNION SWITCH SIGNAL GENISYS II System Hardware Installation 3 ii August 1999 SM 6900B Rev 0 0 ...
Page 60: ...UNION SWITCH SIGNAL GENISYS II System Hardware Installation 3 20 August 1999 SM 6900B Rev 0 0 ...
Page 62: ...UNION SWITCH SIGNAL GENISYS II System Hardware Installation 4 ii August 1999 SM 6900B Rev 0 0 ...
Page 66: ...UNION SWITCH SIGNAL GENISYS II System Hardware Installation 4 4 August 1999 SM 6900B Rev 0 0 ...
Page 67: ......


