background image

03 

Using the Pump Safely


To ensure that the pump is handled correctly, read this section thoroughly before use. 
This manual and the warning labels on the pump include safety icons as an aid to understanding 
safety requirements. 
These  safety  icons  warn  the  operator  and  others  of  possible  dangers  and  damage  and  should 
always be followed. 


  Safety icons 

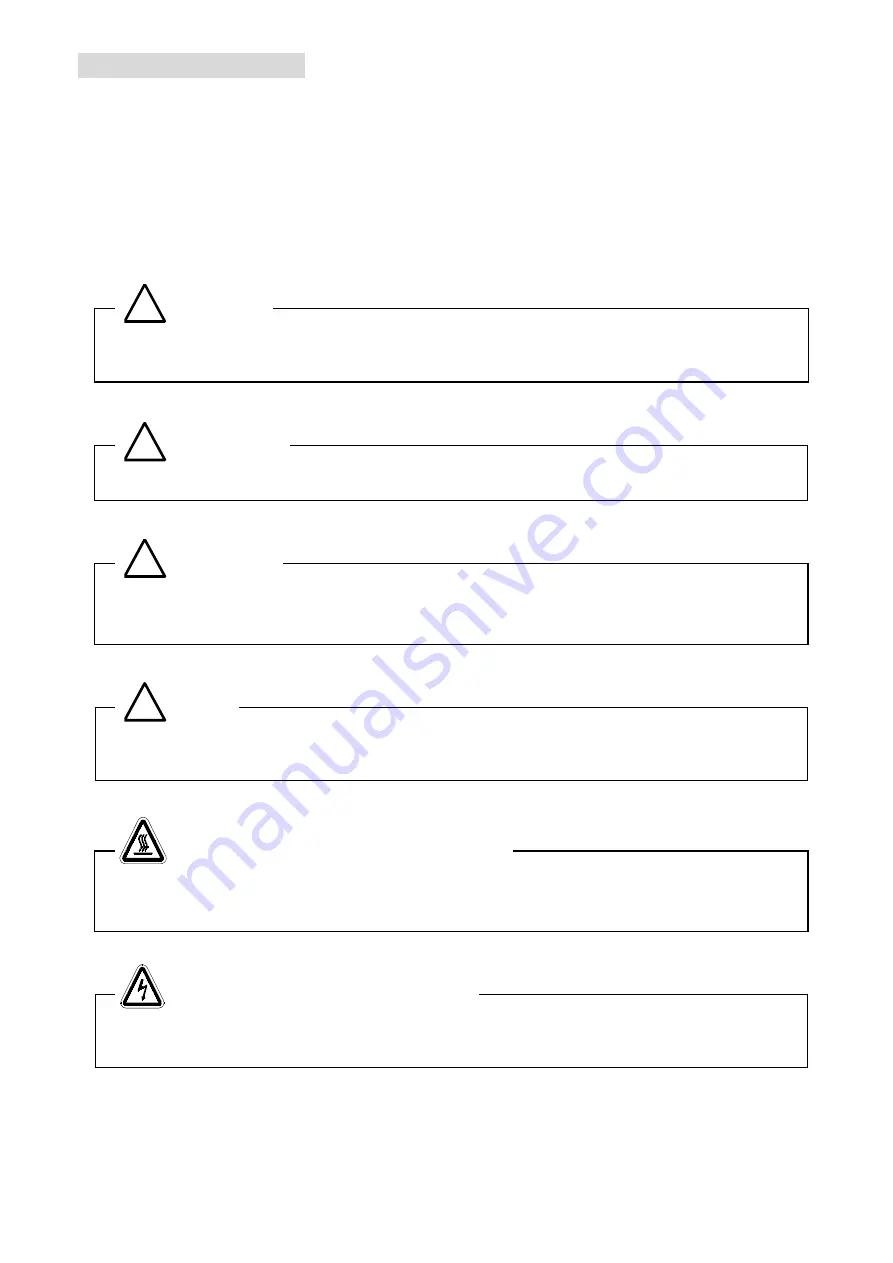
The meanings of the safety icons are as follows. 


Incorrect handling of the equipment is very likely to result in death or serious injury to the 
operator.


Incorrect handling of the equipment may result in death or serious injury to the operator. 


Incorrect handling of the equipment may result in light or medium injuries to the operator or 
damage to the equipment.


Incorrect handling of the equipment may result in damage to the equipment and hinder its 
correct operation.


Some parts of the pump may reach temperatures of 60°C or more during operation. 
Touching such components may result in burns. 


Always switch off the main power supply before installing electrical wiring or performing 
any electrical work on the pump. Failure to do so may result in electric shock.


!

Danger 


!

Warning


!

Caution


!

Note 

  Electric Shock Caution 

  High temperature Caution 

Summary of Contents for DOP-200S

Page 1: ...DOP 300S 150T 300SV 150TV Request to Users Please read this manual thoroughly to ensure safe and effective use of the equipment Keep this manual in a safe place Due to periodic improvements in perfor...

Page 2: ...2 Dimensions 2 3 Installation and Storage 3 3 1 Cautions for Installation and Storage 3 3 2 Environmental Conditions for Installation Storage and Operation 3 3 3 Location 3 3 4 Operational Checks Fol...

Page 3: ...cing and Assembling Consumables 14 6 5 Troubleshooting List 17 7 Product specification of each model 18 8 In Conclusion 22 Warranty 22 Usage Status Check Sheet used with requests for disassembly and r...

Page 4: ...ent correctly Read the section on Safe Use particularly closely Keep This Manual in a Safe Place After reading this manual be sure to keep it in a safe place which is readily accessible to others need...

Page 5: ...acturer if there are any problems with the pump 1 Ensure that the tube on the side of the pump is not gripped or bent when removing the pump from the packaging Holding the pump by this tube may damage...

Page 6: ...perator Incorrect handling of the equipment may result in death or serious injury to the operator Incorrect handling of the equipment may result in light or medium injuries to the operator or damage t...

Page 7: ...sing the pump Such use may result in fire 3 Ensure that the motor is freely ventilated to prevent overheating which may result in fire or burns Power Supply 4 Always switch off the main power supply a...

Page 8: ...may result in injury or fire 15 Inserting fingers or objects into the motor inlet may result in electric shock injury or fire 16 Operating the pump with the discharge outlet blocked or with a device...

Page 9: ...operates the pump will be extremely hot Touching the pump in this condition may result in burns 6 Touching the motor while the pump is in operation or while it is still hot immediately after having b...

Page 10: ...via the pump outlet gas may leak from the pump itself Do not use the pump to evacuate toxic gases If the pump is used to evacuate toxic gas appropriate care is required during maintenance 8 The pump w...

Page 11: ...e gases 5 Do not operate the pump for long periods at near atmospheric pressure 1 2 Specifications Table 1 1 Product Specifications 50Hz 60Hz Model DOP 200S DOP 200SV DOP 300S DOP 300SV Evacuate rate...

Page 12: ...ff the motor power supply circuit automatically to prevent burn out if the motor temperature rises due to overloading or there is a pump fault which prevents rotation 2 Always fit other protective dev...

Page 13: ...blocked 3 3 Location The pump should be installed level in a location with minimal dust and humidity This location should be selected in consideration of ease of installation and removal inspection a...

Page 14: ...diameter of 12 mm or more 3 Ensure that piping connected to the outlet does not cause back pressure Maximum back pressure is 0 03 MPa gauge pressure 4 In case of selecting the inlet pipe and exhaust...

Page 15: ...se and cup packing may harden under cold conditions and the pump may be difficult to start Use the following procedure in this case 1 Open the inlet to atmosphere and switch power ON OFF two or three...

Page 16: ...system introduce other gases resulting in increased pressure 5 2 Evacuation Rate The rate of evacuation varies with the type of gas used and its pressure The maximum rate of evacuation is reached whe...

Page 17: ...g backup inlet and outlet valves 6 Replacing connecting tubes 6 2 Maintenance Ensure that the following checks are conducted at least once every three days while the pump is in operation 1 Does the pu...

Page 18: ...utlet valves Replace in the event of abnormal wear hardening or cracking Cup packing Replace in the event of abnormal wear hardening or cracking Inlet and outlet valves Replace in the event of deforma...

Page 19: ...t 5 mm across flats torque settable to 8Nm 3 Philips screwdriver No 2 4 Cleaning solvent Solvent which does not affect rubber components eg ethyl alcohol 5 Paper Soft cloth or paper to remove contamin...

Page 20: ...e and panel 6 Stand the pump up so that the head may be removed vertically 2 Removing the Head Cover 1 Using the hex wrench loosen the four M6xL30 hex headed bolts holding the head cover and remove th...

Page 21: ...ore removing the cylinder 2 While wearing the gloves turn the fan slowly upwards Always ensure that gloves are worn 3 Remove the cylinder upwards 1 Loosen the screws 2 Pull the joint forward 3 Remove...

Page 22: ...four countersunk M5xL12 screws in the holder plate While wearing gloves hold the loosened connecting rod and loosen the four countersunk screws 3 Remove the holder plate 4 Remove the cup packing 5 Rem...

Page 23: ...et valve 5 Place a small amount of cleaning fluid on a soft cloth or paper and wipe the entire cylinder to remove oil and grease It is particularly important to clean the inlet and outlet valve mounti...

Page 24: ...g Consumables 1 Replace the cup packing Place the cup packing on the connecting rod to ensure that the canopy is downwards 2 Insert the new inlet valve rubber separator into the groove on the rear of...

Page 25: ...side of the inlet valve When set in place tighten the M3xL5 roundhead screw to prevent the inlet valve contacting the groove on the periphery 5 Place the outlet valve on the cylinder and place the bac...

Page 26: ...g the connecting tube ensure that the replacement tube is cut to the same pump length 10 Fit the connecting tube When replacing the connecting tube ensure that the replacement tube is cut to the same...

Page 27: ...correctly 5 1 3 Vacuum gauge is unsuitable 3 Measure with a calibrated vacuum gauge suitable for the pressure range 5 1 4 The inlet piping is too small in diameter or too long 4 Connect piping of an...

Page 28: ...4P 60Hz Fitted with thermal protection relay automatic reset type Voltage frequency 200V 50Hz 200V 60Hz 220V 60Hz 200V 50Hz 200V 60Hz 220V 60Hz Rated current A 1 8 1 7 1 6 1 8 1 7 1 6 Speed r p m 1382...

Page 29: ...60Hz Fitted with thermal protection relay automatic reset type Voltage frequency 200V 50Hz 200V 60Hz 220V 60Hz 200V 50Hz 200V 60Hz 220V 60Hz Rated current A 1 8 1 7 1 6 1 8 1 7 1 6 Speed r p m 1382 1...

Page 30: ...type 3 200V400W4P 60Hz Fitted with thermal protection relay automatic reset type Voltage frequency 200V 50Hz 200V 60Hz 200V 60Hz Rated current A 1 8 1 7 1 7 Speed r p m 1382 1651 1651 Inlet pipe O D...

Page 31: ...60Hz Fitted with thermal protection relay automatic reset type Voltage frequency 200V 50Hz 200V 60Hz 220V 60Hz Rated current A 2 5 2 3 2 2 Speed r p m 1401 1672 1701 Inlet pipe O D 16 I D 12 R1 2 Weig...

Page 32: ...e and inspection etc d Malfunctions caused by modifications or repairs carried out by a party other than the manufacturer or by a service company not approved by the manufacturer e Malfunctions caused...

Page 33: ...Industrial Safety and Health Law designates particular substances as the materials to be notified 2 Usage Status Operation Method Approx hours per day years and months Continuous Operation Intermitte...

Page 34: ...6 6397 2286 ULVAC KIKO Inc https ulvac kiko com en Please contact us for products Service Base or other Inquiries from here ULVAC Inc Components Division 2500 Hagisono Chigasaki Kanagawa 253 8543 Japa...

Reviews: