


MicronNav System
0656-SOM-00001-07
3
© Tritech International Ltd.
Table of Contents
Help & Support ........................................................................................................... 5
Warning Symbols ........................................................................................................ 6
1. Introduction ............................................................................................................. 7
2. Technical Specification ............................................................................................ 8
2.1. System ........................................................................................................ 8
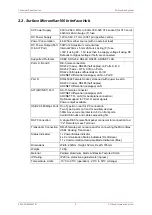
2.2. Surface MicronNav100 Interface Hub ............................................................ 9
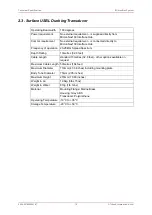
2.3. Surface USBL Dunking Transducer ............................................................. 10
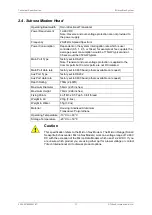
2.4. Subsea Modem Head ................................................................................. 11
3. Installing the System ............................................................................................. 12
3.1. Preparation ................................................................................................ 12
3.1.1. Using the system with the Micron INS .............................................. 12
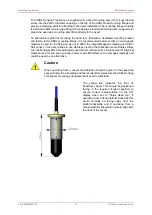
3.1.2. Mounting the Subsea Modem Head .................................................. 12
3.1.3. Mounting the Surface USBL Dunking Transducer .............................. 13
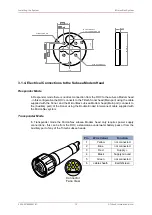
3.1.4. Electrical Connections to the Subsea Modem Head ........................... 15
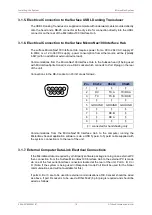
3.1.5. Electrical Connection to the Surface USBL Dunking Transducer ......... 16
3.1.6. Electrical Connection to the Surface MicronNav100 Interface Hub ....... 16
3.1.7. External Computer Data Link Electrical Connections .......................... 16
3.2. Installation .................................................................................................. 17
3.2.1. System requirements ....................................................................... 17
3.2.2. Installing Seanet Pro ....................................................................... 17
3.2.3. Surface Hardware Installation and Configuration ................................ 19
3.2.4. Subsea Hardware Responder Configuration ...................................... 21
3.2.5. Subsea Hardware Transponder Configuration ................................... 28
3.2.6. Connecting optional third party GPS Receiver ................................... 29
3.2.7. Connecting optional third party High Accuracy Heading/Pitch/Roll
MRU Sensors ........................................................................................... 31
3.2.8. Data Input from an ROV .................................................................. 41
3.2.9. Connecting optional third party Video Camera ................................... 43
3.3. Remote Beacons ........................................................................................ 47
3.4. Dry System Check ..................................................................................... 50
3.4.1. Setting up the Application ................................................................ 50
3.4.2. Transducers and integral Heading/Pitch/Roll Sensor Check ................ 50
3.4.3. Optional third party GPS Comms Check ........................................... 52
3.4.4. Optional third party Heading & MRU Check ....................................... 52
3.4.5. Optional third party Video Check ...................................................... 53
3.5. Hardware Reset ......................................................................................... 53
4. Operation .............................................................................................................. 55
4.1. Mobilising the System ................................................................................. 55
4.1.1. Pre Dive Checks ............................................................................. 55
4.1.2. Deploying the USBL Head ............................................................... 55
4.1.3. Measuring the Installation Offsets ..................................................... 55
4.1.4. Creating a New Job (Using Wizard) .................................................. 56
4.1.5. Editing an Existing Job .................................................................... 62
4.1.6. Loading an Old Job ......................................................................... 63
4.1.7. Job Settings for Mobile or Fixed Platforms ........................................ 64
4.1.8. Applying a Geodetic Datum Shift to the reference co-ordinates ........... 70
4.1.9. Launching the Subsea Installation .................................................... 77
4.2. Operating the System ................................................................................. 78
4.2.1. User Controls .................................................................................. 78
4.2.2. The Readings Explained .................................................................. 79
4.2.3. User Features ................................................................................. 79
4.2.4. Other Controls ................................................................................. 84
4.3. Logging and Replay ................................................................................... 86
4.4. Shutting Down the System .......................................................................... 86
5. Maintenance ......................................................................................................... 87