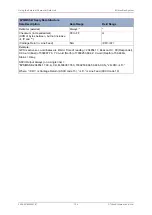
Conversion Between MicronNav Responder and Transponder
MicronNav System
0656-SOM-00001-07
134
© Tritech International Ltd.
confirm the settings and close the
AM100 ModemCfgSetup
page. After a few seconds the
reprogramming of the unit will be complete and "Node 85, Prog Cfg Done" will be displayed
in the status bar.
The magnet can now be removed from the body of the Responder unit and power switched off
and re-applied to activate the change. This now completes the conversion from Responder
to Transponder mode.
Close the
Seanet Setup
program and delete the
Seanet Pro Supervisor
shortcut.
11.2.1. Enabling the USBL Transducer Transponder Transmitter
Run the
Seanet Setup
program by clicking on the
Seanet Setup
icon from the desktop
or navigating to
Setup
from the
Applications
menu of an already running instance of
Seanet Pro.
Click the
Action
arrow button in the
SEAHUBNAV100
row followed by
Setup
from the drop-
down menu. A warning will be displayed, read this and select
OK
to continue to open the
SeaHub Setup
page. Click on
SeaNav100
tab and activate the Transponder transmitter by
enabling the
Has Transmit
check box.
Confirm the settings and close the
SeaHub Setup
page. After a few seconds the
reprogramming of the unit will be complete and "Node 90, Prog Cfg Done" will be displayed
in the status box. The
SEAHUBNAV100
entry will temporarily disappear from the list while the
unit resets to activate the change.
11.2.2. Configure Seanet Pro for Transponder Mode
To configure the Seanet Pro software to operate in Transponder mode first run the program
by selecting the
Seanet Pro
icon from the desktop. If the screen differs from the screen


