


66
Remote Session Operation
(continued)
Virtual Media
Virtual Media via Remote Session
When accessing a connected computer remotely, you can use media from the computer you are accessing the KVM switch with on the remote
computer. You are also able to access media connected to the USB ports on the front of the KVM switch; however, media connected to these
ports needs to be mounted via the local console. (See
Virtual Media via Local Console
section under
Control Panel
in
Remote Session Operation
for details.) To access virtual media via remote session, follow the instructions below.
Note
: When accessing the KVM remotely with a Windows
Vista or 7 computer, you must run Internet Explorer as an administrator for virtual media to function properly.
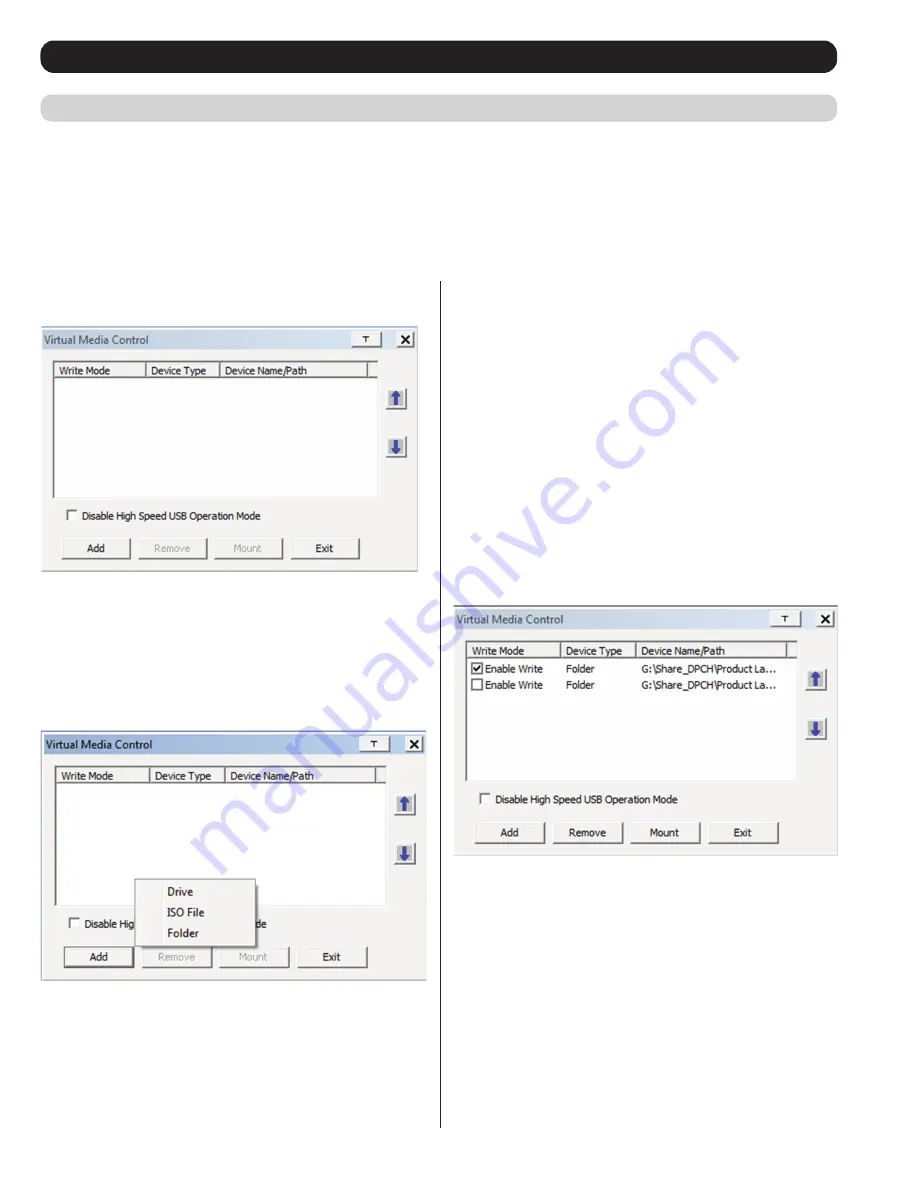
1. Click the
Virtual Media
icon on the control panel to bring up the
following screen.
Note
: The T button in the upper-right corner brings up a slider bar
that allows you to adjust the transparency of the virtual media screen.
When you’re finished making an adjustment, simply click anywhere
on the screen to close the slider bar.
2. Click the
Add
button and then select the desired media from the
list of media sources that appears. Each selected media source will
allow you to choose the available drive, file, folder or removable
disk.
Note
: If your media source is USB 1.1, check the
Disable High Speed
USB Operation Mode
checkbox.
3. Repeat this step to add as many media sources as you want to the
Virtual Media
screen. To remove a media source from the list,
highlight it and click the
Remove
button.
Note
: Only 3 media
sources can be used at any one time, with the top 3 sources in
the list being the active devices. To rearrange the device order,
highlight the desired device and use the arrow keys on the right of
the screen to move the device up or down in the list.
4. Some media sources are
Read Only
, whereas others are
Read/
Write
. Those that are
Read/Write
can be viewed on the remote
computer, and can have data from the remote computer added to
them. Those that are
Read Only
can only be viewed.
Read Only
media sources will be grayed out in the list, not allowing you to
check the
Enable Write
checkbox to the left of the source.
Read/
Write
sources will not be grayed out, and you will be able to decide
whether data can be added to them or not. By default,
Read/Write
sources are displayed with the
Enable Write
checkbox unchecked,
which means that data cannot be added to them. To allow data from
the remote computer to be added to a media source, simply check
the
Enable Write
checkbox to the left of it in the list.
5. Once all media sources are added, and the desired 3 media sources
are at the top of the list, click the Mount button to close the dialog
box and open the media sources on the remote computer.
Note
:
Depending on the speed of your network and the size of the media
source, it may take 30 seconds or so for the dialog box to close and
the media to open on the remote computer.
6. To disconnect the media sources from the remote computer, click
on the
Virtual Media
icon in the control panel.
Control Panel
(continued)


