Tripp Lite B064-008-01-IPG Owner'S Manual Download Page 53

53

OSD Operation 

(continued)

The 

Date/Time

 page allows the user to set the date and time 

parameters for the KVM switch. The following section describes the 
settings on this page.

Time Zone

•  Select the Time Zone and City that most closely resembles where 

the KVM switch is in using the drop-down menu at the top of this 
section.

•  If your area uses Daylight Savings Time, check the 

Daylight 

Savings Time 

checkbox.

To manually set the date and time, do the following:

1. In the 

Date 

section, select the current month using the drop-down 

menu.

2. If needed, click the < or > buttons in the 

Date 

section to move 

backward or forward to the correct year.

3. In the calendar in the 

Date 

section, click on the current day.

4. In the 

Time 

section, enter in the current time using the 24 hour 

HH:MM:SS format.

5. Click the 

Set 

button in the 

Time 

section to apply your changes.

Network Time

To have the time automatically synchronized to a network time server, 
do the following:

1. Check the 

Enable Auto Adjustment 

checkbox.

2. Select a time server from the 

Preferred Time Server

 drop-down list; 

or, check the 

Preferred Custom Server IP 

checkbox and enter in the 

IP of your preferred time server.

3. If desired, repeat step two to enter an 

Alternate Time Server

.

4. Key in the desired number of days between synchronization in the 

Adjust Time Every __ Days

 field.

5. Click the 

Adjust Time Now

 button to synchronize immediately.
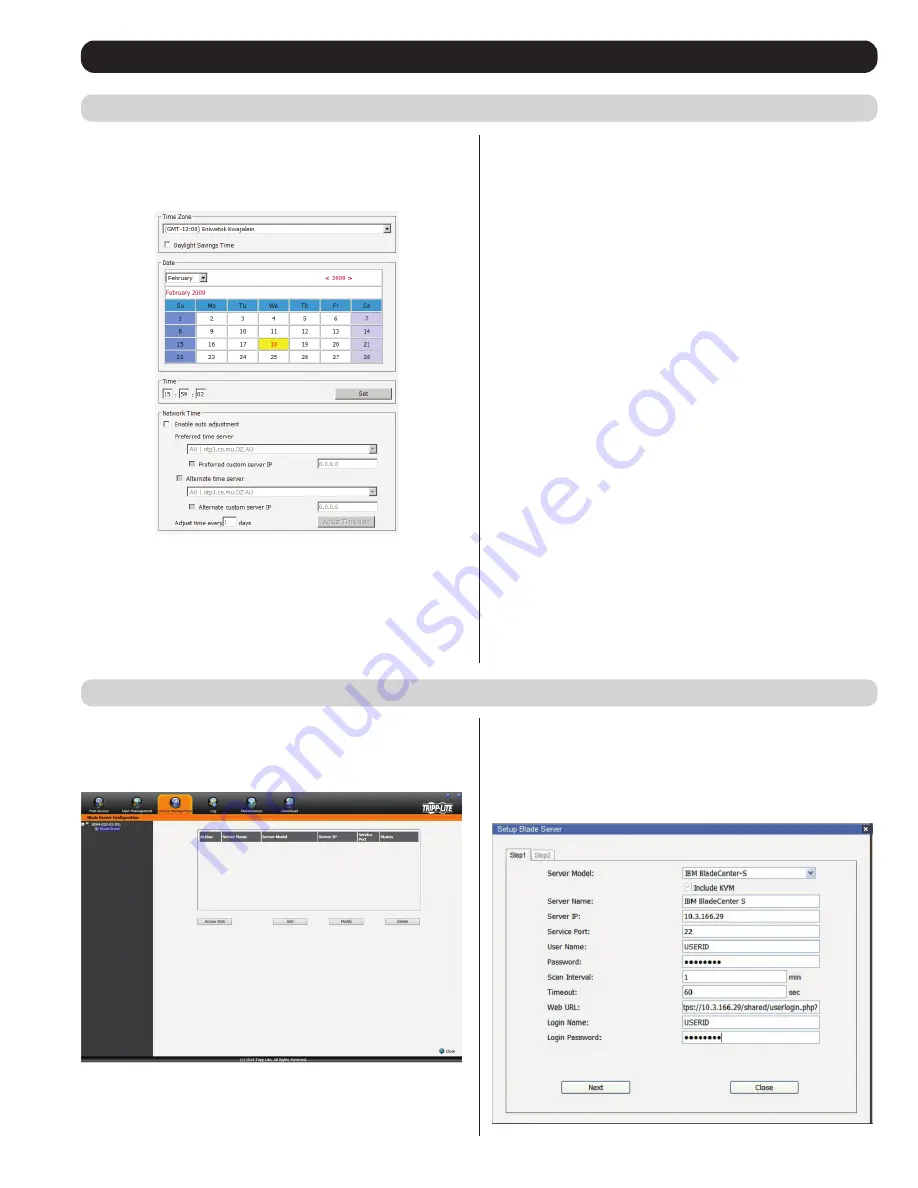
Date/Time

Blade Server Configuration

For Super Administrators and Administrators/Users who have been 
given permission, when you access the 

Device Management

 section 

with a Blade Server selected in the Sidebar tree, its Configuration 
page appears.

Adding a Blade Server

To configure a new blade server, do the following.

1. Select its icon in the Sidebar tree, then click 

Add

 in the main panel. 

The 

Setup Blade Server 

dialog box appears, with the Step 1 tab 

displayed.

Summary of Contents for B064-008-01-IPG

Page 1: ...4 064 08 IPG 2 Power Cords C13 to 5 15P Connectors 1 RJ45 Female to DB9 Male Adapter 1 Grounding Wire 1 Rack Mount Kit 1 Set of Foot Pads 1 CD Includes Owner s Manual Quick Start Guide and Device File...

Page 2: ...Configuration 26 Multi View Configuration 28 Blade Configuration 29 User Management 30 Device Management 36 Device Information 36 Operating Mode 37 Network 37 Advanced Network Management Settings 39...

Page 3: ...atures advanced FPGA graphics processor for improved video quality Multi language support OSD can be displayed in English Spanish French German Russian Italian Japanese Korean traditional Chinese and...

Page 4: ...92 ft 150 m Max Distance B055 001 SER Note SIUs that were purchased prior to that of your KVM switch may require a firmware upgrade in order for them to work properly see Maintenance under OSD Operati...

Page 5: ...bps 4 USB Ports Note Only computers connected to the KVM by a B055 001 USB V2 can access the KVMs Virtual Media functionality Additional USB ports support external keyboard and mouse as well as virtua...

Page 6: ...M switch to the primary network plugs in here 5 Grounding Terminal Connect the included grounding wire to this terminal to ground the KVM switch 6 Modem Port An optional dial in connection is availabl...

Page 7: ...your electrician to replace your obsolete outlet Do not attempt to defeat the purpose of the grounding type plug Always follow your local national wiring codes Position system cables and power cables...

Page 8: ...hat can safely support its weight plus the weight of attached cables When placing the KVM switch on a desktop remove the backing material from the rubber feet that came with this package and affix the...

Page 9: ...s you will be connecting including all pre existing devices on the installation have been turned off 2 Use Cat5e 6 cabling to connect an available KVM port on the first stage unit to a B054 001 PS2 or...

Page 10: ...he installation is assigned a unique Port ID The Port ID is a one or two segment number that is determined by the Stage Level and KVM port number of the KVM switch to which the computer server is conn...

Page 11: ...rst time you must access the B064 Series KVM Switch in order to give it an IP address to which users can connect B064 Series KVM switches support both standard IPv4 and IPv6 There are three methods of...

Page 12: ...DNS Server address it is required that you enter the Preferred DNS server but the Alternate DNS server is an optional field See Network section under Device Management for more information on these se...

Page 13: ...x informing you that the change completed successfully appears click OK The B064 Series KVM Switches can be accessed in the following ways via local console an internet browser the AP Windows Client a...

Page 14: ...You may need to run Internet Explorer as an Administrator in order to view and install the certificate b Click Install Certificate c Follow the Installation Wizard to complete the installation Unless...

Page 15: ...onnect to bring up a login dialog box Provide a Username and Password as provided by your system administrator and click OK to establish a connection with the B064 Series KVM Switch When you have fini...

Page 16: ...for details this section of the main page will display a welcome message This is disabled by default 7 Interactive Display Panel This is the main work area of the OSD Different interfaces are displaye...

Page 17: ...available to Super Administrators or Administrators Users who have been given access Download Users with appropriate permission can click this icon to download the AP Windows Client the AP Java Clien...

Page 18: ...rator you will not be able to access the connected computers 1 When using the Windows ActiveX Viewer and clicking on a port for the first time a screen will open up and you will be prompted to install...

Page 19: ...onvenience especially in large installations with many KVM switches and ports each port can be given a unique name To assign modify or delete a port name follow the instructions below Note Administrat...

Page 20: ...s can view the port The Timeout function does not apply to ports which have this setting Occupy The first user to switch to the port has control over the port However additional users may view the por...

Page 21: ...r allows you to control which ports are displayed in the Port Selection List as well as which ports are scanned when Auto Scan Mode is invoked When you click Filter the bottom of the panel changes to...

Page 22: ...Offline Connect A Connect icon will be located underneath the port list Highlight a port and click Connect to open up a remote session with the selected port displayed Note When accessing the KVM via...

Page 23: ...w on the left hand panel Note Right clicking on a port that is already in a Favorites bookmark will give you the option to cut the port out of that bookmark and paste it into another Favorites bookmar...

Page 24: ...re is no input from the console for the amount of time set with this function the screen is blanked Key in a value from 1 30 minutes A setting of 0 disables this function The default is 0 disabled Whe...

Page 25: ...ssions sub section Super Administrators can see all accounts whereas Administrators can only see Administrator User and Group accounts The browser and non browser Access sub sections are the same exce...

Page 26: ...on the box in the Config column next to the account you wish to edit Click to toggle Config access on off A check mark enables access an X disables access Note Config checkboxes are provided as a way...

Page 27: ...Mode Selects how the port is to be accessed when multiple users are logged onto the same port at the same time Choices are Exclusive Occupy and Share Exclusive The first user to access the port has e...

Page 28: ...tended Display Setting dialog box to select the KVM ports connected to a computer Remove Click to delete a KVM port from the Port List Up Down Click to move a KVM port up or down in the Port List This...

Page 29: ...e associated port as shown by the screenshot of port 08 below For HP blade servers associations are made on a blade by blade basis Each blade is associated with a single port To access a blade click o...

Page 30: ...when they log in The User Management section is displayed differently when accessing the OSD via web browser or one of the non browser clients The web browser version contains two sub sections one fo...

Page 31: ...Note The Port Configuration setting simply allows for an account to be given Configuration access to the connected ports Configuration permission for each port must still be given via the Access sub...

Page 32: ...ts To delete a user account do the following 1 Select the desired user s name from the Main Panel and click Delete 2 A confirmation dialog box will appear asking if you are sure you want to delete the...

Page 33: ...click Delete 2 A confirmation dialog box will appear asking if you are sure you want to delete the selected group account Click OK Assigning Users to Groups There are two ways to assign users to a gr...

Page 34: ...4 Click the Right Arrow to put the user s name into the Selected column 5 Repeat the above for any other users that you want to add to the group 6 Click Save when you are done Removing Users From a Gr...

Page 35: ...To assign device permissions do the following 1 Select the user group name from the user group list or select the user group name in the main panel and click the Modify button 2 In the user group note...

Page 36: ...of the KVM switch is displayed here Main FPGA The Main Field Programmable Gate Array FPGA is displayed here Console FPGA The Console Field Programmable Gate Array FPGA is displayed here Note Does not...

Page 37: ...ius or Fahrenheit See Specifications section for fan and sensor location The Operating Mode sub section allows the working parameters of the KVM to be set The settings in this sub section are describe...

Page 38: ...ch will have its IP address assigned to it by a DHCP server upon booting up and the remaining fields in this section will be grayed out This option is checked by default Set IP Address Manually Fixed...

Page 39: ...s based log server that can be installed on a computer See The Log Server section for details The Log Server section on this page is where the external log server can be enabled and set up for use To...

Page 40: ...nable Check the Enable checkbox to allow AD LDAP authentication and authorization Preferred Alternative LDAP From the drop down menu specify either Preferred LDAP or Alternative LDAP Server IP Fill in...

Page 41: ...irectory Schema Snap in 1 Open a Command Prompt 2 Key in regsvr32 schmmgmt dll to register schmmgmt dll on your computer 3 Open the Start menu Click Run and key in mmc a Click OK 4 On the File menu of...

Page 42: ...k OK to complete step 1 of the procedure Common Name userprofile LDAP Display Name userprofile Syntax Unicode String Minimum 1 Maximum 255 Note The Unique X500 Object ID uses periods not commas Step 2...

Page 43: ...up select userprofile then click OK to complete step 2 of the procedure d Right click on the user s name and select Properties e On the Attribute Editor page of the dialog box that appears select user...

Page 44: ...2 2 29 db 4 3 29 openssl 0 9 8awin32_Setup exe i Click Apply to save the change and complete the procedure j Repeat Step 3 Edit Active Directory Users With the Extended Schema for any other users you...

Page 45: ...gure below Starting the OpenLDAP Server To start the OpenLDAP Server run slapd the OpenLDAP Server executable file from the command line slapd supports a number of command line options the most import...

Page 46: ...ngs continued Using the New Schema To use the new schema do the following 1 Save the new schema file e g B064 Series KVM switch schema in the OpenLDAP schema directory 2 Add the new schema to the slap...

Page 47: ...hen this option is checked the ISP connection will remain active until the network connection is reestablished PPP Online Time When this option is checked the ISP connection will remain active for the...

Page 48: ...Windows XP To set up a dial in connection to the B064 Series KVM Switch under Windows XP do the following 1 From the Start menu select Control Panel Network Connections Create a New Connection 2 When...

Page 49: ...Select the desired IP filter from the list and click Edit An Edit dialog box similar to the Add dialog box will appear 2 Delete the old start IP address and replace it with the new one 3 Delete the ol...

Page 50: ...n system performance mouse keyboard video with the following having the most impact RC4 impacts performance the least out of the four encryption methods DES is second to least in impact followed by 3D...

Page 51: ...nnected to the KVM will not be accessible on the connected computers Browser Service When this box is checked browser access to the KVM switch can be limited by selecting one of the three options in t...

Page 52: ...e certificate will not be valid Email Address administrator yourcompany com 3 When all fields have been filled out all fields are required click the Create button 4 Click the Get CSR button and then s...

Page 53: ...to apply your changes Network Time To have the time automatically synchronized to a network time server do the following 1 Check the Enable Auto Adjustment checkbox 2 Select a time server from the Pre...

Page 54: ...de server for information Timeout Enter in the amount of time that the KVM switch will wait for a response from the blade server before it stops scanning Web URL Enter in the IP address IPv4 IPv6 or d...

Page 55: ...to the right of it to bring up a calendar that allows you to select a desired date and time Click the Apply button to display all of the events that occurred between the date time entered into the Sta...

Page 56: ...ad Progress bar 6 When the upload is complete a pop up appears stating System will reboot in a few seconds The KVM switch will reboot this may take a few minutes and the upgrade will be complete In th...

Page 57: ...u wish to perform a firmware upgrade without checking to see if the current firmware version is newer than the upgrade file simply uncheck this checkbox 3 Click the Adapter Firmware Info button to dis...

Page 58: ...to inform you that the procedure succeeded Terminal Terminal provides a command line to execute options using a terminal interface Type a command in the window and hit Enter to execute it Available c...

Page 59: ...ging out Following the reset allow approximately 30 to 60 seconds before logging back into the KVM If you change the IP address of the KVM the Reset on Exit checkbox is automatically checked To preven...

Page 60: ...te session via the Windows or Java browser and non browser clients the control panel and its functionality remain the same To display the Control Panel hover your mouse pointer over the top center of...

Page 61: ...is not the same For example you can use F1 F2 F3 for one action and F2 F1 F3 for another but you cannot use F1 F3 F2 once F1 F2 F3 has been used Remote Session Operation continued The table below list...

Page 62: ...created they are available to be assigned to ports with only one macro allowed per port See the Port Configuration section under OSD Operation for details on assigning system macros User Macros The U...

Page 63: ...e switch will use that selection to automatically adjust the Video Quality settings to optimize the quality of the video display Since network conditions vary if none of the preset choices appear to w...

Page 64: ...t If the video auto sync fails to align the screen properly use the screen position arrows in the Video Settings screen to make manual adjustments Screen Mode Click this icon to toggle Full Screen mod...

Page 65: ...ges that users post to the board as well as system messages display in this panel If you disable chat messages that get posted do not appear Ctrl Alt Delete Click this icon to send the Ctrl Alt Delete...

Page 66: ...o the Virtual Media screen To remove a media source from the list highlight it and click the Remove button Note Only 3 media sources can be used at any one time with the top 3 sources in the list bein...

Page 67: ...in the upper right of the on screen keyboard and select the desired language To expand the keyboard to include the number pad click on the arrow icon to the right of the language drop down menu Mouse...

Page 68: ...re having syncing problems after adjusting the mouse properties try the following methods to help synchronize the local and remote mouse pointers Note Mouse synchronization may require several seconds...

Page 69: ...mize Control Panel screen which allows you to choose which icons are displayed in the control panel as well as edit some of its features Customize Control Panel The box on the left side of the screen...

Page 70: ...hat you are accessing the connected computers on bus channel 1 and there are 2 users currently accessing bus channel 1 at the same time Snapshot The Snapshot section allows you to determine where snap...

Page 71: ...k to skip from the current port to the last accessible port on the installation without having to invoke the OSD Click to bring up the OSD Click to close the OSD toolbar Click to invoke Panel Array Mo...

Page 72: ...spect ratio Exit Panel Array mode Each panel represents one B064 Series KVM Switch s ports beginning with Port 1 at the upper left and continuing from left to right and top to bottom When the Array is...

Page 73: ...it Individual users can increase decrease the number of panels they can see in Panel Array mode however the picture quality may get worse as the number of panels is decreased For this reason it is rec...

Page 74: ...The first time your run it a screen similar to the one below appears The Menu bar consists of four drop down menus Configure Events Options Help Note If the Menu Bar appears to be disabled select one...

Page 75: ...emove it from the Log Server click OK Descriptions of the fields in this dialog box are shown in the table below Field Description Address This can either be the IP address of the B064 Series KVM Swit...

Page 76: ...unit for the search If no units are selected the search is performed on all of them Priority List Sets the level for how detailed the search results display should be If nothing is selected all result...

Page 77: ...of the Log Server The Log Server Main Screen is divided into two main panels an upper List panel that displays all devices that have been added to the Log Server and a lower Event panel that displays...

Page 78: ...is not connected this field displays Waiting This means that the Log Server is not communicating with the B064 Series KVM Switch and will not record its events This occurs when the Log Server s MAC a...

Page 79: ...15 Sun Keyboard The PC compatible 101 104 key keyboard can emulate the functions of the Sun keyboard when the Control key Ctrl is used in conjunction with other keys The corresponding functions are sh...

Page 80: ...e time or only the remote mouse pointer See Mouse Pointer section under OSD Main Page in OSD Operation for details The display on the remote console is distorted and performing an Autosync doesn t res...

Page 81: ...er as a Virtual Media device If the folder is formatted with the FAT16 file system it must be less than 2Gb to be mounted Appendix continued AP Windows Client Troubleshooting Problem Action Windows Cl...

Page 82: ...eed to have the administrator disable UAC Panel Array Mode Troubleshooting Java Applet AP Java Client Troubleshooting Problem Action The video resolution is of low quality This occasionally occurs whe...

Page 83: ...HD15 interface systems e g Sun Blade 1000 servers The display resolution should be set to 1024 x 768 60Hz Under Text Mode go to OK mode and issue the following commands setenv output device screen r1...

Page 84: ...Remote 1 Local 1 Remote 1 Local 2 Remote 1 Local 4 Remote 1 Local 1 Remote 1 Local 2 Remote 1 Local 4 Remote 1 Local 8 Remote Dual Power Supplies Yes Power Input Connector x2 IEC 320 C6 I P Rating 100...

Page 85: ...he KVM switches temperature sensors adjust the fan speed accordingly If any of the four sensors sense a temperature greater than 89 F 32 C all of the fans will be set to spin at half speed When all fo...

Page 86: ...f use of equipment loss of software loss of data costs of substitutes claims by third parties or otherwise FCC Notice Class A This device complies with part 15 of the FCC Rules Operation is subject to...

Reviews: