background image

WSP™ 

DATA SHEET


WSP™ SELF-PRIMER PUMPS 

WSP-D300_8 

Rev. 3 


01/09/20 


© 2019 The Factory 

50 

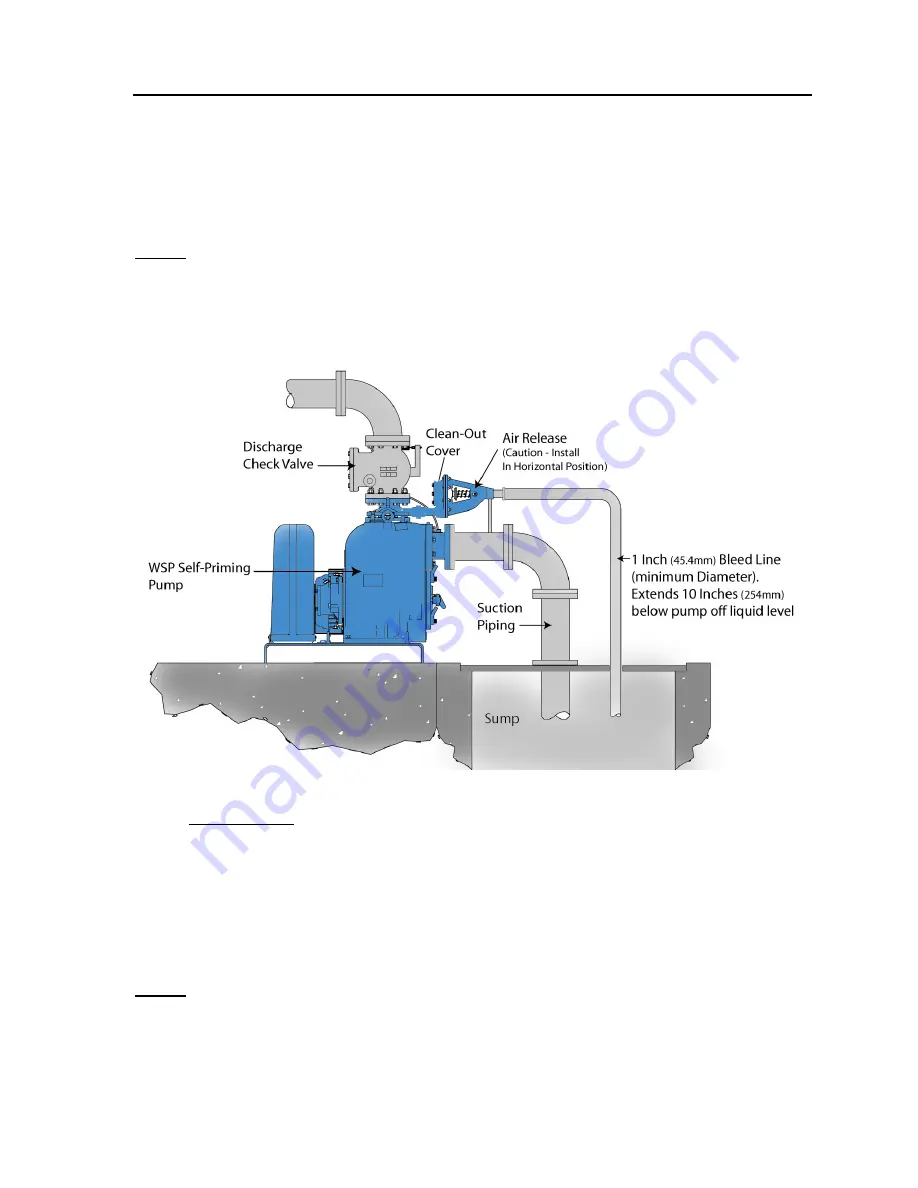
The valve outlet opening is at the opposite (small) end of the valve body. It 

also has 1-inch standard NPT pipe threads.  A bleed line that drops back to 

the wet-well or sump must be connected to the valve outlet.  It is imperative 

that the bleed line is the same size or larger than the inlet piping.  When 

possible, do not use elbows in a bleed line made of piping. 


NOTE:


Every  WSP™  ARV  should be modified to accommodate an independent 

bleeder line that can slope backward toward a sump or the wet-well (Figure 

18).  When more than one WSP™ ARV is installed in a system, each valve 

must be fitted with an independent bleeder line. Never use a common 

manifold pipe.  Contact your local WSP™  distributor or the factory for 

information about WSP™ ARV installation for individual applications. 


Figure 18


H.  ALIGNMENT 


To maximize mechanical operation of your WSP™  Self-Primer Pump be sure to 

correctly align your pump and its power source. This is crucial to maintain high levels 

of performance. It is essential that both drive and pump in the V-belt driven and the 

flexible coupling systems are mounted to allow their shafts to be in  alignment and 

parallel to each other.  Prior to commencing operation, the operator or service staff 

must 

inspect for correct alignment once the pump and piping have been installed. 


NOTE:


Check Section IX OPERATION, Part B. Start-Up for Rotation prior to final 

pump alignment.


Both drive and pump are aligned prior to being shipped when the Weir Self-Primer Pump is  

mounted at the factory,  During shipping and handling, the pump and drive may lose the  

factory alignment.  Therefore, it is vital that both drive and pump be inspected and realigned 

Summary of Contents for 8-WSP

Page 1: ...Self Priming Pumps Installation Operation Maintenance Instructions Model 8 WSP WSP D300_8 Trillium Flow Technologies Tel 801 359 8731 Fax 801 530 7531 Copyright 2019 The Factory All rights reserved ...

Page 2: ...eal Installation 29 2 Cartridge Seal Installation 30 K INSTALLING ADJUSTING THE IMPELLER 30 L INSTALLING THE ROTATING ASSEMBLY 32 M INSTALLING THE SUCTION CHECK VALVE 32 N INSTALLING ADJUSTING THE COVERPLATE 32 V MAINTAINING THE PRESSURE RELIEF VALVE 34 A Final Pump Assembly 35 VI LUBRICATION 35 A Seal Cavity 35 B Bearing Cavity 35 C Power Source 36 VII TROUBLESHOOTING 36 VIII INSTALLATION 38 A PU...

Page 3: ... Couplings 51 4 V Belt Drives 52 IX OPERATION 53 A PRIMING 53 B START UP 54 C OPERATION 54 1 Lines with a Bypass 54 2 Lines Without a Bypass 55 3 Leaking 55 4 Liquid Temperature and Overheating 55 5 Strainer Check 56 6 Checking the Pump Vacuum 56 D STOPPING 57 1 Preserving the Pump in Cold Weather 57 E CHECKING THE BEARING TEMPERATURE 58 X TECHNICAL DATA 59 A 8 WSP Curve 59 B 8 WSP General Arrange...

Page 4: ...It pumps liquids containing large entrained solids as well as slurries Its basic material is ductile iron with a cast steel impeller and a steel wearplate For questions about the pump or its application not covered in this manual or other documentation included with the unit please contact your WSP distributor or write to Weir Specialty Pumps P O Box 209 Salt Lake City UT 84110 0209 Phone 801 359 ...

Page 5: ...THE PROCEDURE HAZARDS OR UNSAFE PRACTICES WHICH COULD RESULT IN MINOR PERSONAL INJURY OR PRODUCT OR PROPERTY DAMAGE WHICH COULD RESULT FROM FAILURE TO FOLLOW THE PROCEDURE II SAFETY The installation operation and maintenance warnings for all sized WSP Self Primer WSP Pumps follows PLEASE STUDY THESE INSTRUCTIONS CAREFULLY BEFORE PUTTING THE PUMP INTO SERVICE ADHERENCE TO THESE INSTRUCTIONS IS NECE...

Page 6: ...AUSE PARTS TO BE EXPELLED VIOLENTLY BEFORE SERVICING ALLOW SUFFICIENT TIME FOR AN OVERHEATED PUMP TO COMPLETELY COOL ONCE THE PUMP HAS COMPLETELY COOLED DRAIN THE LIQUID FROM THE PUMP BY REMOVING THE CASING DRAIN PLUG WHEN REMOVING THE DRAIN PLUG USE CAUTION FAILURE TO DO SO MAY RESULT IN INJURY PLATES COVERS GAUGES OR FITTINGS MUST NOT BE REMOVED FROM AN OVERHEATED PUMP LIQUIDS IN THE PUMP CAN RE...

Page 7: ...THE PUMP TO COOL BEFORE SERVICING ANY EQUIPMENT DO NOT OPERATE PUMP WITH BOTH SUCTION AND DISCHARGE VALVES CLOSED OR WITH SUCTION OR DISCHARGE BLOCKED BY CLOGGING THIS COULD CAUSE DAMAGE AND IS DANGEROUS THESE PUMPS ARE TO BE USED FOR LIQUID SERVICE ONLY EXCESSIVE PRESSURE CAN CAUSE MALFUNCTION LEADING TO INJURY PUMP LIFTING EYES ON THE SELF PRIMING PUMP ARE ONLY DESIGNED TO HANDLE THE WEIGHT OF T...

Page 8: ... PUMP HAS BEEN ENGINEERED TO PUMP LIQUIDS THAT CONTAIN SOLIDS OR SLURRIES AT NO TIME SHOULD THE LIQUID BE VOLATILE CORROSIVE OR COMBUSTIBLE FAILURE TO DO SO COULD DAMAGE THE PUMP OR RESULT IN INJURY AFTER THE PUMP CASING HAS BEEN FILLED REINSTALL AND TIGHTEN THE FILL PLUG FAILURE TO OPERATE THE PUMP WITHOUT ALL CONNECTION PIPING SECURELY INSTALLED COULD CAUSE LIQUID IN THE PUMP TO BE FORCED OUT UN...

Page 9: ...ON AND DISCHARGE VALVES 6 CAREFULLY AND SLOWLY VENT THE PUMP 7 DRAIN THE PUMP PUMP LIFTING EYES ON THE SELF PRIMING PUMP ARE ONLY DESIGNED TO HANDLE THE WEIGHT OF THE BARE PUMP BEFORE LIFTING ENSURE THAT ALL SUCTION AND DISCHARGE HOSES AND PIPING HAVE BEEN REMOVED FROM THE PUMP AND IT IS FREE OF ANY BASE AND DRIVER EQUIPMENT LIFTING DEVICES SUCH AS CHAIN LIFTING EYES HOOKS ETC MUST BE APPROVED BY ...

Page 10: ... ANY ACCOMPANYING DECALS SERIOUS DAMAGE COULD OCCUR TO THE PUMP ASSEMBLY IF BOTH LIFTING EYES ARE NOT UTILIZED DURING LIFTING AND MOVEMENT OF THE UNIT ONLY LIFT THE PUMP WITH THE LIFTING EYES IN HIGH DISCHARGE HEAD APPLICATIONS THE DISCHARGE THROTTLING VALVE MUST BE GRADUALLY CLOSED BEFORE THE PUMP IS STOPPED BYPASS LINES MUST BE SECURED AGAINST BEING DRAWN INTO THE PUMP SUCTION INLET WHEN RETURNE...

Page 11: ...N A PROPERLY EQUIPPED SHOP BY QUALIFIED TECHNICIANS IT IS RECOMMENDED THAT THE BEARING BE CLEANED AND INSPECTED IN PLACE TO PREVENT DAMAGE DURING REMOVAL FROM THE SHAFT WE HIGHLY RECOMMEND REPLACEMENT OF THE BEARINGS ANYTIME THE SHAFT AND BEARINGS ARE REMOVED BEARINGS MUST BE KEPT IN AN ENVIRONMENT THAT IS FREE OF ALL DIRT AND FOREIGN MATERIAL FAILURE TO DO SO WILL RESULT IN A SHORTER BEARING LIFE...

Page 12: ...PERATURES ABOVE 160 O F 71 O C IS NOT RECOMMENDED FOR THIS SEAL THIS PUMP SHOULD NOT BE USED AT HIGHER OPERATING TEMPERATURES WITHOUT CONSULTING THE FACTORY WHEN REUSING AN OLD SEAL DO NOT ATTEMPT TO SEPARATE THE ROTATING PORTION OF THE SEAL FROM THE SHAFT SLEEVE DURING USE THE RUBBER BELLOWS WILL BOND TO THE SLEEVE AND ATTEMPTING TO SEPARATE THEM WILL DAMAGE THE BELLOWS BEFORE REINSTALLING THE IM...

Page 13: ...ed life from your WSP Self Primer pump If you have questions about your current or proposed application contact your WSP distributor or the Weir Specialty Pump factory The key to a quality preventive maintenance program is continuous record keeping Always note changes in suction and discharge gauge readings if your pump includes such gauges If there are changes between regular inspections it may i...

Page 14: ...following If your pump is driven by V Belts Check tightness Alignment of belts Tension belts Check the following If your pump is direct drive with a coupling Inspect the coupling for signs of Wear Misalignment Loose fasteners Check the following If your pump has an Air Release Valve Inspect and lubricate Semi Annually Service Owner Status Notes Check the following Adjust impeller to wear plate cle...

Page 15: ...ssible situation that could happen during maintenance or repair of the WSP Self Primer Pump As always it is the owner s and maintenance staff s duty to be sure that safety and established maintenance procedures and processes are used Any procedures or processes not noted in this manual should only be completed after determining that personal safety and equipment integrity is not harmed A number of...

Page 16: ... TO WORKING ON THIS PUMP ALWAYS LOCK OUT OR DISCONNECT THE PUMP FROM ITS POWER SOURCE IT MUST REMAIN INOPERABLE DURING REPAIRS To take apart and repair the power source refer to the documentation supplied with your power source or contact your local power source representative Digit 1 Digit 2 Digit 3 Digit 4 Digit 5 Digit 6 Digit 7 Digit 8 Digit 9 Case Cover Plate Seal Plate Wear Plate Bearing Hou...

Page 17: ...VERS PLATES OR PLUGS 5 CLOSE THE SUCTION AND DISCHARGE VALVES 6 CAREFULLY AND SLOWLY VENT THE PUMP 7 DRAIN THE PUMP A REMOVING THE COVER PLATE WEARPLATE Remove the pump casing drain plug Drain the pump before attempting to maintain or repair the unit Once the cover plate assembly is removed the wearplate becomes accessible and is easy to maintain When service or repair is completed clean inspect a...

Page 18: ...e not sold separately C REMOVING THE ROTATING ASSEMBLY To service the rotating assembly without disconnecting the suction or discharge piping remove the power source This will provide clearance for servicing To prevent seal cavity oil from escaping when the impeller is loosened remove the seal cavity drain plug and drain the oil in the seal cavity before loosening the impeller With the rotating as...

Page 19: ...bar to lever against the arm of the lathe dog in a counterclockwise direction You should be facing the drive end of the shaft Be very careful and avoid damaging either the keyway or the shaft Once the impeller is dislodged take out the lathe dog the wood block and the key NOTE The rotating assembly may be removed through the coverplate opening if desired Figure 2 ...

Page 20: ...ng then tag and tie the rotating assembly shims to simplify reassembly NOTE If you prefer a tool for disassembly may be obtained from Weir Specialty Pumps Should you select this option follow all instructions included in the package You may construct a tool that is similar if you use a inch pipe made of schedule 80 steel or malleable iron with a standard tee connection Figure 4 All threads should ...

Page 21: ...from the shaft after the rotating assembly is removed from the pump casing Because the tension on the shaft seal spring will be released as it is removed use extra care and caution Inspect and replace the impeller if it is severely worn or shows cracking After removing the adjusting shims from the impeller either tag and tie them or measure and record their thickness to make the impeller reassembl...

Page 22: ...S Remove the drain plug from the bearing housing Drain the lubricant then clean inspect and reinsert the drain plug Disconnect the pump hardware before sliding the bearing cap and oil seal from the shaft Push the oil seal from the bearing cap after removing its gasket After placing a block of wood against the shaft at the end of the impeller tap the shaft and bearings from the bearing housing Pres...

Page 23: ...earings by hand and inspect the balls If the bearing balls are discolored or rotating them is rough replace the bearings Bearing tolerances provide tight fit of the bearings onto the pump shaft as well as a snug fit in the bearing housing The bearing housing the bearings or the shaft should be replaced if adequate bearing fit is not maintained If the bearings need to be replaced take off the outbo...

Page 24: ...nd 40 lb ft for lubricated threads I REASSEMBLING INSTALLATING THE SHAFT BEARING Soak a soft cloth in cleaning solvent and wipe down the bearing housing the shaft and all component parts with the exception of the bearings Check all parts for damage or wear and replace any that are defective BEFORE USING ANY CLEANING SOLVENTS CAREFULLY READ AND FOLLOW ALL PRECAUTIONS PRINTED ON THE SOLVENT CONTAINE...

Page 25: ...NSTALLATION OF THE BEARINGS INTO THE BEARING BORE NEVER STRIKE THE BALL CAGE OR BALLS NOTE To correctly install the outboard bearing on the shaft place it with the integral retaining ring on the bearing O D near the drive end of the shaft To ease installation the bearings may be heated with an induction heater an electric oven a hot plate or a hot oil bath Bearings should never be heated directly ...

Page 26: ...hen the lip seal sleeve is installed lubricate the lip seal portion of the shaft before sliding the shaft and assembled bearings into the bearing housing The retaining ring on the outboard bearing should be seated against the bearing housing Next remove the installation tool or properly tapered sleeve Once the lip is positioned as shown in Figure 7 push the inboard oil seal into the bearing housin...

Page 27: ... IN WELL VENTILATED AREAS AWAY FROM EXCESSIVE HEAT SPARKS AND FLAMES Soak a cloth in fresh cleaning solvent Thoroughly wipe down the seal cavity and the shaft Look carefully for nicks burrs and debris in the stationary seat bore located in the sealplate Remove any that exist and be sure the stationary seat bore is thoroughly clean before you install the seal Figure 8 Figure 8 ANY TIME THE OLD SEAL...

Page 28: ...L Facilitate seal installation by lubricating the shaft sleeve O ring and the external stationary seat O ring with a tiny amount of light lubricating oil Figure 9 shows seal part identification Figure 9 OPERATION AT TEMPERATURES ABOVE 160 O F 71 O C IS NOT RECOMMENDED FOR THIS SEAL THIS PUMP SHOULD NOT BE USED AT HIGHER OPERATING TEMPERATURES WITHOUT CONSULTING THE FACTORY ...

Page 29: ...at holder lubricate the external stationary seat holder O ring and the bore of the sealplate where the seal will be installed with light oil 4 a Lubricate the shaft sleeve with lightweight oil b Lubricate the inside of the bellows in the rotating head assembly with lightweight oil 5 a Put the shaft sleeve into the seal face side of the rotating head This is located on the opposite side of the I D ...

Page 30: ...the point where the stationary seat O ring engages the seal plate bore 6 Install the impeller shims and screw the impeller onto the shaft until it seats against the seal 7 Continue to screw the impeller onto the shaft until the stationary seat is fully seated in the seal plate The seal spring will compress and the shaft sleeve will break the shear pins This will allow the sleeve to slide down the ...

Page 31: ...ing assembly is left in the pump casing the clearance may be measured by cautiously reaching through the fill port with a feeler gauge WHEN REUSING AN OLD SEAL DO NOT ATTEMPT TO SEPARATE THE ROTATING PORTION OF THE SEAL FROM THE SHAFT SLEEVE DURING USE THE RUBBER BELLOWS WILL BOND TO THE SLEEVE AND ATTEMPTING TO SEPARATE THEM WILL DAMAGE THE BELLOWS BEFORE REINSTALLING THE IMPELLER COMPLETELY CLEA...

Page 32: ...worn or damaged replace it NOTE Only replace the check valve assembly as a total unit Parts are not sold individually Enter the case through the coverplate opening with the check valve Place the check valve adaptor in the mounting slot This is located in the suction flange Match the adaptor to the flange hole and attach the check valve with the check valve pin NOTE If you removed the suction or di...

Page 33: ... could interfere with or prevent a strong seal with the back cover Locate and loosen the 2 hand adjusting knobs in the coverplate until they are even with the backside machined surface of the coverplate Accurately position the coverplate over the 4 studs then slide it into the pump s casing Use two diagonally positioned hand nuts that are opposite each other for pushing the coverplate into the pum...

Page 34: ...rs and all available adjustment on the back cover side of the pump has been used you may make an additional 0 125 inch adjustment by removing the adjusting shims on the rotating assembly The installed pump must be totally cooled down prior to draining liquid from the pump casing Once cool remove the coverplate and the adjusting shims from the rotating assembly When this is complete reinstall the a...

Page 35: ... and pour clean liquid into the pump casing Reinstall and firmly secure the fill cover Refer to Section IX OPERATION Part C Operation before initiating pump service VI LUBRICATION A Seal Cavity Take out the vented plug before starting the pump Use SAE No 30 oil in the seal cavity and fill it to the middle of the sight gauge For maximum performance be sure to keep the oil level in the middle of the...

Page 36: ...ow safety information on all labels decals and tags affixed to the pump before any attempts to open or maintain your WSP Self Primer pump NO PERSON SHOULD ATTEMPT TO OPEN OR SERVICE THIS PUMP BEFORE BECOMING THOROUGHLY FAMILIAR WITH ALL THE PROCEDURES OUTLINED IN THIS MANUAL 1 PLEASE STUDY THESE INSTRUCTIONS CAREFULLY 2 WHEN PERFORMING EQUIPMENT MAINTENANCE THE EQUIPMENT ELECTRICAL SERVICE MUST BE...

Page 37: ...nto suction line Correct leak Internal lining of suction hose separation Replace suction hose Leaking or worn seal or pump gasket Check pump vacuum Replace leaking or worn seal or gasket Strainer plugged or blocked Check strainer and clean if necessary Suction intake vortexing Check installation and correct submergence as needed Impeller wearplate worn or damaged Replace worn or damaged parts Chec...

Page 38: ... air Locate and eliminate source of air bubble Pump or drive not mounted securely Secure mounting hardware Impeller plugged blocked or damaged Clean out debris and replace damaged parts BEARINGS RUN TOO HOT POSSIBLE CAUSE PROBABLE REMEDY Bearing temperature is rising above normal Check bearing temperature regularly to monitor any increase Low or incorrect lubricant Check for proper type and level ...

Page 39: ...our local WSP distributor or the factory if you need additional help A PUMP DIMENSIONS For the physical dimensions of your WSP Self Primer WSP Pump see Section X of this instruction manual B INSPECTION PRIOR TO INSTALLATION To ensure satisfaction and peak performance your WSP pump assembly received a thorough inspection and testing before being shipped from the factory Re inspect the pump for any ...

Page 40: ...ls inspection do not put it into service until you have resolved any problems C PUMP POSITIONING 1 Lifting Inspect the shipping tag on your pump unit s packing for accurate weight to be sure the lifting equipment you use will have adequate capacity Pump weights will differ depending on the type of drive and mounting used Before lifting existing units drain and remove all currently installed equipm...

Page 41: ...ction you must select the kind with reinforced rigid wall construction to avoid hose collapse under suction pressure When using suction lines do not use piping couplings as connectors 2 Configuring the Line Lines used for suction and discharge must be kept straight to reduce friction losses Using elbows and fittings substantially increases friction loss When elbows are a necessity use the kind wit...

Page 42: ...lat part uppermost This eliminates air pockets Valves are rarely used in suction lines however if a valve is needed it should be installed with the stem horizontal This eliminates air pockets that reduce performance 2 Strainers Be sure to use any strainer included with your pump since spherical solids passing through the strainer will also move through the pump When no strainer is included but you...

Page 43: ...fle is at a length that is 1 times the suction pipe s diameter This permits trapped air to be vented prior to any liquid being pulled into the suction inlet If possible avoid installing two suction lines to a single sump This causes the paths of the flow to intersect and impacts performance of the pumps Eliminate this possibility by spacing the suction inlets apart from each other Keep the length ...

Page 44: ...WSP DATA SHEET WSP SELF PRIMER PUMPS WSP D300_8 Rev 3 01 09 20 2019 The Factory 44 Figue 11 Figure 12 Figure 13 ...

Page 45: ...DISCHARGE HEAD APPLICATIONS THE DISCHARGE THROTTLING VALVE MUST BE GRADUALLY CLOSED BEFORE THE PUMP IS STOPPED 3 Bypass Lines When priming air from the suction line must be vented on the discharge side to the outside since self priming pumps are not air compressors Should the discharge line be open this air will vent through the discharge When a discharge line check valve is installed the pump dis...

Page 46: ...olume of liquid may be bypassed back to the wet well Such an occurrence will reduce the pumps performance To avoid this Weir Specialty Pumps advises installing a WSP ARV WSP Automatic Air Release Valve in the bypass line WSP ARVs offer low maintenance and high levels of dependability For more information see the WSP ARV in this section for information on its operation and installation Contact your...

Page 47: ... OVERHEATED PUMP LIQUIDS IN THE PUMP CAN REACH BOILING TEMPERATURES AND PRESSURE INSIDE THE PUMP CAN CAUSE PARTS TO BE EXPELLED VIOLENTLY G WSP AUTOMATIC AIR RELEASE VALVE WSP ARV The WSP ARV allows air release through the bypass line If the WSP ARV is installed and set correctly to the appropriate hydraulic operating specifications for your application the WSP ARV then closes automatically when t...

Page 48: ...he spring and shuts the valve Figure 16 The valve then stays closed slowing the liquid bypass down to 1 to 4 gallons 3 8 to 19 liters per minute ENSURE THAT THE BYPASS LINE IS DIRECTED BACK INTO THE WET WELL OR TANK TO PREVENT HAZARDOUS SPILLS AS SOME LEAKING 1 TO 5 GALLONS 3 8 TO 19 LITERS PER MINUTE WILL OCCUR WHEN THE VALVE IS IN THE FULL CLOSED POSITION The spring will automatically return the...

Page 49: ...er rod This will increase or decrease tension on the spring Contact your local WSP distributor or the factory for information regarding a WSP ARV automatic release valve for many applications 2 WSP Air Release Valve Installation Independently mount the WSP ARV horizontally and connect it to the self priming pump discharge line Figure 17 NOTE Contact the factory for specific installation instructio...

Page 50: ...butor or the factory for information about WSP ARV installation for individual applications Figure 18 H ALIGNMENT To maximize mechanical operation of your WSP Self Primer Pump be sure to correctly align your pump and its power source This is crucial to maintain high levels of performance It is essential that both drive and pump in the V belt driven and the flexible coupling systems are mounted to ...

Page 51: ... PROCEDURE AFTER ALTERING ALIGNMENT 1 Coupled Drives The axis of the power source and the axis of the pump shaft must be aligned in both the vertical and horizontal planes when using couplings Consult the coupling manufacturer s service documentation for specific clearance or gap requirements between the driven and driving shafts 2 Spider Insert Type Couplings Use calipers to measure dimensions on...

Page 52: ...between the coupling and the straightedge to measure the amount of skew in the alignment Realign the coupling according to the coupling manufacturer s specification 4 V Belt Drives Both the power source and the pump must be parallel when using V belt drives A straightedge placed along the pulleys sides will help determine the correct alignment of the pulleys Figure 20 Be sure the belts are matched...

Page 53: ...LE CORROSIVE OR COMBUSTIBLE FAILURE TO DO SO WOULD DAMAGE THE PUMP OR RESULT IN INJURY PUMP PERFORMANCE INCLUDING SPEED AND OPERATING CONDITIONS ARE REQUIRED TO BE WITHIN THE RANGE SHOWN ON THE MANUFACTURER S PUMP PERFORMANCE CURVE A PRIMING Both pump and piping must be installed as required in Section VIII INSTALLATION Be sure the pump is firmly mounted and all pipe connections are airtight Inspe...

Page 54: ...source 1 ROTATION When facing the impeller the pump s proper rotation direction is counterclockwise Incorrect pump rotation may harm the pump and seriously impact performance Be sure to inspect the power source direction of rotation prior to using other troubleshooting procedures if your pump s performance is not within the manufacturer s specified limits See Pump Performance Curve in Section X Wh...

Page 55: ... fill slowly Unexpected shock pressure to the pump could compromise the pipe ends the gaskets the sprinkler heads and any other fixtures attached to the line Adjust the throttling valve to the mandatory flow rate once the discharge line is filled to capacity DO NOT OPERATE PUMP WITH BOTH SUCTION AND DISCHARGE VALVES CLOSED OR WITH SUCTION OR DISCHARGE BLOCKED BY CLOGGING THIS COULD CAUSE DAMAGE AN...

Page 56: ...e check or any time the pump casing overheats and triggers the valve to release pressure The pressure relief valve may only be replaced with an original manufacturer s pressure relief valve provided by Weir Specialty Pumps Do not use a substitute 5 Strainer Check When a suction strainer is included with the pump or the user has installed a strainer inspect and clean the strainer on a regular basis...

Page 57: ... before completing the shutdown IN HIGH DISCHARGE HEAD APPLICATIONS THE DISCHARGE THROTTLING VALVE MUST BE GRADUALLY CLOSED BEFORE THE PUMP IS STOPPED Once the pump is stopped either disconnect or block the power source to be sure the pump will stay dormant during inspection maintenance or repair DO NOT OPERATE PUMP WITH BOTH SUCTION AND DISCHARGE VALVES CLOSED OR WITH SUCTION OR DISCHARGE BLOCKED...

Page 58: ...use the measurement is inaccurate Instead determine the temperature of the bearings by touching a contact type thermometer to the bearing housing then document the temperature for accurate record keeping Bearings are nearing the point of failure when there is a sudden rise in bearing temperature Check for adequate viscosity of the bearing lubricant and be sure it is at the appropriate level as not...

Page 59: ... Suction 8 Discharge 8 Impeller Diameter 14 75 Max Solid Sphere 3 00 BHP GPM x FT x SG 3960 x Efficiency KW 367 x Efficiency M 3 HR x M Copyright 2002 All rights reserved APRIL 2006 Certif ied tests are performed using Hy draulic Institute acceptance level B VARIABLE 1150 60 1250 1050 50 30 40 20 950 850 40 1350 750 650 30 25 15 60 Determine NPSHR prior to using repriming table Do not use availabl...

Page 60: ...WSP DATA SHEET WSP SELF PRIMER PUMPS WSP D300_8 Rev 3 01 09 20 2019 The Factory 60 B 8 WSP General Arrangement Drawing ...

Page 61: ...WSP DATA SHEET WSP SELF PRIMER PUMPS WSP D300_8 Rev 3 01 09 20 2019 The Factory 61 C 8 WSP Sectional Drawing and Parts List ...

Page 62: ...WSP DATA SHEET WSP SELF PRIMER PUMPS WSP D300_8 Rev 3 01 09 20 2019 The Factory 62 ...

Page 63: ...WSP DATA SHEET WSP SELF PRIMER PUMPS WSP D300_8 Rev 3 01 09 20 2019 The Factory 63 ...

Page 64: ...WSP DATA SHEET WSP SELF PRIMER PUMPS WSP D300_8 Rev 3 01 09 20 2019 The Factory 64 ...

Page 65: ...WSP DATA SHEET WSP SELF PRIMER PUMPS WSP D300_8 Rev 3 01 09 20 2019 The Factory 65 ...

Page 66: ...WSP DATA SHEET WSP SELF PRIMER PUMPS WSP D300_8 Rev 3 01 09 20 2019 The Factory 66 ...

Page 67: ...WSP DATA SHEET WSP SELF PRIMER PUMPS WSP D300_8 Rev 3 01 09 20 2019 The Factory 67 D WSP Air Release Valve Drawing and Parts List ...

Page 68: ... 316 SST 6 413 NUT HEX 20970 316 SST 8 414 BOLT HOUSING LONG 800548 316 SST 2 415 NUT SELF LOCKING NYLON 12221 NYLON 1 416 O RING INSPECTION COVER 803167 NITRILE 1 417 O RING INSPECTION COVER 803168 NITRILE 1 418 OIL SEAL 803166 STD 1 419 BOLTS END CAP 13553 316 SST 6 420 BOLTS HOUSING SHORT 20944 316 SST 6 421 SPRING RETAINER 0730072 151 316 SST 1 ASSEMBLY P N S 0730059 4 AND 0730059 5 ARE IDENTI...

Reviews: