background image

EASy IP EAS Network Receiver - Operation Manual

38

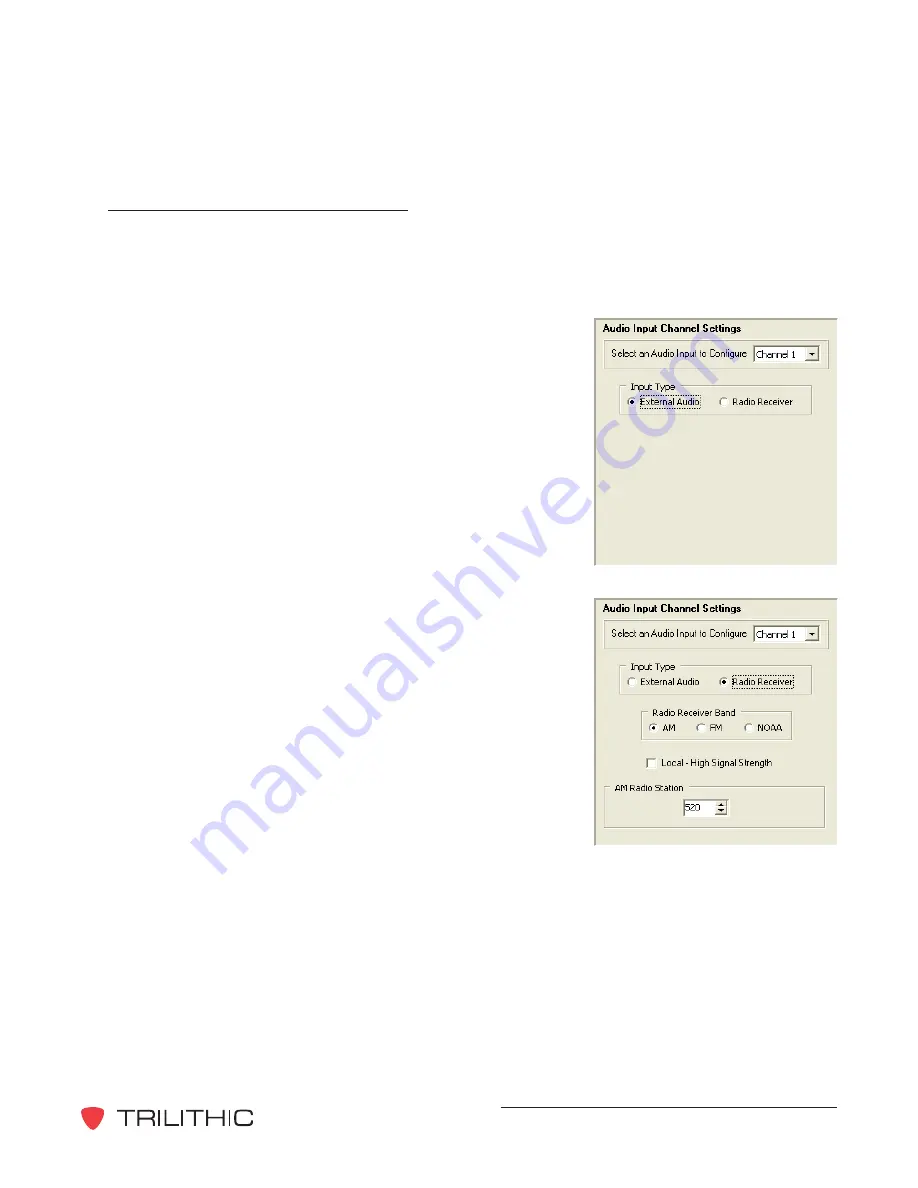
Audio Input Channel Settings

Perform the following steps to setup the audio input channel settings for your Network
Receiver:

1. Select the down arrow next to the 

Select an Audio Input to Configure

 drop-down

box, and then highlight the desired channel (

Channel

1

 or 

Channel 2

).

2. Select the 

External Audio

 radio button if the

selected channel is either not used, or is connected
to an audio source, otherwise select the 

Radio

Receiver

 radio button.

3. If the selected channel is an antenna input and you

have selected the Radio Receiver radio button
perform the following steps:

Select the 

AM

FM

, or 

NOAA

 radio button,

where NOAA is the National Weather Radio
band.

If the station is a nearby, high-power radio
station, select the 

Local - High Signal

Strength

 checkbox.

Select the correct radio frequency for your
selected radio band at the bottom of the

Audio Input Channel Settings

 area.

4. Select the 

Program Audio Settings

 button to set the configuration for the selected

channel and repeat for each audio input channel that needs configured.

Summary of Contents for EASyIP

Page 1: ...EASyIP EAS Network Receiver Patent Pending OPERATION MANUAL...

Page 2: ...leader providing telecommunications solutions for major broadband RF and microwave markets around the world As an ISO 9000 2001 certified company with over 40 years of collective expertise in enginee...

Page 3: ...Receiver 14 4 Initial Configuration 15 5 Required Encoder Decoder Setup 18 6 Network Receiver Management Program 19 Overview 19 How to Install the Software 19 How to Un Install the Software 23 System...

Page 4: ...Existing Encoder Decoder in the Contact List 42 Deleting an Existing Encoder Decoder from the Contact List 43 Logs Tab 44 Utilities Tab 46 7 Web Browser Configuration 47 Overview 47 Time Configuration...

Page 5: ...available Monday through Friday from 8 00AM to 5 00PM EST Callers in NorthAmerica can dial 1 317 895 3600 or 1 800 344 2412 toll free International callers should dial 1 317 895 3600 or fax questions...

Page 6: ...itial Configuration describes the steps needed to perform the initial configuration of the EAS Network Receiver Chapter 5 Required Encoder Decoder Setup describes the steps required to perform the set...

Page 7: ...r entered text and commands appear in bold Section names Web and email addresses appear in italics Note A note is information that will be of assistance to you related to the current step or procedure...

Page 8: ...m Configuration button from the EAS Network Receiver Management Program This will send the currently displayed configuration parameters to the instrument and should be the last configuration operation...

Page 9: ...ork Receiver s via the network Note The EAS Network Receiver chassis is capable of housing two Network Receivers This allows four radio or baseband audio inputs in a single chassis Each Network Receiv...

Page 10: ...ns to expand the maximum amount of monitoring assignments that a single EAS Encoder Decoder can handle Allow multiple EAS Encoder Decoders to use the same EAS Network Receiver Allow multiple EAS Netwo...

Page 11: ...r and the radio signal strength is acceptable this LED will illuminate When Channel 1 is configured as an audio input this LED turns off when no audio is being received The LED flashes when EAS messag...

Page 12: ...dio tuner D AUDIO CH2 Three pin positive ground negative balanced audio input for the channel 2 radio tuner E LAN RJ 45 connector for a 10 100 base T Ethernet connection F RS 232 9600 Baud serial inte...

Page 13: ...peration The network must be able to allow communication between the Network Receivers encoder decoders and the configuration computer as follows 10 100 Base T Ethernet interface one for every two rad...

Page 14: ...enna or audio input to each of the channels to be used If you are using baseband audio inputs balanced audio is preferred Only one source radio or baseband audio can be used on a single channel 3 Conn...

Page 15: ...lete the initial configuration of the EAS Network Receiver 1 Connect the RS 232 cable supplied between the Network Receiver s RS 232 port and a PC with an RS 232 port and HyperTerminal software 2 Star...

Page 16: ...rk Receiver Once the following text appears press any key on the PC keyboard before the countdown reaches zero 5 The text Press AtoAccept the settings or M to Modify will appear press the M button and...

Page 17: ...ess for your network i e 192 168 0 1 and press the Enter button The text HTTP Server enabled Disable it Y N or HTTP Server disabled Enable it Y N press the Y or N button and then press the Return butt...

Page 18: ...e have been upgraded See your specific hardware or software Operation Manual for more information on how upgrade your firmware and software Perform the following steps to configure your encoder decode...

Page 19: ...e performed by using the EAS Network Receiver Management Program as shown in this chapter or through an Internet Web browser For more information on how to configure your EAS Network Receiver through...

Page 20: ...proceed to the next step of the installation wizard or select the Cancel button to exit without installing 4 The Welcome to the InstallShield Wizard for Trilithic EAS Network Receiver screen appears...

Page 21: ...am screen appears select the Install button to proceed with the installation 6 The Destination Folder screen appears select the Next button to accept the default installation directory or select the C...

Page 22: ...the Finish button to confirm the software installation The software installation is now complete and can be started by selecting the Desktop icon or by selecting the program from the Start menu 8 The...

Page 23: ...r Remove Programs icon The Add or Remove Programs window will appear 4 From the Add or Remove Programs window scroll through the listed of currently installed programs and select Trilithic EAS Network...

Page 24: ...o button to quit the un install of the software 7 The software will begin to un install A window will appear showing the progress of the un install Once the un install is complete the progress window...

Page 25: ...he System tab is possible to Maintain a database of several configurations that are usually used for several Network Receivers Control the IP address and port that the software uses to connect to the...

Page 26: ...e can be ignored This feature is also useful for four channel systems that include two Network Receivers Adding a New Network Receiver System Perform the following steps to add a new Network Receiver...

Page 27: ...ghlight the desired system name and then select the ACCEPT button Note Always verify the correct system has been selected before making changes to the configuration parameters Deleting an Existing Net...

Page 28: ...Modify System button enter the new Network Receiver system name and then select the ACCEPT button Configuring Your Network Receiver Communication Settings To configure the EAS Network Receiver Manage...

Page 29: ...iver you must configure your Network Receiver communication settings for the desired Network Receiver To send a configuration to the desired Network Receiver on the System tab select the Program Confi...

Page 30: ...onfigurations can be updated from the Network Receivers themselves Note Before retrieving the selected configuration parameters from the Network Receiver you must configure your Network Receiver commu...

Page 31: ...reporting any errors The Network Receiver may take as long as sixty seconds to complete a reset cycle If the value of the IP Address and or Configuration Port field was changed on the Configuration ta...

Page 32: ...erform the following steps to upgrade the firmware of your Network Receiver system 1 On the System tab of the software select the Upgrade Firmware button The EAS Network Receiver Upgrade Utility scree...

Page 33: ...ill show the status of the upgrade Once the upgrade is complete select the OKAY button 6 It is recommended that you power cycle the EAS Network Receiver making sure to leave the power off for 5 second...

Page 34: ...etwork configuration CAUTION Changes to any parameters located on the Configuration Tab do not take affect until you select the RESET Hardware Button from the EAS Network Receiver Management Program o...

Page 35: ...P to automatically adjust the Network Receiver s clock select the Enable SNTP checkbox to enable this feature and then Enter the IP address of the SNTP server in the Primary SNTP Server field Enter th...

Page 36: ...r the Network Receiver Subnet Mask Enter the value of the subnet mask address for the Network Receiver s subnet Default Gateway Enter the value of the gateway address for the subnet or leave blank Hos...

Page 37: ...is used to choose radio stations or configure a baseband audio input to be used for EAS monitoring EAS sources are specified in State and Local EAS plans not chosen by the user In addition to configur...

Page 38: ...ce otherwise select the Radio Receiver radio button 3 If the selected channel is an antenna input and you have selected the Radio Receiver radio button perform the following steps Select the AM FM or...

Page 39: ...volume by adjusting the slider up or down 3 Verify the audio settings by selecting the Change Speaker Source Volume button The front panel speaker should contain clear audio from the selected channel...

Page 40: ...a single EAS Network Receiver This tab is provided to configure the encoder decoders that must be contacted with EAS alert messages CAUTION Configuration changes to the EAS Network Receiver do not tak...

Page 41: ...n the IPAddress field 2 Use the up or down arrow button to choose a UDP port number of the selected encoder decoder uses to receive Network Receiver alerts in the UDP Port field For more information o...

Page 42: ...ps 1 On the Encoder Decoders tab of the software select the desired encoder decoder from the contact list The selected encoder decoder s IP address and UDP port number will automatically appear in the...

Page 43: ...ecoder from the Contact List To delete an existing encoder decoder from the contact list on the Encoder Decoders tab of the software select the desired encoder decoder from the contact list and then s...

Page 44: ...s will maintain a log of messages received from Network Receivers CAUTION Logging stops when the log memory is full therefore it is recommended that the logs be erased every three to six months Word W...

Page 45: ...s for the desired Network Receiver Download Onboard Log Connect to the selected Network Receiver and retrieve its log Once downloaded the log information will be displayed in the log display window Er...

Page 46: ...st message To send a EAS test message enter the desired FIPS Code in the FIPS Code for Test field and then press the Send Test Message button CAUTION Pressing the Send Test Message button may cause in...

Page 47: ...of the Internet Web browser EAS Network Receiver Configuration Enter the address http XXX XXX XXX XXX index into the URL address bar of your Internet Web browser XXX XXX XXX XXX denotes the configured...

Page 48: ...the changes to your time settings press the Program Time Configuration button to program your EAS Network Receiver with the new settings To program the internal clock of the Network Receiver select th...

Page 49: ...configure the same settings that are described in Chapter 6 Network Receiver Management Program Configuration Tab Network Settings Once you have completed your changes to the network configuration se...

Page 50: ...Channel 2 select External Audio AM Radio FM Radio or NOAA Radio button Note The button that corresponds to the current audio input setting will not be displayed Note To edit the current audio input se...

Page 51: ...tion page If the selected channel is External Audio and you have selected the AM Radio FM Radio or NOAA Radio button or you have selected the Edit input type Settings button the corresponding settings...

Page 52: ...o the contact list enter the IPAddress and UDP Port of the selected encoder decoder in the corresponding field To delete an existing encoder decoder from the contact list delete the IPAddress and UDP...

Page 53: ...g that may be used in troubleshooting the EAS system These logs are not typically used in FCC required files as the encoder decoders will maintain a log of messages received from Network Receivers Sel...

Page 54: ...t messages Select the Reset button to restart the Network Receiver To send a EAS test message enter the desired FIPS Code in the County Code field and then press the Test button CAUTION Pressing the S...

Page 55: ...3 1 2 SEM ASI Mon it o r Po r t 1 2 3 4 5 6 7 8 A SI S tatus Gi gE E n et 1 2 3 1 2 SEM ASI Mon it o r Po r t 1 2 3 4 5 6 7 8 A SI S tatus Gi gE E n et 1 2 3 1 2 SEM ASI Mon it o r Po r t 1 2 3 4 5 6...

Page 56: ...eceivers per board Communications 1 RS 232C serial port available on a DB9 connector 1 10 100 Base T Ethernet port available on a RJ 45 jack Supported network protocols ARP RARP PING UDP TCP IP FTP HT...

Page 57: ...ctable as external baseband audio or radio receiver Baseband audio inputs balanced 600 Ohm modular screw terminal plugs Internal radio receivers 2 4 internal radio receivers selectable as AM FM or NOA...

Page 58: ...the Buyer under this Warranty and in no event shall Trilithic Inc be liable for incidental or consequential damages for any alleged breach of this Warranty This Warranty shall not apply to any part o...

Page 59: ...Trilithic Inc 9710 Park Davis Drive Indianapolis IN 46235 317 895 3600 800 344 2412 P N 0010210021 12 07 Made in U S A...

Reviews: