Trikdis Ethernet E16 Installation Manual Download Page 21


www.trikdis.com 


  21     


February, 2020 


“Ethernet” communicator 

E16


6.3


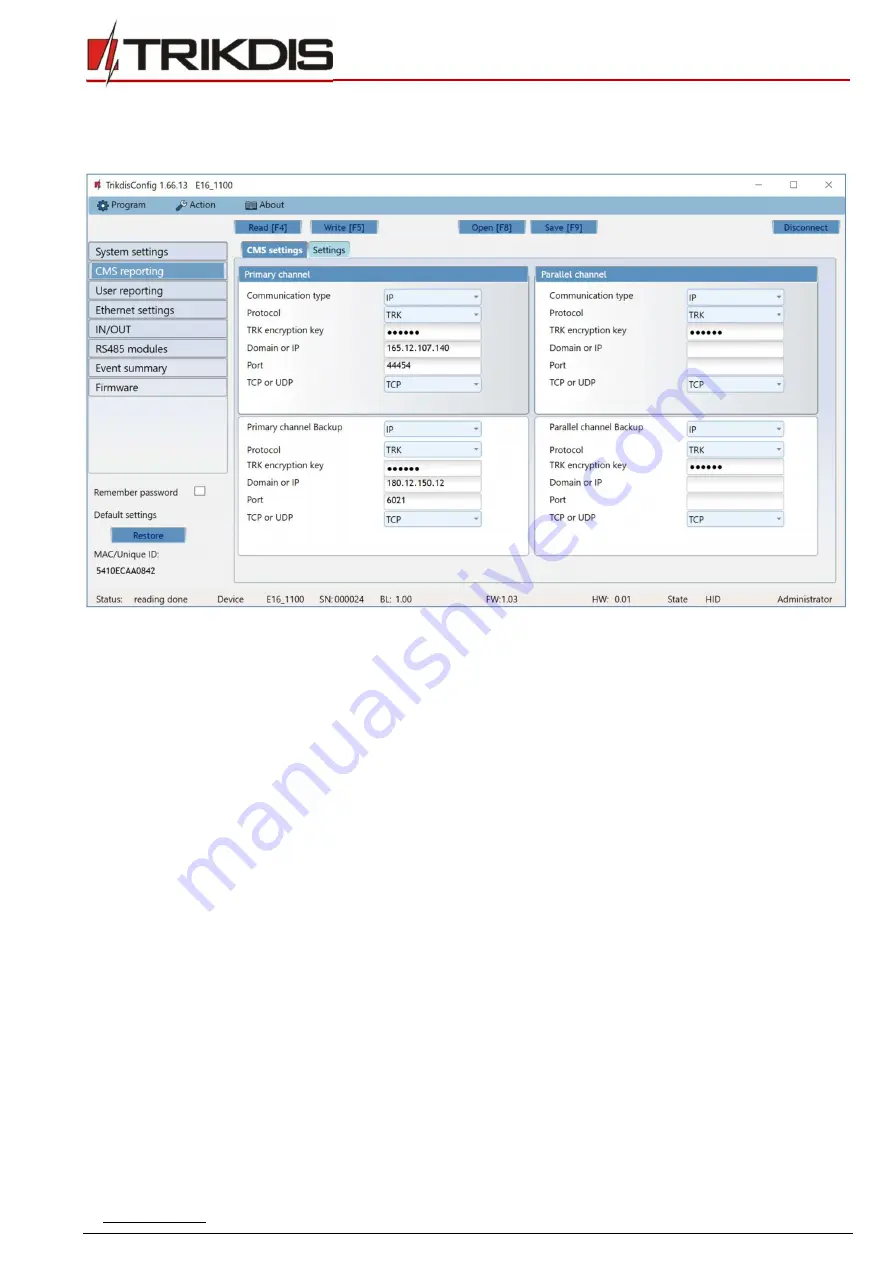
“CMS reporting” window 

“CMS settings” tab  


The communicator sends events to the monitoring station via a wired internet (IP) connection.  
Events can be sent over several channels of communication. The primary and parallel communication channels can operate 
simultaneously, this way the communicator can send events to two receivers at the same time. Backup channels can be assigned 
for both primary and parallel channels, which will be used when the connection via the primary or parallel channel is interrupted. 
Communication is encoded and password protected. A TRIKDIS receiver is required for receiving and sending event information 

to the monitoring programs:  


For  connection  over  IP  -  software  receiver  IPcom  Windows/Linux,  hardware  IP/SMS  receiver  RL14  or  multichannel 

receiver RM14.  

“Primary channel” settings group 


Communication type

 - select which method for connecting to the monitoring station receiver will be used (IP).  


Protocol 

- select in which coding the events should be sent:

 TRK 

(to TRIKDIS receivers);

 DC-09_2007 

or

 DC-09_2012

 (to 

universal receivers); 

TL150 

(to SUR-GARD receivers).  


TRK encryption key

 - 6-digit message encryption key. The key written to the communicator must match the receiver’s 

key.  


Domain or IP 

- enter the domain or IP address of the receiver.  


Port 

- enter the network port number of the receiver.  


TCP or UDP 

- select in which protocol (TCP or UDP) the events should be sent.  

“Primary channel Backup” settings group  

Enable the backup channel mode to send events via backup channel if connection via primary channel is lost. Backup channel 
settings are same as described above.  

“Parallel channel” settings group 

Events are transmitted in parallel with the first channel through this channel. When the second channel is enabled, events can 
be sent simultaneously to two receivers (e.g., local and centralized monitoring stations). Parallel channel settings are the same 
as described above. 

Summary of Contents for Ethernet E16

Page 1: ...www trikdis lt UAB Trikdis Draugyst s str 17 LT 51229 Kaunas Lithuania 370 37 408 040 info trikdis lt Ethernet communicator E16 Installation manual February 2020...

Page 2: ...input connection 12 3 4 Connect LAN cable 13 3 5 Schematics for wiring a relay 13 3 6 Schematics for connecting iO series expansion modules 13 3 7 Turn on the communicator 13 4 PROGRAMMING THE CONTRO...

Page 3: ...lly in order to avoid mistakes that can lead to malfunction or even damage to the equipment Disconnect the power supply before making any electrical connections Changes modifications or repairs not au...

Page 4: ...erting Contact ID codes to SIA codes Connection supervision by polling to IP receiver every 30 seconds or by user defined period Backup channel that will be used if connection with the primary channel...

Page 5: ...ansmission protocols TRK DC 09_2007 DC 09_2012 TL150 Memory Up to 60 messages Changing settings With TrikdisConfig computer program remotely or locally via USB Mini B port Operating environment Temper...

Page 6: ...rd input output terminal COM Common negative terminal A RS485 RS485 bus A contact B RS485 RS485 bus B contact 1 5 LED indication of operation Indicator Light status Description NETWORK Off No connecti...

Page 7: ...corrupted 1 6 Structural schematic with E16 usage Note Before you begin make sure that you have the necessary 1 USB cable Mini B type for configuration 2 At least 4 wire cable for connecting communic...

Page 8: ...or connection with Protegus app In System settings window 1 Select Security panel model that will be connected to the communicator 2 Select Remote Arm Disarm if you want users to be able to control th...

Page 9: ...ring Station In System settings window 1 Enter Object ID account number provided by the Central Monitoring Station 4 characters 0 9 A F Do not use FFFE FFFF Object ID 2 Select Security panel model tha...

Page 10: ...d Configure Primary channel Backup settings 10 Recommended Configure Parallel Channel and its Parallel Channel Backup settings After finishing configuration click Write F5 and disconnect the USB cable...

Page 11: ...16 communicator has 3 universal input output terminals that can be set to the OUT PGM operating mode The outputs OUT can control three areas of the security system If you want to control the system in...

Page 12: ...efault input setting NO The input type can be changed in the TrikdisConfig window IN OUT Type Connect the input according to the selected input type NO NC NC EOL NO EOL NO DEOL NC DEOL as shown in the...

Page 13: ...s need to be connected to the communicator or if you want to connect a temperature sensor connect the TRIKDIS iO series wired or wireless output expander Configuration of expander modules connected to...

Page 14: ...DIGIPLEX EVO series go to cell 3012 and enter 4 digit PC download password TEXECOM Texecom control panels need to be programmed for both reading events and remote control You need to set the Texecom p...

Page 15: ...2 3rd Party Device Type set Trikdis 3 Serial port set Serial Port 1 Plugged In In Use By 3rd Party Device 4 Save settings and exit the application Honeywell Ademco Vista Follow these steps for Honeyw...

Page 16: ...ng windows 2 Power supply is connected POWER LED illuminates green 3 Registered to the network NETWORK LED illuminates green 3 Click Add new system and enter the E16 s MAC number This number can be fo...

Page 17: ...at is the number for each of the specified areas in the security system and press Save 3 In the side menu press Settings and in the newly opened window press Settings Select the box Arm Disarm with PG...

Page 18: ...nal security you can select Use Application password for ARM DISARM Then after pressing the button to arm disarm the alarm system a window for entering the app password will open 5 3 Arming disarming...

Page 19: ...ique ID Device IMEI number Status Operating condition Device Device type E16 should be shown SN Device serial number BL Browser version FW Device firmware version HW Device hardware version Status Con...

Page 20: ...nel PC download password for the direct control of Paradox and Texecom control panels you need to enter the PC UDL password It must match the password that was entered in the control panel How to chan...

Page 21: ...Communication type select which method for connecting to the monitoring station receiver will be used IP Protocol select in which coding the events should be sent TRK to TRIKDIS receivers DC 09_2007...

Page 22: ...es PING heartbeats keep the active communication session between the device and the receiver An active session is required for remote connection control and configuration of the device We recommend se...

Page 23: ...cting to the Protegus app default 123456 6 5 Ethernet settings window Ethernet settings settings group Use DHCP check the box to have the communicator automatically register to the network If the auto...

Page 24: ...triggered Event or Restore CID enter the event code or leave the default value Upon entering the event the event code will be sent to Protegus and CMS Part enter the partition area number that will b...

Page 25: ...nd restore codes After input is triggered the communicator will send an event with set event code to monitoring station receiver Protegus app Contact ID event code Enable allow message transmission wh...

Page 26: ...AND OR XOR conditions upon which the relay output will be controlled In the table inputs can be assigned Contact ID event and restore codes After an input is triggered the communicator will send an e...

Page 27: ...ion enter the communicator s MAC number This number can be found on the device and the packaging sticker 3 Optional in the System name field enter the desired name for the E16 with this Unique ID 4 Pr...

Page 28: ...d manually After an update all previously set settings will remain unchanged When writing firmware manually it can be changed to a newer or older version To update 1 Run TrikdisConfig 2 Connect the co...

Page 29: ...25 HA Alarm active in zone z E130 BA Alarm active in zone z E131 BA Alarm active in zone z E132 BA Alarm active in zone z E133 BA Alarm active in zone z E134 BA Alarm active in zone z E135 BA Tamper a...

Page 30: ...42 E342 ET System failure 343 E343 ET System failure 344 E344 XQ System communication failure 350 E350 YC System communication failure 351 E351 LT System communication failure 352 E352 LT System failu...

Page 31: ...r v E456 CG Exit violation by user v E457 EE System disarmed after alarm by user v E458 OR Recent arm v user E459 CR Wrong code entered E461 JA Auto arm time extended by user v E464 CE Device disabled...

Page 32: ...HH No more alarm in zone z R130 BH No more alarm in zone z R131 BH No more alarm in zone z R132 BH No more alarm in zone z R133 BH No more alarm in zone z R134 BH No more alarm in zone z R135 BH No m...

Page 33: ...350 R350 YK No more system communication failure 351 R351 LR No more system communication failure 352 R352 LR No more system failure 353 R353 YK No more system communication failure 354 R354 YK No mo...

Page 34: ...enabled in zone z 552 R552 YK Zone z bypass cancelled R570 UU Zone z bypass cancelled R571 FU Zone z bypass cancelled R572 MU Zone z bypass cancelled R573 BU Group bypass by user v cancelled R574 CF...

Reviews: